Front Bumper Fascia Replacement (TrailBlazer)
Front Bumper Fascia Replacement (TrailBlazer)
Removal Procedure
1.Remove the grille. Refer to Grille Replacement .
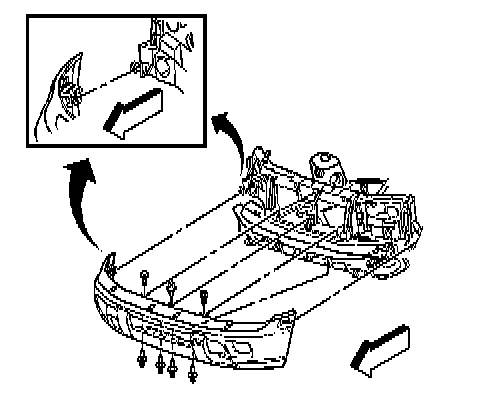
2.Remove the 2 bolts that retain the top of the fascia to the headlamp housing panel.
3.Remove the push-pin that retains the top of the fascia to the headlamp housing panel.
4.Raise and support the vehicle. Refer to Lifting and Jacking the Vehicle .
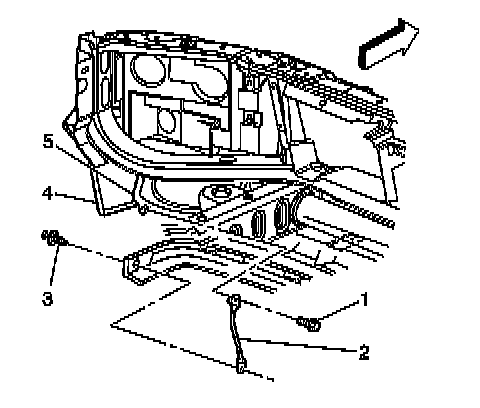
5.Remove the push-pins (3) that retain the fascia to the fascia support rods (2).
6.Remove the fog lamps from the fascia. Refer to Front Fog Lamp Replacement .
7.Remove the air deflector. Refer to Front Bumper Fascia Air Deflector Replacement Front Bumper Fascia Air Deflector Replacement .
8.Remove the 4 push-pins that retain the bottom of the fascia to the headlamp housing panel.
9.Release the body side attachment tabs and pull the fascia straight forward from the wheelhouse opening in order to remove the fascia from the vehicle.
Installation Procedure
1.Position the fascia to the vehicle, ensuring that the body side attachment tabs are fully seated.
2.Install the 4 push-pins that retain the bottom of the fascia to the headlamp housing panel.
3.Install the push-pins (3) that retain the fascia to the fascia support rods (2).
4.Install the air defector. Refer to Front Bumper Fascia Air Deflector Replacement Front Bumper Fascia Air Deflector Replacement .
5.Install the fog lamps. Refer to Front Fog Lamp Replacement .
6.Lower the vehicle.
Caution:Refer to Fastener Caution .
7.Install the 2 bolts that retain the top of the fascia to the headlamp housing panel.
TightenTighten the bolts to 10 N �m (89 lb in).
8.Install the push-pin that retains the center of the top of the fascia to the headlamp housing panel.
9.Install the grille. Refer to Grille Replacement .