Test Z: TRAC Off Indicator Inoperative
- If anti-lock brake diagnostic system check has not been performed, perform ANTI-LOCK BRAKE DIAGNOSTIC SYSTEM CHECK
under SELF-DIAGNOSTIC SYSTEM. If anti-lock brake diagnostic system check has been performed, go to next step.
- Turn ignition switch to OFF position. Connect scan tool to Data Link Connector (DLC). DLC is located below left side of instrument panel, to right of steering column. See Figure
. Turn ignition switch to RUN position, with engine off. Using scan tool, observe Traction Control System (TCS) WARNING LIGHT parameter in TCS data list. If scan tool displays OFF, go to next step. If scan tool does not display OFF, go to step 12
.
- Turn ignition switch to OFF position. Observe TRAC OFF indicator on Instrument Panel Cluster (IPC) during bulb check. Turn ignition switch to RUN position, with engine off. If TRAC OFF indicator illuminates during bulb check and then turns off, go to next step. If TRAC OFF indicator does not illuminate during bulb check and then turn off, go to step 13
.
- Turn ignition switch to RUN position, with engine off. Using scan tool, observe TCS ENABLE STATUS parameter in TCS data list. Activate TCS switch. If TCS ENABLE STATUS does not change state, go to next step. If TCS ENABLE STATUS changes state, check for an intermittent or poor connections in related circuits. See DIAGNOSING INTERMITTENTS
.
- Using scan tool, observe TCS ENABLE STATUS parameter in TCS data list. If scan tool displays ENABLED, go to next step. If scan tool does not display ENABLED, go to step 7
.
- Turn ignition switch to OFF position. Disconnect TCS switch harness connector. Turn ignition switch to RUN position, with engine off. Using scan tool, observe TCS ENABLE STATUS parameter. If scan tool does not display ENABLED, go to step 8
. If scan tool displays ENABLED, go to step 11
.
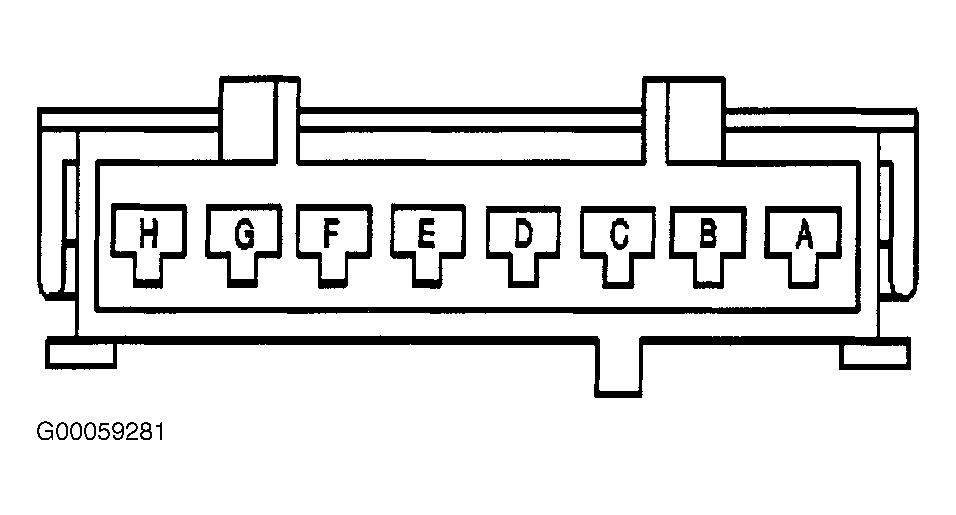
- Turn ignition switch to OFF position. Disconnect TCS switch harness connector. Connect a 3-amp fused jumper wire between TCS switch harness connector terminals "B" (Black/White wire) and "C" (Brown/White wire). See Fig 1
. Turn ignition switch to RUN position, with engine off. Using scan tool, observe TCS ENABLE STATUS parameter. If scan tool does not display ENABLED, go to step 9
. If scan tool displays ENABLED, go to step 11
.
 Courtesy of GENERAL MOTORS CORP.
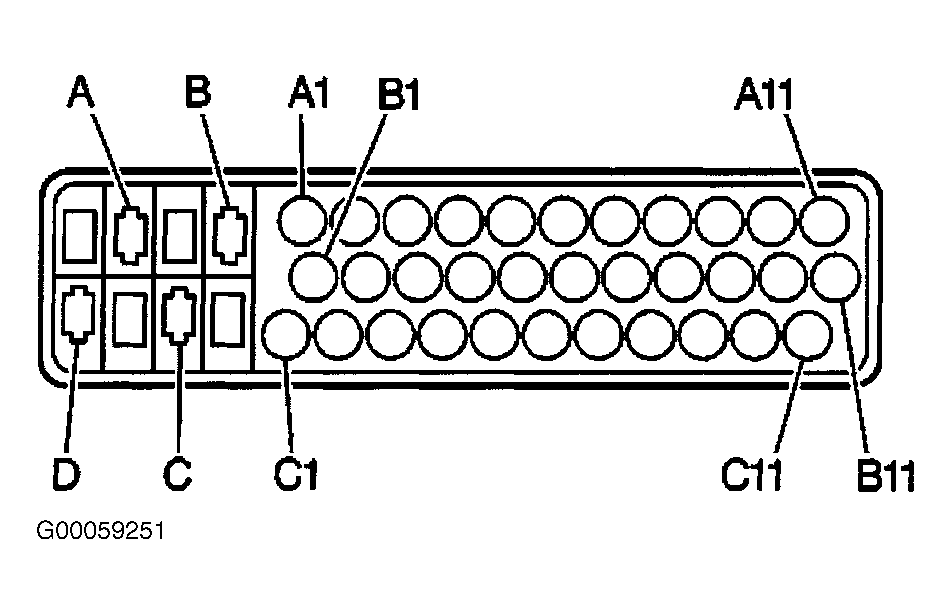
- Test Brown/White wire between TCS switch harness connector terminal "C" and Electronic Brake Control Module (EBCM) harness connector terminal A1 for short to ground. See Fig 1
and Fig 2
. EBCM is located on brake master cylinder. If no problem is found, go to step 12
. If problem is found, repair as necessary. After repair, go to step 17
.
 Courtesy of GENERAL MOTORS CORP.
- Test Brown/White wire between TCS switch harness connector terminal "C" and Electronic Brake Control Module (EBCM) harness connector terminal A1 for high resistance or an open. See Fig 1
and Fig 2
. EBCM is located on brake master cylinder. If no problem is found, go to next step. If problem is found, repair as necessary. After repair, go to step 17
.
- Test Black wire between ground and TCS switch harness connector terminal "B" for high resistance or an open. See appropriate GROUND DISTRIBUTION article in WIRING DIAGRAMS. If no problem is found, go to step 12
. If problem is found, repair as necessary. After repair, go to step 17
.
- Check for poor connections at TCS switch harness connector. If no problem is found, go to step 14
. If problem is found, repair as necessary. After repair, go to step 17
.
- Check for poor connections at EBCM harness connector. If no problem is found, go to step 15
. If problem is found, repair as necessary. After repair, go to step 17
.
- Check for poor connections at IPC harness connectors. If no problem is found, go to step 16
. If problem is found, repair as necessary. After repair, go to step 17
.
- Replace TCS switch. After repair, go to step 17
.
- Replace EBCM. See ELECTRONIC BRAKE CONTROL MODULE
under REMOVAL & INSTALLATION. After repair, go to step 17
.
- Replace IPC. See INSTRUMENT PANEL CLUSTER
under REMOVAL & INSTALLATION. After repair, go to next step.
- Operate system to verify repair. If system does not operate properly, go to step 2
. If system operates properly, system is okay.