Instrument Panel (IP) - Tie Bar / Cross Vehicle Beam
Instrument Panel Tie Bar Replacement
Removal Procedure
1. Disconnect the negative battery cable. Refer to Battery Negative Cable Disconnection and Connection.
2. Remove the instrument panel. Refer to Instrument Panel Assembly Replacement (Instrument Panel (IP) - Assembly Replacement) .
3. Remove the instrument panel upper trim. Refer to Instrument Panel Trim Pad Replacement (Instrument Panel (IP) - Trim Pad Replacement) .
4. Remove the body control module. Refer to Body Control Module Replacement.
5. Remove the DRL module. Refer to Daytime Running Lights (DRL) Control Module Replacement.
6. Remove the EBTCM module. Refer to Electronic Brake Control Module Replacement.
7. Remove the steering column. Refer to Steering Column Replacement.
8. Remove the A/C module. Refer to HVAC Module Assembly Replacement.
9. Remove the extension ducts. Refer to Extended Console Air Outlet Duct Replacement.
10. Remove the center air outlet. Refer to Center Air Outlet Replacement.
11. Remove the defroster duct. Refer to Defroster Air Outlet Duct Replacement.
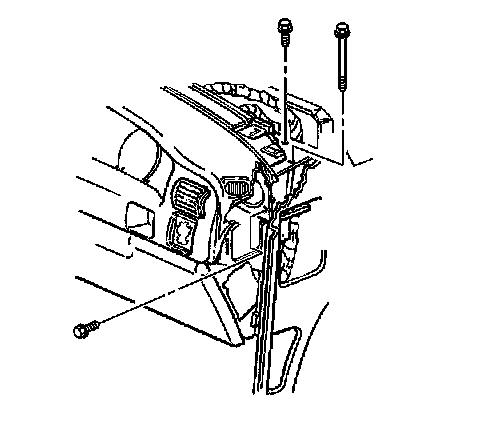
12. Remove the bolts/screws from the cross car beam to the body.
13. Remove the cross car beam from the body.
Installation Procedure
1. Position the cross car beam to the body.
Notice: Refer to Fastener Notice in Cautions and Notices.
2. Install the bolts/screws to the cross car beam to body.
Tighten the bolts/screws to 25 N.m (18 lb ft).
3. Install the defroster duct. Refer to Defroster Air Outlet Duct Replacement.
4. Install the center air outlet. Refer to Center Air Outlet Replacement.
5. Install the extension ducts. Refer to Extended Console Air Outlet Duct Replacement.
6. Install the A/C module. Refer to HVAC Module Assembly Replacement.
7. Install the steering column. Refer to Steering Column Replacement.
8. Install the EBTCM module. Refer to Electronic Brake Control Module Replacement.
9. Install the DRL module. Refer to Daytime Running Lights (DRL) Control Module Replacement.
10. Install the body control module. Refer to Body Control Module Replacement.
11. Install the wiring harness. Refer to Instrument Panel Wiring Harness Replacement (Instrument Panel (IP) - Wiring Harness Replacement) .
12. Install the instrument panel upper trim. Refer to Instrument Panel Trim Pad Replacement (Instrument Panel (IP) - Trim Pad Replacement) .
13. Install the instrument panel. Refer to Instrument Panel Assembly Replacement (Instrument Panel (IP) - Assembly Replacement) .
14. Connect the negative battery cable. Refer to Battery Negative Cable Disconnection and Connection.