Instrument Panel (IP) - Trim Pad Replacement
Instrument Panel Trim Pad Replacement (Impala)
Removal Procedure
1. Disable the SIR system. Refer to Disabling the SIR System in SIR.
2. Disconnect the battery ground (negative) cable. Refer to Battery Negative Cable Disconnection and Connection in Engine Electrical.
3. Remove the LH and RH instrument panel insulator. Refer to Instrument Panel Insulator Replacement (Left) (Instrument Panel (IP) - Insulator Replacement - Left)Instrument Panel Insulator Replacement (Right) (Instrument Panel (IP) - Insulator Replacement - Right).
4. Remove the knee bolster brackets to the instrument panel. Refer to Knee Bolster Bracket Replacement (Driver) (Knee Bolster Bracket Replacement - Driver)Knee Bolster Bracket Replacement (Passenger) (Knee Bolster Bracket Replacement - Passenger).
5. Remove the inflatable restraint steering wheel module. Refer to Steering Wheel Inflatable Restraint Module Replacement (Impala) Steering Wheel Inflatable Restraint Module Replacement (Monte Carlo) in SIR.
6. Remove the steering wheel. Refer to Steering Wheel Replacement in Steering Wheel and Column - Tilt.
7. Remove the steering wheel tilt lever. Refer to Tilt Lever Replacement - On Vehicle in Steering Wheel and Column - Tilt.
8. Remove the steering column trim covers. Refer to Steering Column Trim Cover Replacement - On Vehicle in Steering Wheel and Column - Tilt.
9. Remove the multifunction switch. Refer to Multifunction Turn Signal Lever Replacement - On Vehicle in Steering Wheel and Column - Tilt.
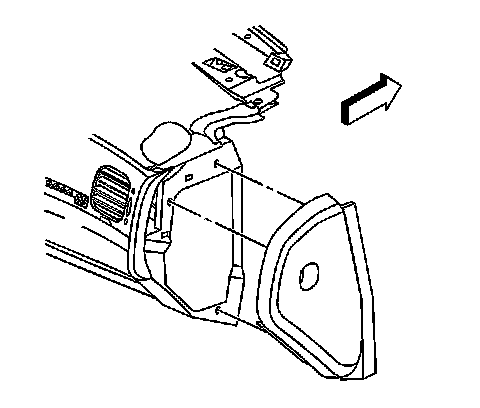
10. Remove the RH instrument panel access opening cover.
11. Remove the instrument panel compartment. Refer to Instrument Panel Compartment Replacement (Service and Repair).
12. Remove the floor console, if equipped. Refer to Front Floor Console Replacement (Impala) (Front Floor Console Replacement).
13. Engage the parking brake, if equipped with column shift.
14. Position the transaxle shift control indicator to 1, if equipped with column shift.
15. Remove the ignition switch cylinder bezel.
16. Remove the instrument panel cluster trim plate. Refer to Instrument Panel Cluster Trim Plate Bezel Replacement (Impala) (Instrument Panel Cluster (IPC) - Trim Plate Bezel Replacement).
17. Remove the ignition switch.
18. Remove the radio. Refer to Radio Replacement in Entertainment.
19. Remove the HVAC control assembly. Refer to Control Assembly Replacement (C60) Control Assembly Replacement (CJ3) in HVAC Systems - Manual.
20. Remove the headlamp switch. Refer to Headlamp Switch Replacement in Lighting Systems.
21. Remove the hood release handle. Refer to Hood Primary Latch Release Cable Handle Replacement (Hood Primary Latch Release Cable Handle Replacement) in Body Front End.
22. Disconnect the data link connector.
23. Remove the LH and the RH windshield pillar garnish moldings. Refer to Windshield Pillar Garnish Molding Replacement (Impala) (Windshield Pillar Garnish Molding Replacement) in Interior Trim.
24. Remove the defroster grille. Refer to Defroster Grille Replacement (Instrument Panel (IP) - Defroster Grille Replacement).
25. Remove the instrument panel upper trim pad. Refer to Instrument Panel Upper Trim Pad Replacement (Impala) (Service and Repair).
26. Remove the remote control door lock receiver module. Refer to Remote Control Door Lock Receiver Replacement in Keyless Entry.
27. Remove the instrument panel cluster trim plate bezel. Refer to Instrument Panel Cluster Trim Plate Bezel Replacement (Impala) (Instrument Panel Cluster (IPC) - Trim Plate Bezel Replacement).
28. Remove the instrument panel cluster. Refer to Instrument Cluster Replacement (Instrument Panel Cluster (IPC) - Replacement).
29. Remove the SIR inflator module. Refer to Instrument Panel Inflatable Restraint Module Replacement in SIR.
30. Remove the instrument panel compartment lamp switch. Refer to Instrument Panel Compartment Lamp Replacement in Lighting Systems.
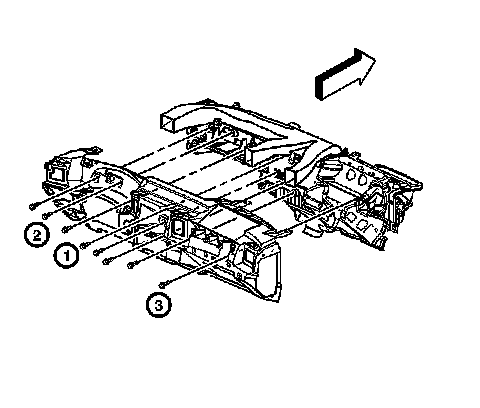
31. Remove the instrument panel assembly screws in the order indicated in the graphic.
32. Reposition the instrument panel wiring harness from the instrument panel.
33. Remove the instrument panel assembly from the vehicle.
Installation Procedure
1. Position the instrument panel assembly to the vehicle.
2. Reposition the instrument panel wiring harness.
Notice: Refer to Fastener Notice in Cautions and Notices.
3. Install the instrument panel trim pad-to-crosscar beam screws in the order indicated in the graphic.
Tighten the instrument panel trim pad-to-crosscar beam screws to 10 Nm (89 lb in).
4. Install the instrument panel compartment lamp switch. Refer to Instrument Panel Compartment Lamp Replacement in Lighting Systems.
5. Install the SIR inflator module. Refer to Instrument Panel Inflatable Restraint Module Replacement in SIR.
6. Install the instrument panel cluster. Refer to Instrument Cluster Replacement (Instrument Panel Cluster (IPC) - Replacement).
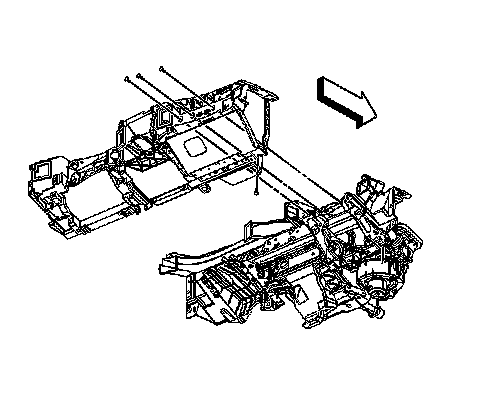
7. Install the instrument panel trim pad-to-instrument panel compartment bracket screws.
Tighten the instrument panel trim pad-to-instrument panel compartment bracket screws to 2 Nm (18 lb in).
8. Install the instrument panel upper trim pad. Refer to Instrument Panel Upper Trim Pad Replacement (Impala) (Service and Repair).
9. Install the remote control door lock receiver module. Refer to Remote Control Door Lock Receiver Replacement in Keyless Entry.
10. Install the defroster grille. Refer to Defroster Grille Replacement (Instrument Panel (IP) - Defroster Grille Replacement).
11. Install the RH and the LH windshield pillar garnish moldings. Refer to Windshield Pillar Garnish Molding Replacement (Impala) (Windshield Pillar Garnish Molding Replacement).
12. Connect the SIR inflator module electrical connector. Install the SIR inflator module. Refer to Instrument Panel Inflatable Restraint Module Replacement in SIR.
13. Install the data link connector.
14. Install the hood release handle. Refer to Hood Primary Latch Release Cable Handle Replacement (Hood Primary Latch Release Cable Handle Replacement) in Body Front End.
15. Install the headlamp switch. Refer to Headlamp Switch Replacement in Lighting Systems.
16. Install the HVAC control assembly. Refer to Control Assembly Replacement (C60) Control Assembly Replacement (CJ3) in HVAC Systems - Manual.
17. Install the radio. Refer to Radio Replacement in Entertainment.
18. Install the ignition switch. Refer to Ignition and Start Switch Replacement.
19. Install the instrument panel cluster trim plate.
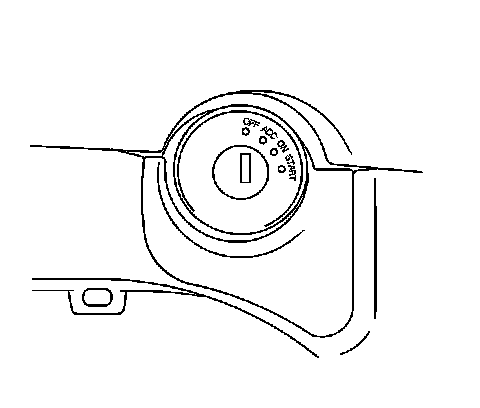
20. Install the ignition switch cylinder bezel.
21. Position the transaxle shift control indicator to Park.
22. Release the parking brake.
23. Install the multifunction switch. Refer to Multifunction Turn Signal Lever Replacement - On Vehicle in Steering Wheel and Column - Tilt.
24. Install the steering column trim covers. Refer to Steering Column Trim Cover Replacement - On Vehicle in Steering Wheel and Column - Tilt.
25. Install the steering wheel tilt lever. Refer to Tilt Lever Replacement - On Vehicle in Steering Wheel and Column - Tilt.
26. Install the steering wheel. Refer to Steering Wheel Replacement in Steering Wheel and Column - Tilt.
27. Install the steering wheel SIR inflator module. Refer to Steering Wheel Inflatable Restraint Module Replacement (Impala) Steering Wheel Inflatable Restraint Module Replacement (Monte Carlo) in SIR.
28. Install the floor console, if equipped. Refer to Front Floor Console Replacement (Impala) (Front Floor Console Replacement).
29. Install the instrument panel compartment. Refer to Instrument Panel Compartment Replacement (Service and Repair).
30. Install the RH instrument panel fuse block access opening cover.
31. Install the knee bolster brackets to the instrument panel. Refer to Knee Bolster Bracket Replacement (Driver) (Knee Bolster Bracket Replacement - Driver)Knee Bolster Bracket Replacement (Passenger) (Knee Bolster Bracket Replacement - Passenger).
32. Install steering column opening filler panel to the instrument panel lower trim panel. Refer to Steering Column Opening Filler Replacement).
33. Install the LH and RH instrument panel insulator. Refer to Instrument Panel Insulator Replacement (Left) (Instrument Panel (IP) - Insulator Replacement - Left)Instrument Panel Insulator Replacement (Right) (Instrument Panel (IP) - Insulator Replacement - Right).
34. Enable the SIR system.
35. Connect the battery ground (negative) cable. Refer to Battery Negative Cable Disconnection and Connection in Engine Electrical.