Upper Control Arm Bushings Replacement
DISASSEMBLE PROCEDURE^ Tools Required:
- J 21474-5 Control Arm Bushing Receiver
- J 21474-18 Upper Control Arm Nut
- J 21474-19 Upper Control Arm Screw
- J 39872 Half Moon Spacer
- J 39930 Upper Control Arm Bushing Receiver/Installer
Service the upper control arm bushing separately from the upper control arm.
1. Remove the upper control arm. Refer to UPPER CONTROL ARM REPLACEMENT.
2. Remove the bolts/screws and the nuts.
3. Separate the front upper control arm from the upper control arm support.
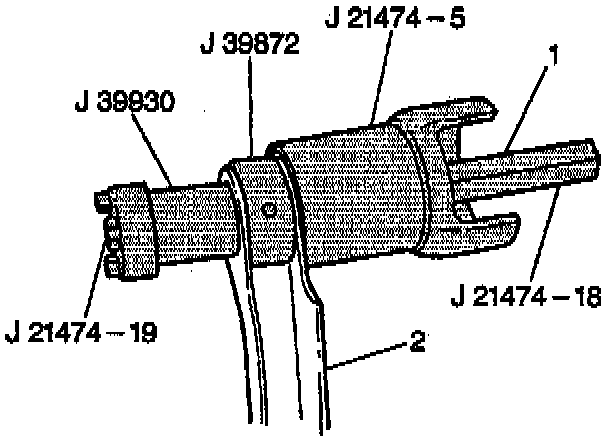
4. Perform the following procedure in order to remove the upper control arm bushing from the upper control arm (2):
4.1 Thread J 21474-19 through J 39930 (the three tangs on J 39930 should be against the screw head).
4.2 Thread J 21474-19 through the inside of the upper control arm bushing (you may need to wiggle J 21474-19 until the tool slides through the bushing).
4.3 Run the smaller end of J 21474-5 onto J 21474-19, then place the thrust washer (1) on J 21474-19 with the seams facing toward J 21474-5.
4.4 Install J 39872 around the outside of the bushing in order to avoid metal distortion during removal.
4.5 Ensure that both J 39930 and J 21474-5 line up properly, then install J 21474-18 on J 21474-19.
4.6 Tighten J 21474-19 and J 21474-18 until the bushing is pushed all the way out (making a popping noise).
ASSEMBLE PROCEDURE
1. Perform the following procedure in order to install the upper control arm bushings:
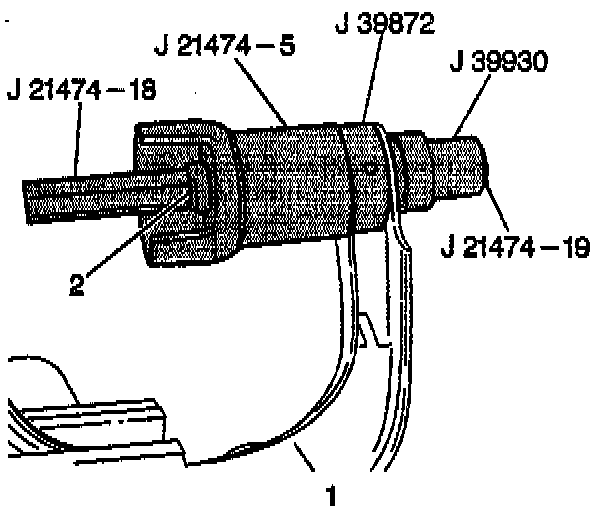
1.1. Secure the control arm tightly in a vise, then thread J 21474-19 through J 39930 (the three tangs on J 39930 should face away from the screw head).
1.2. Install a new upper control arm bushing onto J 21474-19 with the three indentations facing toward the three tangs on J 39930.
1.3. Install the threaded end of J 21474-19 into the upper control arm from the outer side of the control arm.
1.4. Install J 21474-5 onto J 21474-19 from the inside of the control arm.
1.5. Install the thrust washer (2) onto J 21474-19 with the seam facing toward the control arm bushing.
1.6. Install J 39872 around the outside of the bushing in order to avoid metal distortion during removal.
1.7. Install J 21474-18 onto J 21474-19, ensuring that the three tangs prongs on J 39930 fit into the indentations of the bushing.
1.9. Tighten until the bushing is flush with the control arm.
2. Install the front upper control arm to the front upper control arm support.
NOTICE: Always use the correct fastener in the proper location. When you replace a fastener, use ONLY the exact part number for that application. The manufacturer will call out those fasteners that require a replacement after removal. The manufacturer will also call out the fasteners that require thread lockers or thread sealant. UNLESS OTHERWISE SPECIFIED, do not use supplemental coatings (paints, greases, or other corrosion inhibitors) on threaded fasteners or fastener joint interfaces. Generally, such coatings adversely affect the fastener torque and joint clamping force, and may damage the fastener. When you install fasteners, use the correct tightening sequence and specifications. Following these instructions can help you avoid damage to parts and systems.
3. Install the bolts/screws and nuts.
Tighten
Tighten the nuts to 98 Nm (72 ft. lbs.).
4. Install the upper control arm. Refer to UPPER CONTROL ARM REPLACEMENT.