Wheel Removal and Installation
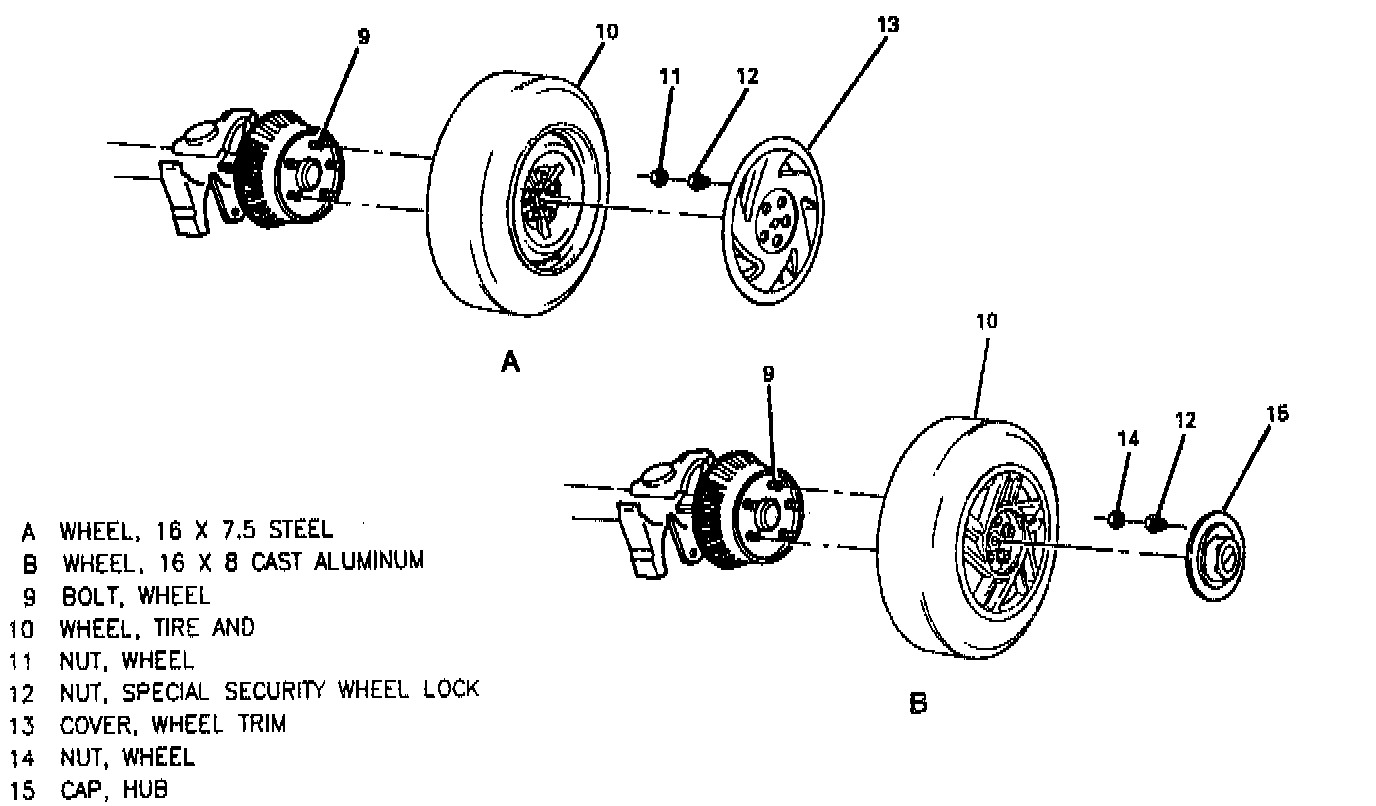
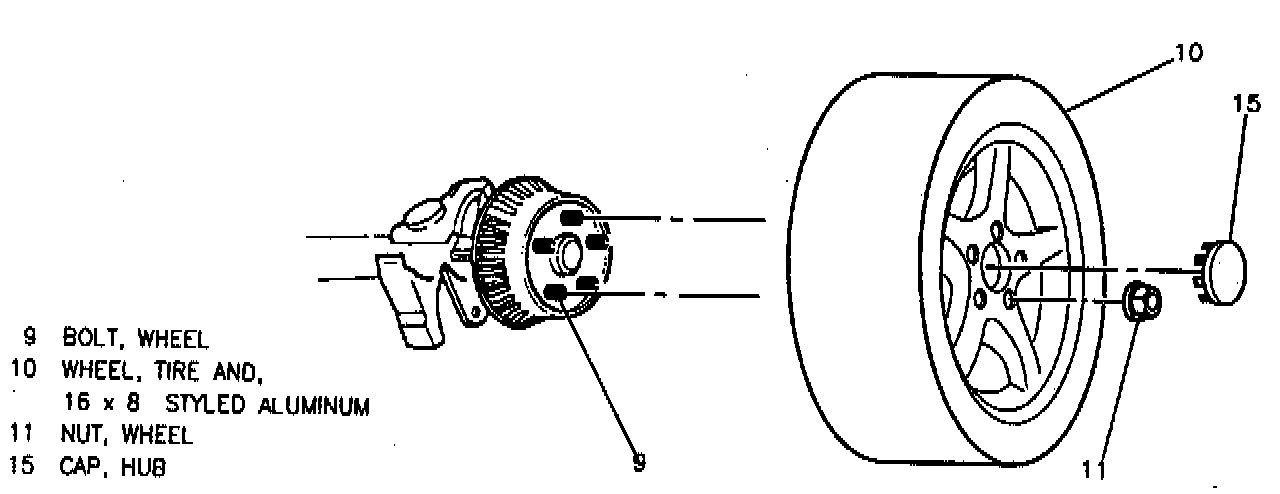
NOTICE: Improperly tightened wheel nuts can lead to brake pulsation and rotor damage. To avoid expensive brake repairs, evenly tighten the wheel nuts in the proper sequence and to the proper torque specification. Penetrating oil has not been found to be effective in removing tight wheels. However, if it is used, it should be applied sparingly to the wheel center hole area only.
CAUTION: If penetrating oil gets on the vertical surfaces between the wheel and the rotor or brake drum, It could cause the wheel to work loose as the vehicle is driven, resulting in a loss of control and an injury accident.
NOTICE: Never use heat to loosen a tight wheel. It can shorten the life of the wheel, studs, or hub and bearing assemblies. Wheel nuts must be tightened in sequence and to the proper torque to avoid bending the wheel or rotor. Sometimes wheels can be difficult to remove due to foreign material or a tight fit between the wheel center hole and the rotor. Excessive force such as hammering the wheel or tire can cause damage and is not recommended. Slight tapping on the tire sidewall using a large rubber mallet is acceptable.
GENERAL INFORMATION
The wheel can be removed without damage as follows:
1. Retighten all wheel nuts on affected wheel. Then loosen each nut two turns. Rock vehicle from side to side. If this is not effective, go to step 2.
2. Rock vehicle from "DRIVE" to "REVERSE" allowing vehicle to move several feet in each direction. Apply quick, hard jabs on the brake pedal to loosen wheel. If wheel still does not loosen, then rock vehicle again from side to side as hard as possible using one or more person's body weight. If wheel is still tight, repeat procedure.
REMOVE OR DISCONNECT
1. Raise and suitably support vehicle.
2. Wheel nut cap, if equipped.
3. Hub cap (15) or wheel trim cover (l3).
4. Special security wheel lock nut (12), if equipped.
^ Use special security wheel lock key, located in the front floor console.
5. Wheel nuts (11 or 14).
^ Mark location of the tires and wheels (10) to the hub.
6. Tire and wheel
CAUTION: Before Installing wheels, remove any buildup of corrosion on the wheel mounting surface and brake drum or rotor mounting surface by scraping and wire brushing. Installing wheels without good metal-to-metal contact at the mounting surfaces can cause wheel nuts to loosen, which can later allow the wheel to come off while causing loss of control. Wheel nuts must be tightened in sequence and to proper torque to avoid bending wheel or brake drum or rotor.
Clean:
^ Wheel nuts (11 or 14), bolts (9), wheel (10) and brake drum or rotor mounting surfaces.
INSTALL OR CONNECT
NOTICE: Always use the correct fastener in the correct location. When you replace a fastener, use ONLY the exact part number for that application. The manufacturer will call out those fasteners that require a replacement after removal. The manufacturer will also call out the fasteners that require thread lockers or thread sealant. UNLESS OTHERWISE SPECIFIED, do not use supplemental coatings (paints, greases, or other corrosion inhibitors) on threaded fasteners or fastener joint interfaces. Generally, such coatings adversely affect the fastener torque and the joint clamping force, and may damage the fastener. When you install fasteners, use the correct tightening sequence and specifications. Following these instructions can help you avoid damage to parts and systems.
1. Tire and wheel (10).
CAUTION: Never use oil or grease on bolts or wheel nuts. Tighten the wheel nuts with your fingers until they are snug. Then, tighten the wheel nuts in the proper sequence to the specified torque. Refer to "Specifications". Improperly tightened wheel nuts could eventually allow the wheel to come off while the vehicle is moving, possibly causing loss of control, personal injury and property damage.
2. Wheel nuts (11 or 14).
3. Special security wheel lock nut (12), if equipped.
^ Use special security wheel lock key located in front floor console.
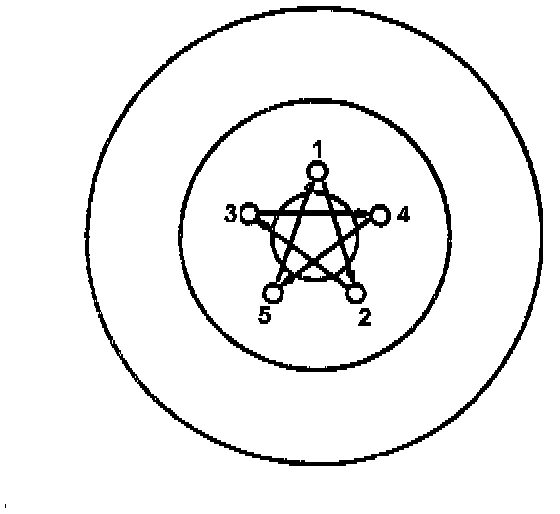
^ Tighten nuts (11, 12 or 14) in increments of 27 Nm (20 ft. lbs.) in sequence up to 140 Nm (100 ft. lbs.).
4. Hub cap (15) or wheel trim cover (13), if equipped.
^ Cover (13) to 6 Nm (53 inch lbs.).
5. Wheel nut cap, if equipped.
6. Lower vehicle.