Pontiac & Olds mobile Models
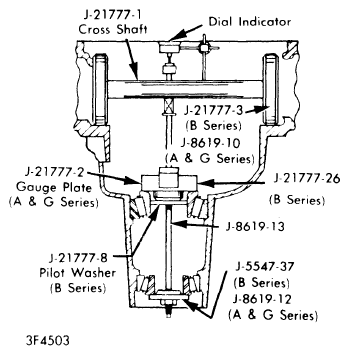
- Assemble gauge plate, stud and pilot into carrier assembly and tighten hex nut while rotating gauge plate, Obtain preload of 20-25 INCH lbs, for new bearings or 10-15 INCH lbs, for old bearings.
 Courtesy of GENERAL MOTORS COMPANY
- Place suitable dial indicator (J-8001) on mounting post of cross shaft (arbor) with contact button touching indicator pad, Set indicator on zero and depress until needle rotates three-fourths turn clockwise, Tighten indicator in this position.
- Install gauge discs on cross shaft (arbor) assembly and position in carrier so that dial indicator rod is directly over gauging area of gauge plate, Discs must be fully seated in side bearing bores, Install bearing caps over cross shaft (arbor) discs.
- Position cross shaft (arbor so that indicator rod contacts gauging area of gauge plat. Rock cross shaft (arbor) slowly back and forth until indicator records greatest deflection, At that point, set indicator to zero, Repeat rocking action to verify setting.
- After zero setting is obtained, rotate cross shaft (arbor) until dial indicator rod is removed from gauging area, Indicator will now read pinion depth directly, Record this figure.