Steering Gear, Tie Rods
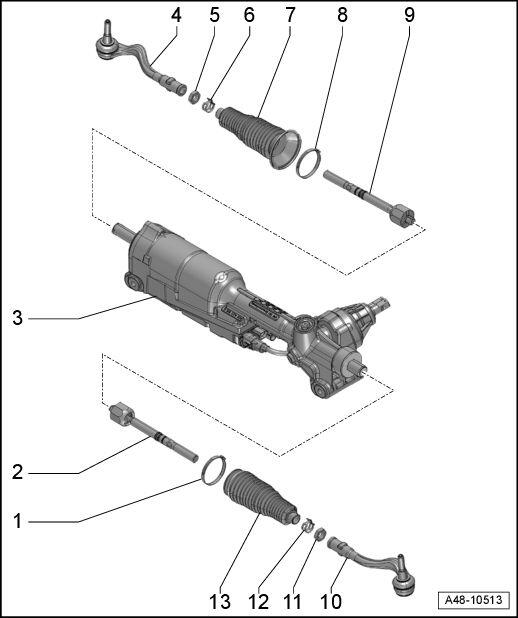 Courtesy of AUDI OF AMERICA, LLC
- Clamp
- Replace after removing.
- Do not open the new clamp
- Tensioning. Refer to Figure.
- Tie Rod
- 140 Nm
- Grease the joint with Steering Gear Grease: G 052 168 A1
- Removing and installing. Refer to TIE ROD, REMOVING AND INSTALLING .
- If the tie rod is deformed, the control arm on this side of the vehicle must also be replaced.
- Steering Gear
- Tie Rod End
- Check dust cap for damage and correct seating.
- Check dimension. Refer to Figure
- Removing and installing. Refer to TIE ROD END, REMOVING AND INSTALLING .
- If the tie rod end is deformed, the control arm on this side of the vehicle must also be replaced.
- Nut
- 80 Nm
- When loosening and tightening, counterhold at the tie rod end
- Spring Clamp
- Replace after removing.
- Spring Clamp, Installing. Refer to Figure.
- Boot
- Replace after removing.
- Check for damage
- Must not be twisted when toe is being adjusted
- Do not crumple the boot
- Do not bring into contact with hard or sharp objects.
- Grease the sealing locations with Steering Gear Grease: G 052 168 A1
- Make sure it is installed correctly. Refer to Figure.
- Replacing. Refer to BOOT, REMOVING AND INSTALLING .
- Clamp
- Replace after removing.
- Do not open the new clamp
- Tensioning. Refer to Figure.
- Tie Rod
- 140 Nm
- Grease the joint with Steering Gear Grease: G 052 168 A1
- Removing and installing. Refer to TIE ROD, REMOVING AND INSTALLING .
- If the tie rod is deformed, the control arm on this side of the vehicle must also be replaced.
- Tie Rod End
- Check dust cap for damage and correct seating.
- Check dimension. Refer to Figure
- Removing and installing. Refer to TIE ROD END, REMOVING AND INSTALLING .
- If the tie rod end is deformed, the control arm on this side of the vehicle must also be replaced.
- Nut
- 80 Nm
- When loosening and tightening, counterhold at the tie rod end
- Spring Clamp
- Replace after removing.
- Spring Clamp, Installing. Refer to Figure.
- Boot
- Replace after removing.
- Check for damage
- Must not be twisted when toe is being adjusted
- Do not crumple the boot
- Do not bring into contact with hard or sharp objects.
- Grease the sealing locations with Steering Gear Grease: G 052 168 A1
- Installation position. Refer to Figure.
- Make sure it is installed correctly. Refer to Figure.
- Replacing. Refer to BOOT, REMOVING AND INSTALLING .