Overview - Charge Air System, 3.0L Engine-Side, Version 1: Notes
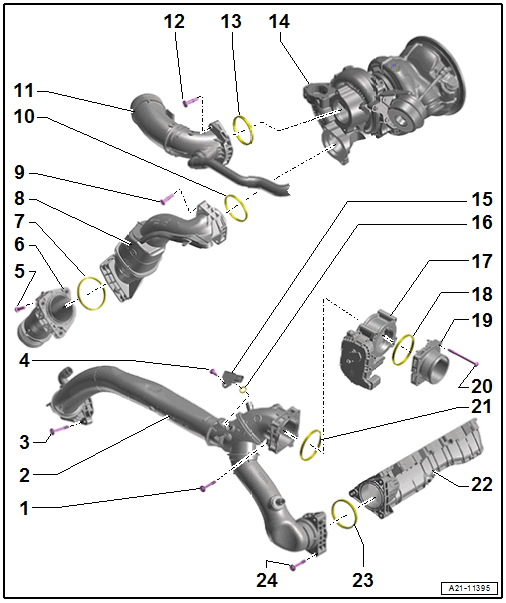 Courtesy of AUDI OF AMERICA, LLC
- Bolt
- Tightening Specifications and Sequence. Refer to Figure.
- Upper Air Guide Pipe
- Bolt
- Tightening Specifications and Sequence. Refer to Figure.
- Thread cutting
- Position the bolt by hand and tighten it until it finds the old threads. Then tighten the bolt to the specification.
- Bolt
- Bolt
- Connection
- Seal
- Replace after removing.
- For model versions
- Air Duct Pipe
- There are different versions. Refer to the Parts Information for the allocation.
- Bolt
- Seal
- Intake Manifold with Crankcase Ventilation Hose
- Bolt
- Seal
- Turbocharger
- Intake Air Temperature Sensor -G42- /Manifold Absolute Pressure Sensor -G71-
- O-Ring
- Not available separately; replace if leaking -item 15 or damaged
- Throttle Valve Control Module -GX3-
- Seal
- Connection
- Bolt
- Step 1: 5 Nm
- Step 2: 6 Nm
- Thread cutting
- Position the bolt by hand and tighten it until it finds the old threads. Then tighten the bolt to the specification.
- Seal
- Intake Manifold
- Seal
- Bolt
- Thread cutting
- Position the bolt by hand and tighten it until it finds the old threads. Then tighten the bolt to the specification.
- Tightening Specifications and Sequence. Refer to Figure.