Overview - Rear Brakes: Notes
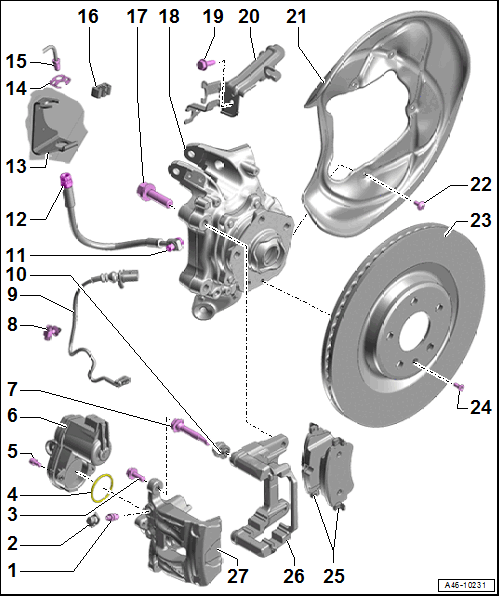 Courtesy of VOLKSWAGEN GROUP OF AMERICA, INC.
- Bleed Screw
- 11 Nm
- Before installing, thinly coat with Assembly Paste:G 052 150 A2
.
- Protective Cap
- Bolt
- 35 Nm
- Clean before re-using
- Replace if damaged
- Replace self-locking bolts and nuts after removing
- When loosening and tightening, counterhold at the guide pin
- Seal
- Bolt
- 13 Nm
- Clean before re-using
- Replace if damaged
- Replace self-locking bolts and nuts after removing
- Electro-Mechanical Parking Brake Motor
- Left Parking Brake Motor -V282-
- Right Parking Brake Motor -V283-
- Guide Pin
- Clip
- Brake Pad Wear Indicator Wire
- Protective Cap
- Banjo Bolt
- 35 Nm
- Permanent with seals
- Check for damage
- Replace together with the brake hose
- Clean any corrosion from the sealing surface on the brake caliper
- Brake Hose
- Pay attention to the correct routing: make sure the brake hose is not blocked, bent or rubbing against the vehicle
- Replace if damaged
- Make sure that tabs are properly seated in the grooves on the bracket.
- Bracket
- For the brake line/hose
- On the body
- Spring
- Brake Line
- Brake line to brake hose tightening specification: 14 Nm
- Bracket
- Bolt
- 100 Nm +90°
- Replace after removing.
- Wheel Bearing Housing
- Bolt
- Bracket
- Brake Shield
- Bolt
- 10 Nm
- Clean before re-using
- Replace if damaged
- Replace self-locking bolts and nuts after removing
- Brake Rotor
- Do not use excessive force to separate the brake rotor from the wheel hub. Use rust remover, if necessary, otherwise the brake rotor could be damaged.
- Maximum lateral run-out: 0.06 mm
- If the brake rotor is installed, measure using the Dial Indicator - 0-10mm:VAS6079
and Dial Indicator Bracket:6079/1
.
- Clean away any dirt and rust on the brake rotor, and perform the measurement 10 mm from the outer edge of the brake rotor.
- Replace on both sides of axle if worn.
- Refer to BRAKE ROTOR, REMOVING AND INSTALLING
- Bolt
- 8 Nm
- Clean before re-using
- Replace if damaged
- Replace self-locking bolts and nuts after removing
- Brake Pads
- Check the pad thickness. For the wear limit, refer to appropriate service information.
- Always replace on both axles.
- Allocation. Refer to the Parts information.
- Refer to BRAKE PADS, REMOVING AND INSTALLING
- Installation position. Refer to Figure.
- Brake Carrier
- Delivered as an assembled replacement part with sufficient grease on the guide pins
- Refer to BRAKE CARRIER, REMOVING AND INSTALLING
- Clean the contact surfaces for the brake pads and thinly coat with Lithium Grease:G 052 150 A2
- Brake Caliper