Overview - Front Brakes, Steel Brakes 1LC/1LD/1LE/1LF/1LG/1LH: Notes
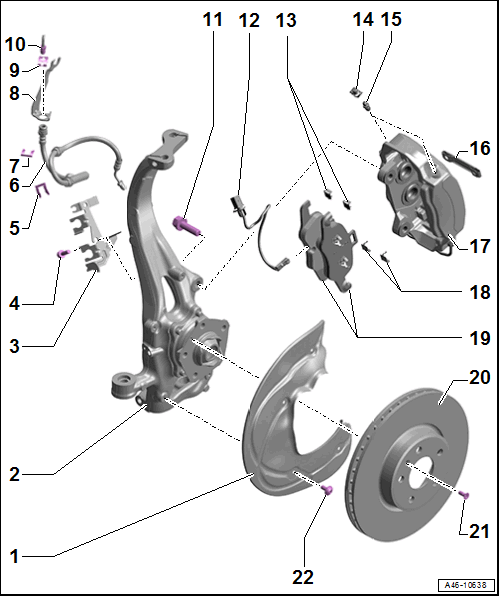 Courtesy of VOLKSWAGEN GROUP OF AMERICA, INC.
- Brake Shield
- Wheel Bearing Housing
- Bracket
- Bolt
- 20 Nm
- Clean before re-using
- Replace if damaged
- Replace self-locking bolts and nuts after removing
- Hose Bracket
- Brake Hose
- Make sure the brake hose is routed correctly. Make sure the brake hose is not blocked, bent, twisted or rubbing against the vehicle.
- Replace if damaged
- Make sure that tabs are properly seated in the grooves on the bracket.
- Brake hose to brake caliper tightening specification: 14 Nm
- Hose Bracket
- Bracket
- For the brake line/hose
- On the body
- Spring
- Brake Line
- Brake line to brake hose tightening specification: 14 Nm
- Do not change the bending shape.
- Replace a damaged or bent brake line
- Bolt
- 200 Nm
- Clean before re-using
- Replace if damaged
- Replace self-locking bolts and nuts after removing
- Brake Pad Wear Indicator Wire
- Anti-Friction Plate
- Installation position. Refer to Figure.
- Protective Cap
- Bleed Screw
- Spring Bracket
- Brake Caliper
- Anti-Friction Plate
- Installation position. Refer to Figure.
- Brake Pads
- Brake Rotor
- Allocation. Refer to the Parts information.
- Wear limit. Refer to TECHNICAL DATA, BRAKES
.
- Maximum lateral run-out: 0.06 mm
- If the brake rotor is installed, measure using the Dial Indicator - 0-10mm:VAS6079
and Dial Indicator Bracket:6079/1
.
- Clean away any dirt and rust on the brake rotor, and perform the measurement 10 mm from the outer edge of the brake rotor.
- Always replace on both axles.
- Do not use excessive force to separate the brake rotor from the wheel hub. Use rust remover, if necessary, otherwise the brake rotor could be damaged.
- Refer to BRAKE ROTOR, REMOVING AND INSTALLING, STEEL BRAKES
- Bolt
- 8 Nm
- Clean before re-using
- Replace if damaged
- Replace self-locking bolts and nuts after removing
- Bolt
- 10 Nm
- Clean before re-using
- Replace if damaged
- Replace self-locking bolts and nuts after removing