Overview - Drive Axle With 88/98 Mm Diameter Outer CV Joint And Drive Axle With 100/108 Mm Diameter Inner CV Joint With Cap: Notes
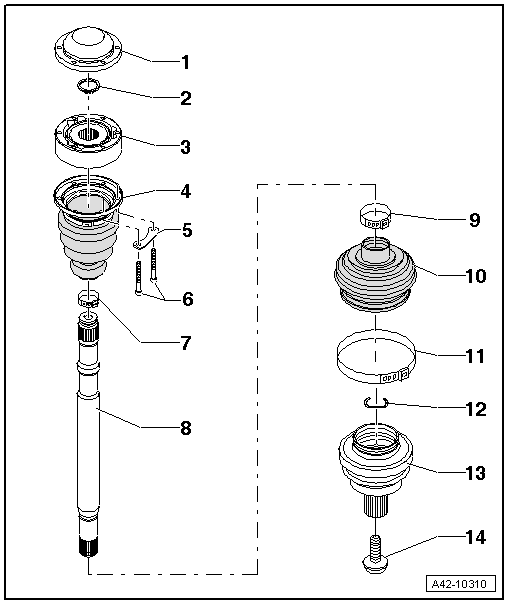 Courtesy of AUDI OF AMERICA, LLC
- Cover
- Carefully remove the cover using a drift, replace if damaged.
- The adhesive surfaces on the cover/inner CV joint must be free of grease when installing.
- Coat the sealing surface with Sealant before installing the CV joint.
- Locking Ring
- Always replace if removed
- Remove and install using commercially available locking ring pliers.
- Inner CV Joint
- Replace only as complete unit.
- Checking. Refer to INNER CV JOINT, CHECKING .
- Grease quantity and type. Refer to GREASE QUANTITY AND TYPE .
- The adhesive surfaces must be free of oil and grease
- When installing joint on axle shaft, splines on axle shaft must be lightly coated with grease used in joint.
- Inner CV Boot with Cap
- Without vent hole
- Carefully remove the cap using a drift, replace if damaged.
- Check the inner CV joint if there is damage. Refer to INNER CV JOINT, CHECKING .
- The sealing surfaces on the cap/inner CV joint must be free of grease when installing.
- Locking Plate
- Bolt
- 70 Nm
- M 10
- Always replace if removed
- Clamp
- Drive Axle
- Clamp
- Outer CV Boot
- Without vent hole
- Check for tears and chafing; replace if necessary
- The protective boot/metal cap sealing surfaces must be free of grease when installing.
- The protective boot/drive axle sealing surfaces must be free of grease when installing.
- Clamp
- Locking Ring
- Always replace if removed
- Insert before mounting in ring groove (not visible with joint installed)
- Before installing CV joint, align sealing ring in center with opening facing upward.
- Outer CV Joint
- Bolt