No Sound Is Heard From the Speaker(s) (Display Is Normal) (With ELS Audio System)
Audio System Symptom Troubleshooting - No sound is heard from the speaker(s) (display is normal) (with ELS audio system)
No sound is heard from the speaker(s) (display is normal) (with ELS audio system)
NOTE:
- Check the vehicle battery condition first Testing and Inspection.
- Check the connectors for poor connections or loose terminals.
- Do the individual speaker test Speaker Test/Replacement.
- Set the fader and balance positions to the center.
- Before doing the troubleshooting, do the audio unit power switch will not turn on troubleshooting Audio Unit Power Switch Will Not Turn On (No Information Display and No Sound).
1. Turn the ignition switch to ON (II).
2. Make sure the volume is not set to the MIN level, and check for sound in all modes (AM/FM, CD, XM, USB).
Is there sound in all models, and is the sound normal?
YES -
System is OK at this time. Check for poor connections at the audio unit and speakers.�
NO -
- If there is no sound in all modes, go to step 3.
- If there is no sound in AM/FM mode, do the AM or FM radio reception interference troubleshooting Symptom Troubleshooting.
- If there is no sound in CD mode, do the Audio disc does not play troubleshooting Symptom Troubleshooting.
- If there is no sound in the XM radio, do the Poor or no sound with XM radio troubleshooting Poor or No Sound With XM Radio (Audio Unit Does Display XM Channels).
- If there is no sound in the USB mode, do the USB input sound is low or cannot be heard troubleshooting USB Input Sound Is Low or Cannot Be Heard.
3. On the steering wheel, check if the navigation talk command, and/or the HandsFreeLink talk command are set.
Are the navigation talk command and/or the HFL talk command function set?
YES -
Cancel the navigation talk command by pressing the navigation BACK button, and/or the HFL talk command by pressing the HFL BACK button, then recheck the function.�
NO -
Go to step 4.
4. Turn the ignition switch to LOCK (0).
5. Disconnect the HandsFreeLink control unit 28P connector and navigation unit connector A (20P).
6. Turn the ignition switch to ON (II), and recheck the audio system for sound.
Did the sound return?
YES -
Reconnect the HandsFreeLink control unit and the navigation unit one at a time, and note which one causes sound to go away, replace the HandsFreeLink control unit Service and Repair.�
NO -
Go to step 7.
7. See if the problem recurs with the tuner and more than one CD.
Does the problem recur using the tuner as well as CDs?
YES -
Go to step 8.
NO -
Go to poor AM or FM radio reception or interference troubleshooting Symptom Troubleshooting.�
8. Turn the ignition switch to LOCK(0).
9. Check the No. 32 (10A) fuse in the under-dash fuse/relay box.
Is the fuse OK?
YES -
Go to step 10.
NO -
Replace the fuse (s), and recheck.�
10. Measure the voltage between stereo amplifier connector A (18P) terminal No. 18 and body ground.
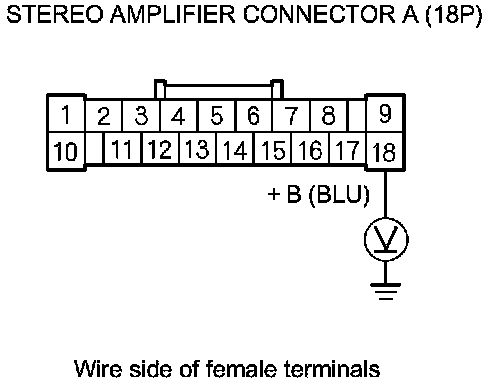
Is there battery voltage?
YES -
Go to step 11.
NO -
Repair an open in the wire between the No. 31 (20 A) fuse in the under-dash fuse/relay box and stereo amplifier connector A (18P) terminal No. 18.�
11. Turn the ignition switch to ON (II).
12. Measure the voltage between stereo amplifier connector B (28P) terminal No. 3 and body ground.
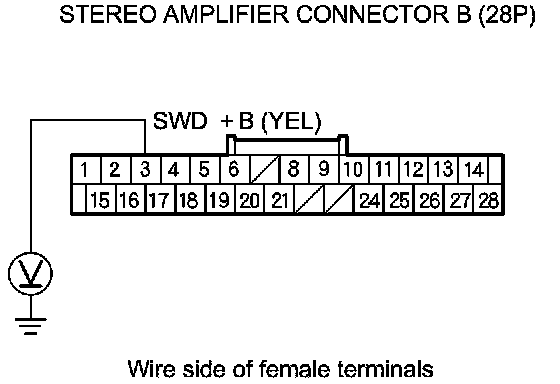
Is there battery voltage?
YES -
Go to step 13.
NO -
Repair an open in the wire between stereo amplifier connector B (28P) terminal No. 3 and audio unit connector D (32P) terminal No. 23. If the wire and pin fits are OK, substitute a known-good audio unit Audio Unit Removal/Installation (With Navigation System), and recheck. If the symptom/indication goes away, replace the original audio unit Audio Unit Removal/Installation (With Navigation System).�
13. Measure the voltage between body ground and stereo amplifier connector A (18P) terminal No. 9, and between body ground and connector B (28P) terminal No. 2 individually.
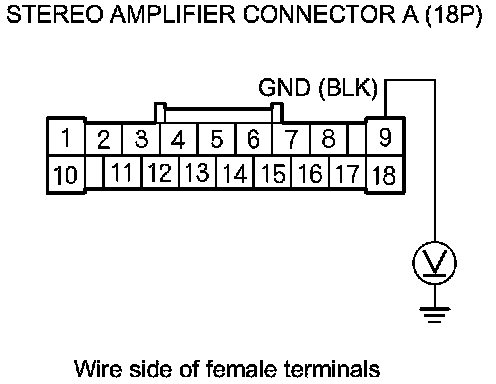
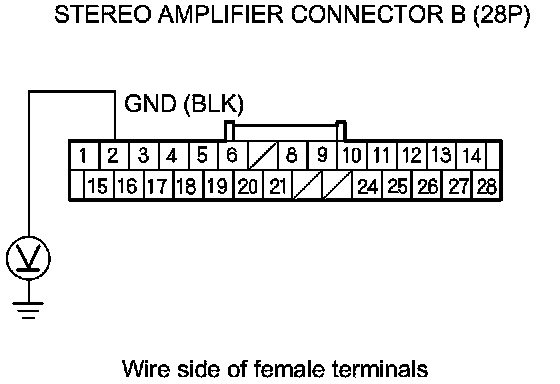
Is there less than 0.2 V?
YES -
Go to step 15.
NO -
Repair an open in the wire between stereo amplifier connector A (18P) terminal No. 9, connector B (28P) terminal No. 2 and body ground (G503) or (G504).�
14. Turn the ignition switch to LOCK(0).
15. Disconnect stereo amplifier connector A (18P).
16. Check the speaker(s) with no sound for any damage.
Is there any damage?
YES -
Replace the speaker Speaker Test/Replacement, and recheck.�
NO -
Go to step 17.
17. Remove the speaker(s) with no sound Speaker Test/Replacement, and disconnect its connector.
18. Check the speaker connector for a loose or poor connection.
Reconnect the speaker 2P or 8P connector, and recheck the symptom; is the condition still present?
YES -
Go to step 19.
NO -
Intermittent failure. Operation is normal.�
19. Test the speaker(s) Speaker Test/Replacement.
Is the speaker OK?
YES -
Go to step 20.
NO -
Replace the speaker(s) Speaker Test/Replacement.�
20. Reconnect the speaker connector(s).
21. Check for continuity between body ground and stereo amplifier connector A (18P) according to the table.
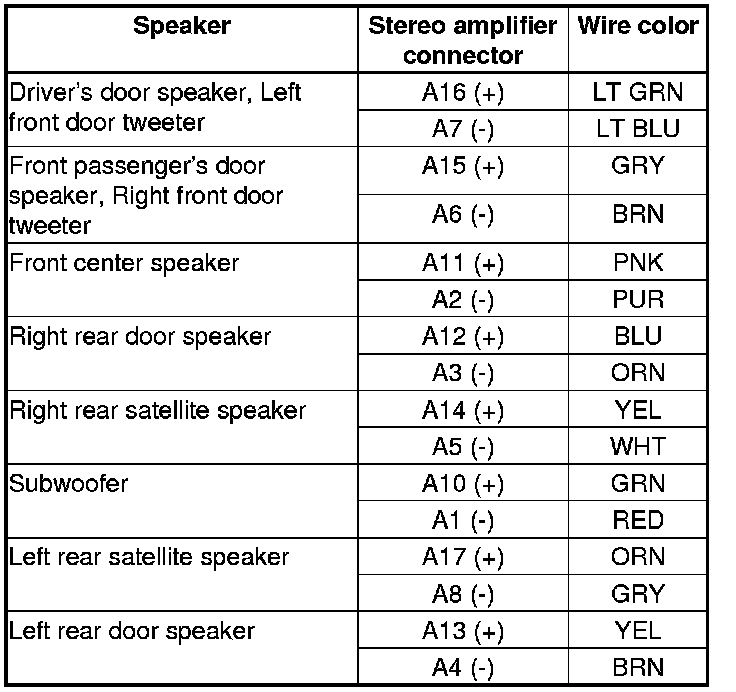
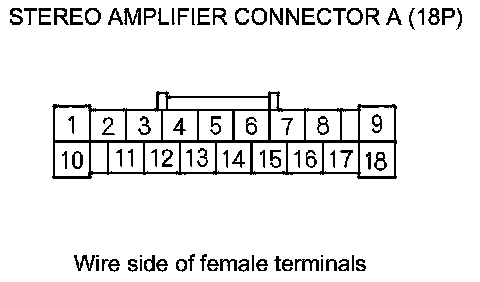
Is there continuity?
YES -
Repair a short to body ground in the wire(s) between the stereo amplifier and the speaker(s).�
NO -
Go to step 22.
22. Disconnect the left front door tweeter 2P connector and right front door tweeter 2P connector.
23. Measure the resistance between each pair of speaker terminals at stereo amplifier connector A (18P) according to the table.
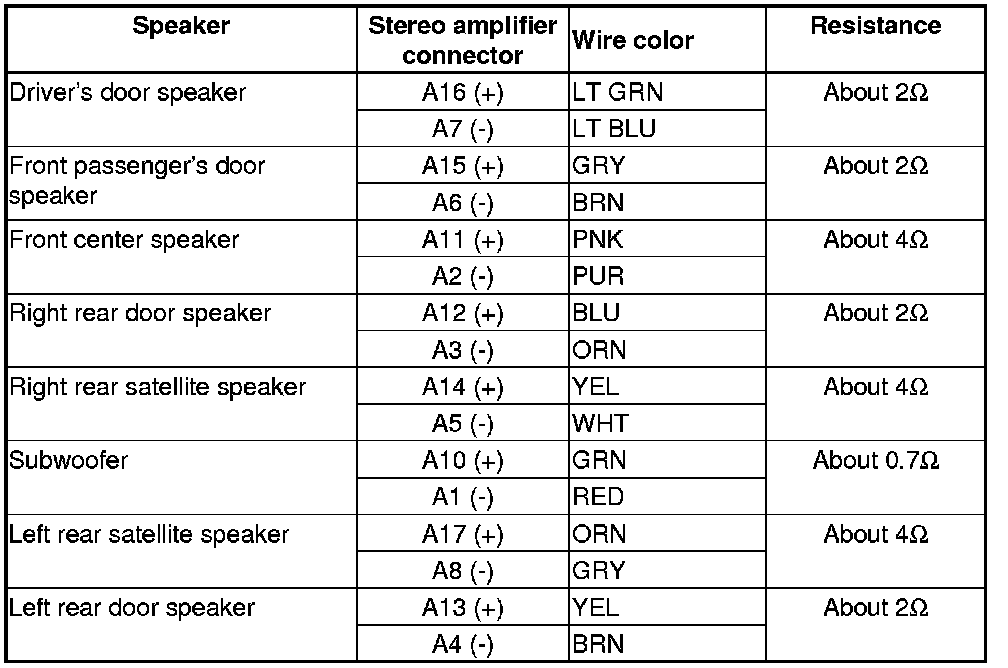
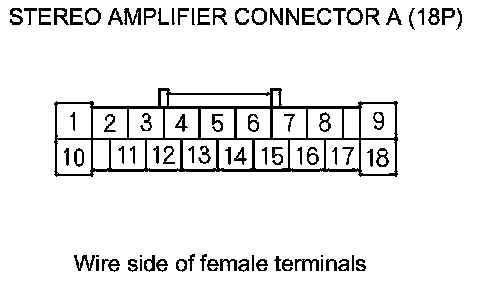
Is the resistance OK?
YES -
Go to step 24.
NO -
Repair an open or a short in the wire(s) between the stereo amplifier and speaker(s).�
24. Connect stereo amplifier connector A (18P) terminals with jumper wires as shown.
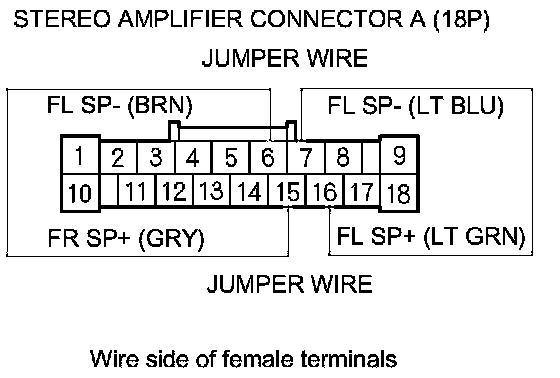
25. Check for continuity between the tweeter 2P connector terminals according the table.
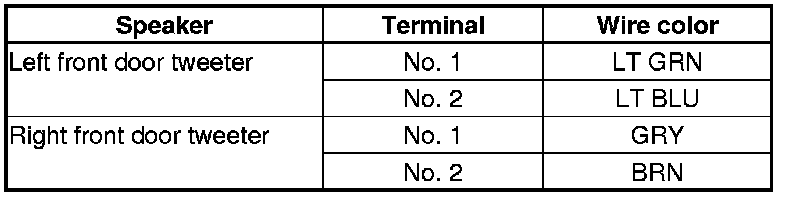
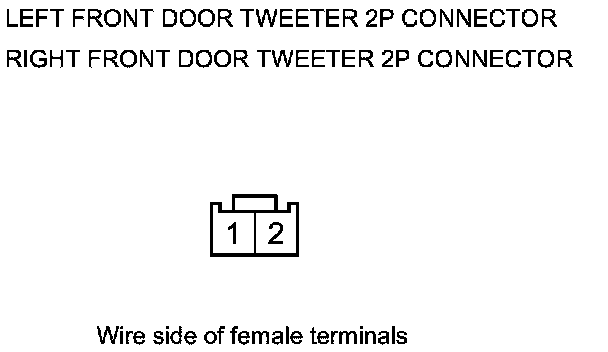
Is there continuity?
YES -
Go to step 26.
NO -
Repair an open in the wire between the stereo amplifier and tweeter speaker.�
26. Disconnect stereo amplifier connector B (28P).
27. Check for continuity between stereo amplifier connector B (28P) terminals and body ground as shown.
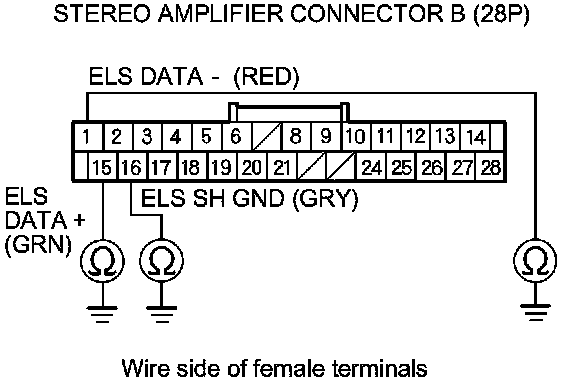
Is there continuity?
YES -
There is a short to ground in the wire(s) between stereo amplifier and audio unit. Replace the affected shielded harness.�
NO -
Go to step 28.
28. Check for continuity between the terminals of stereo amplifier connector B (28P) according to the table.

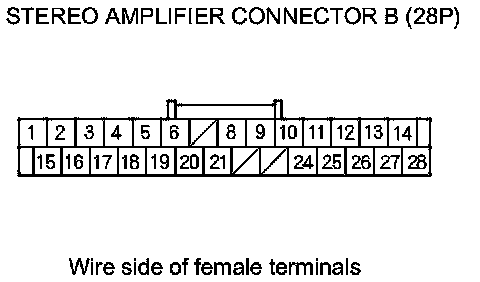
Is there continuity between any of the terminals?
YES -
There is a short in the wire(s) between the audio unit and the stereo amplifier. Replace the affected shielded harness.�
NO -
Go to step 29.
29. Disconnect audio connector D (32P).
30. Check for continuity between audio unit connector D (32P) and stereo amplifier connector B (28P) according to the table.
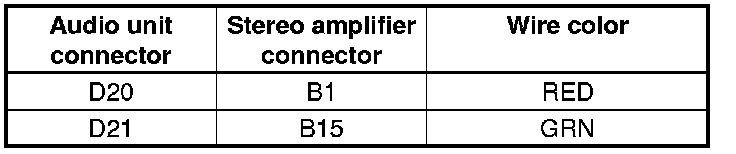
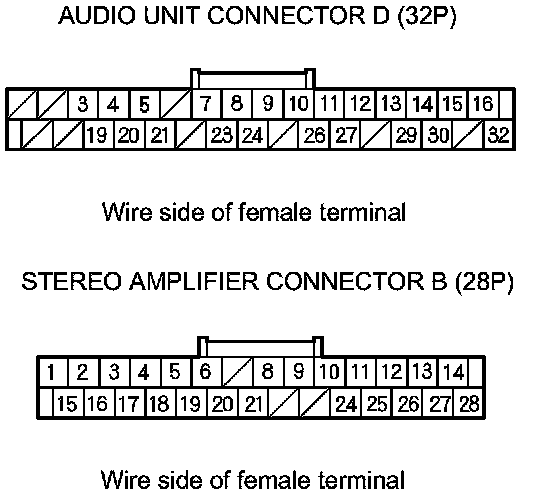
Is there continuity?
YES -
Go to step 31.
NO -
There is an open in the wire(s) between the audio unit and the stereo amplifier. Replace the affected shielded harness.�
31. Check for continuity between audio unit connector D (32P) and stereo amplifier connector B (28P) according to the table.
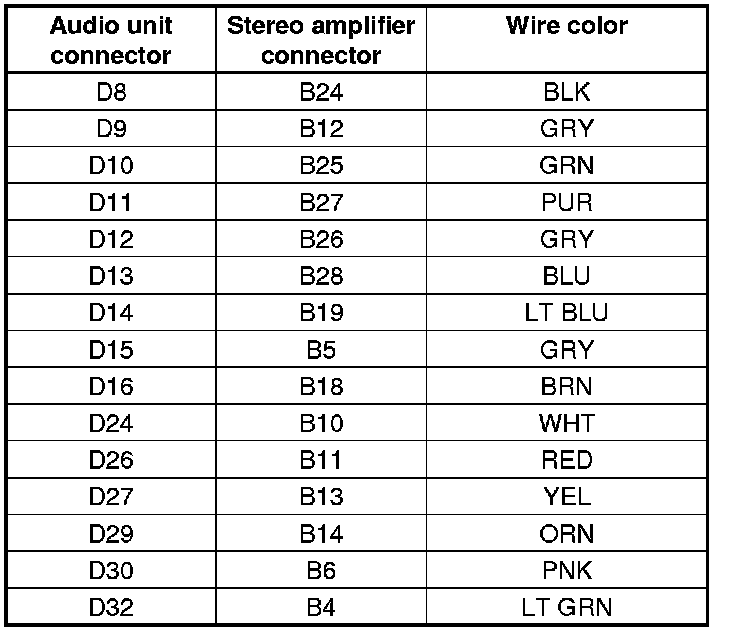
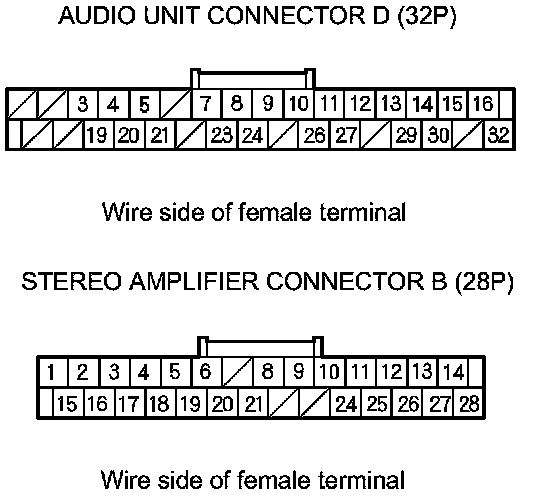
Is there continuity?
YES -
Go to step 32.
NO -
There is an open in the wire(s) between the audio unit and the stereo amplifier. Replace the affected shielded harness.�
32. Check for continuity between stereo amplifier connector B (28P) and body ground according to the table.
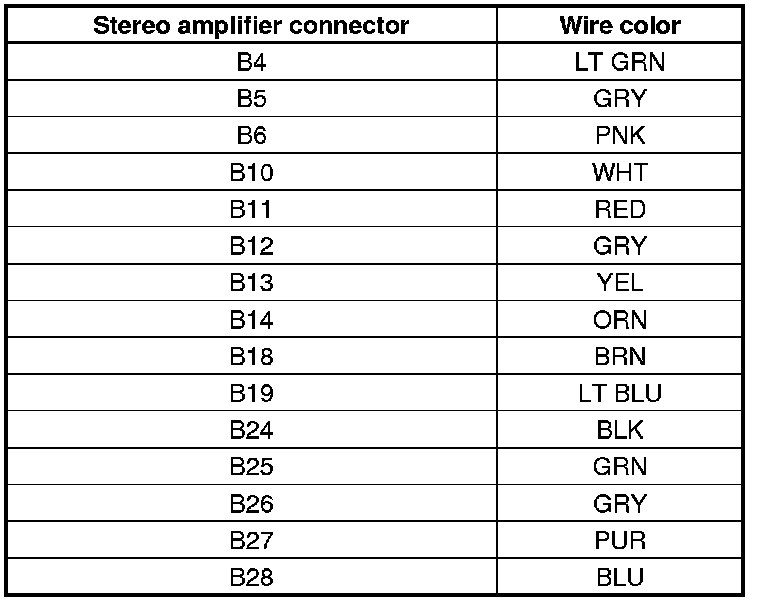
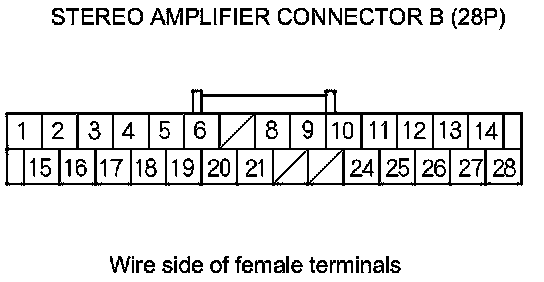
Is there continuity?
YES -
There is a short to body ground in the wire(s) between the audio unit and the stereo amplifier. Replace the affected shielded harness.�
NO -
Go to step 33.
33. Check for continuity between the terminals of stereo amplifier connector B (28P) according to the table.
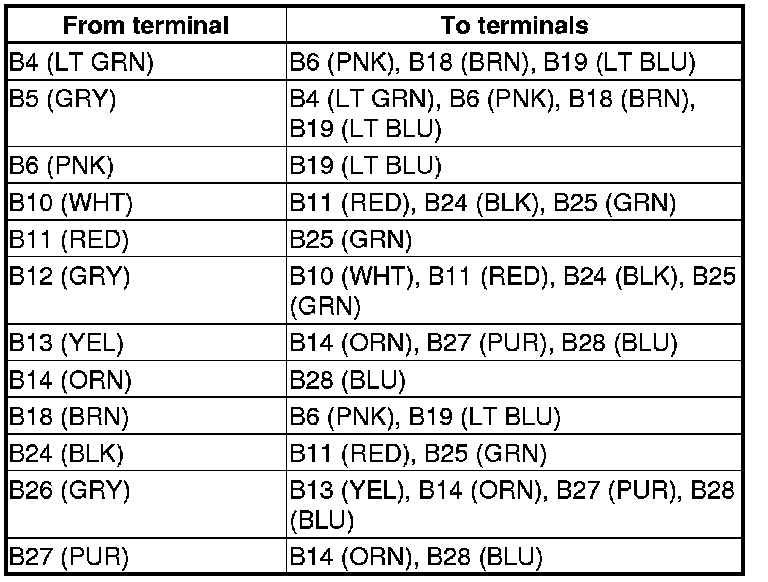
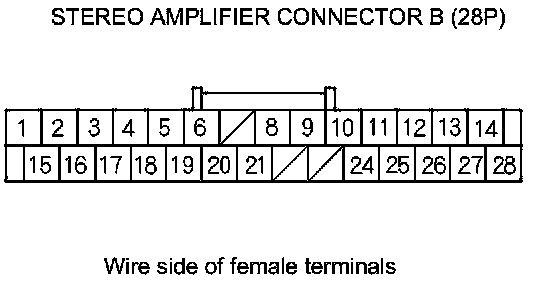
Is there continuity between any of the terminals?
YES -
There is a short in the wire(s) between the audio unit and the stereo amplifier. Replace the affected shielded harness.�
NO -
Substitute a known-good stereo amplifier Stereo Amplifier Removal/Installation (With Navigation System), and recheck. If the symptom goes away, replace the original stereo amplifier Stereo Amplifier Removal/Installation (With Navigation System). If the symptom/indication does not go away, replace the audio unit Audio Unit Removal/Installation (With Navigation System).�