Booming Sound While Driving With Audio Unit ON or OFF
Audio System Symptom Troubleshooting - Booming sound while driving with audio unit on or off
Booming sound while driving with audio unit on or off
NOTE:
- Check the vehicle battery condition first Battery Test.
- Check the connectors for poor connections or loose terminals.
1. Turn the ignition switch to ON (II), or press the engine start/stop button to select the ON mode.
2. Operate the audio unit, and the speakers function normally.
Is a booming sound or a low-frequency hum heard from speakers?
YES -
Go to step 3.
NO -
Go to No sound is heard from the speaker(s) troubleshooting:
- With navigation system With Navigation.�
- Without navigation system Without Navigation.�
3. Open the driver's door, with the booming sound present.
Is the booming sound still present?
YES -
Go to step 62.
NO -
Go to step 4.
4. Turn the VOLUME/POWER () knob to off.
5. Do the ANC/active sound control Self-Diagnostic Function Audio System Self-Diagnostic Function.
6. Press the No. 1 button.
Is the low-frequency hum sound heard?
YES -
Go to step 7.
NO -
Go to step 30.
7. Check that the low-frequency hum sound continues sounding for about 1 minute.
Does the low-frequency hum sound continue sounding for about 1 minute?
YES -
Go to step 53.
NO -
Go to step 8.
8. Turn the ignition switch to LOCK (0), or press the engine start/stop button to select the OFF mode.
9. Check the No. 15 (10 A) fuse in the under-hood fuse/relay box.
Is the fuse OK?
YES -
Go to step 10.
NO -
Replace the fuse, and recheck.�
10. Turn the ignition switch to ON (II), or press the engine start/stop button to select the ON mode.
11. Check for the hard error code How To Troubleshoot The Navigation System.
Is DTC 2707 Indicated?
YES -
Go to navigation system DTC 2707 troubleshooting 2707.�
NO -
Go to step 12.
12. Turn the ignition switch to LOCK (0), or press the engine start/stop button to select the OFF mode.
13. Connect a voltmeter between ANC/active sound control unit 16P connector terminals No. 3 and No. 11.
NOTE: Use the voltmeter in AC range.
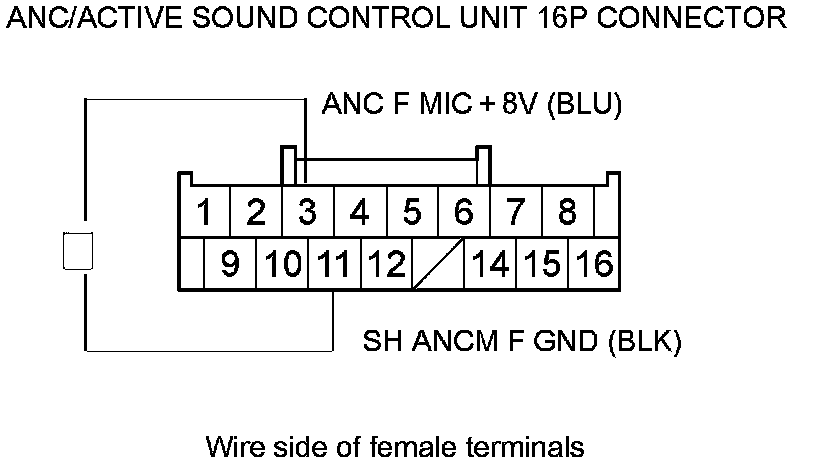
14. Turn the ignition switch to ACC (I), or press the engine start/stop button to select the ACC mode.
15. Make a loud noise in front of the front HFL-navigation-ANC/active sound control microphone.
Does the voltage change when making a loud noise in front of the microphone?
YES -
Replace the ANC/active sound control unit Service and Repair.�
NO -
Go to step 16.
16. Turn the ignition switch to LOCK (0), or press the engine start/stop button to select the OFF mode.
17. Disconnect the ANC/active sound control unit 16P connector and the front HFL-navigation-ANC/active sound control microphone 7P connector.
18. Check for continuity between ANC/active sound control unit 16P connector terminal No. 3 and the front HFL-navigation-ANC/active sound control microphone 7P connector terminal No. 4.
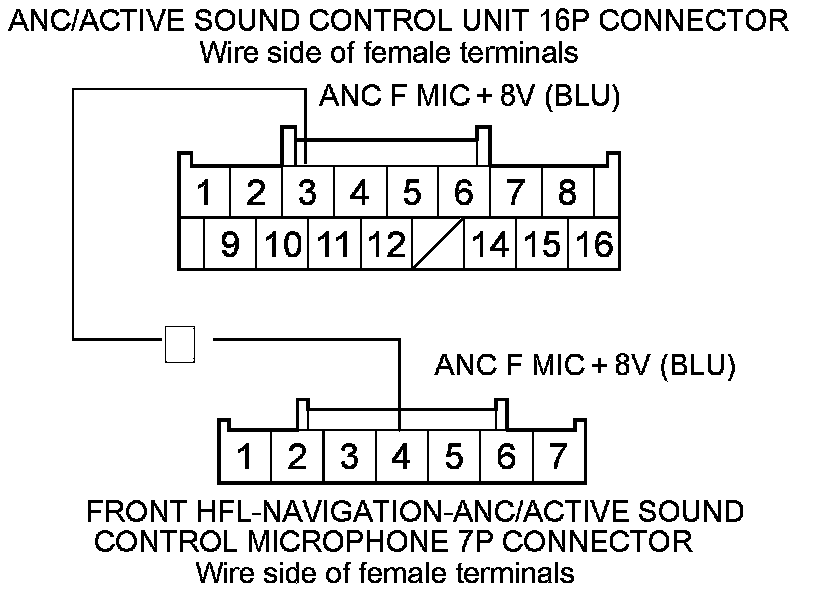
Is there continuity?
YES -
Go to step 19.
NO -
There is an open in the wire between ANC/ active sound control unit 16P connector and the front HFL-navigation-ANC/active sound control microphone 7P connector. Replace the affected shielded harness.�
19. Check for continuity between ANC/active sound control unit 16P connector terminal No. 3 and body ground.
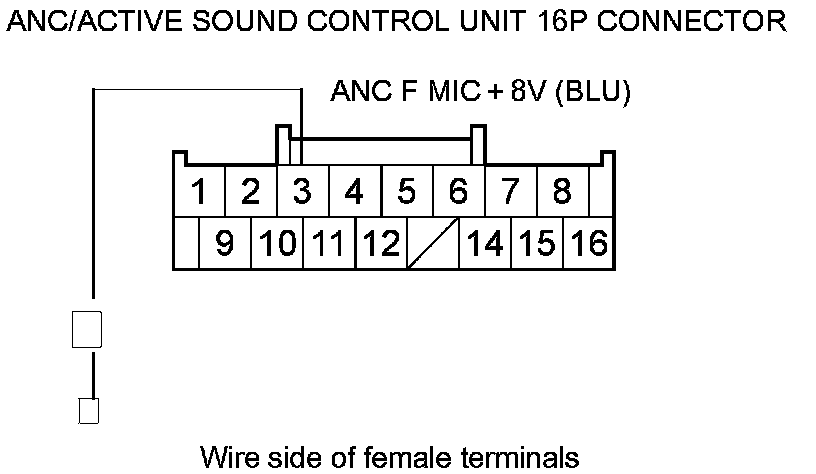
Is there continuity?
YES -
There is a short to body ground in the wire between the ANC/active sound control unit 16P connector and the front HFL-navigation-ANC/active sound control microphone 7P connector. Replace the affected shielded harness.�
NO -
Go to step 20.
20. Connect a voltmeter between ANC/active sound control unit 16P connector terminals No. 4 and No. 5.
NOTE: Use the voltmeter in AC range.
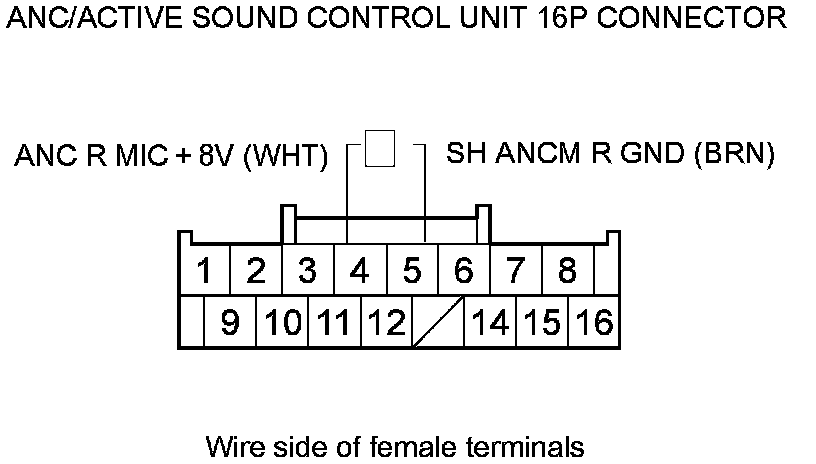
21. Turn the ignition switch to ACC (I), or press the engine start/stop button to select the ACC mode.
22. Make a loud noise in front of the rear ANC/active sound control microphone.
Does the voltage change when making a loud noise in front of the microphone?
YES -
Replace the ANC/active sound control unit Service and Repair.�
NO -
Go to step 23.
23. Turn the ignition switch to LOCK (0), or press the engine start/stop button to select the OFF mode.
24. Disconnect the ANC/active sound control unit 16P connector and the rear ANC/active sound control microphone 2P connector.
25. Connect rear ANC/active sound control microphone 2P connector terminals No. 1 and No. 2 with a jumper wire.
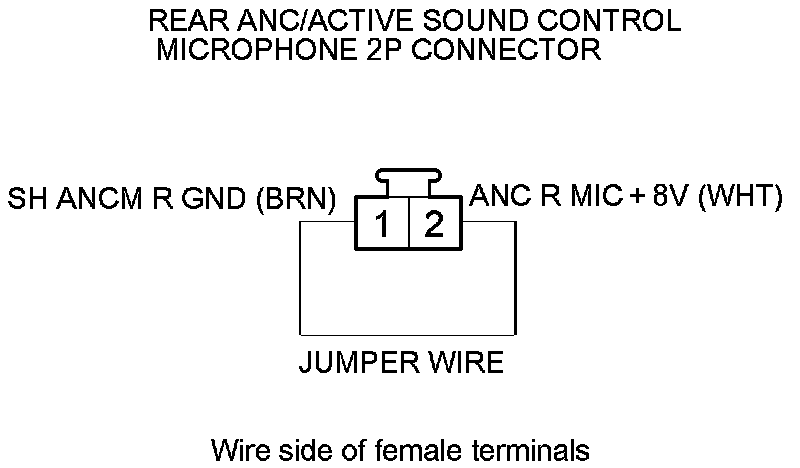
26. Check for continuity between ANC/active sound control unit 16P connector terminals No. 4 and No. 5.
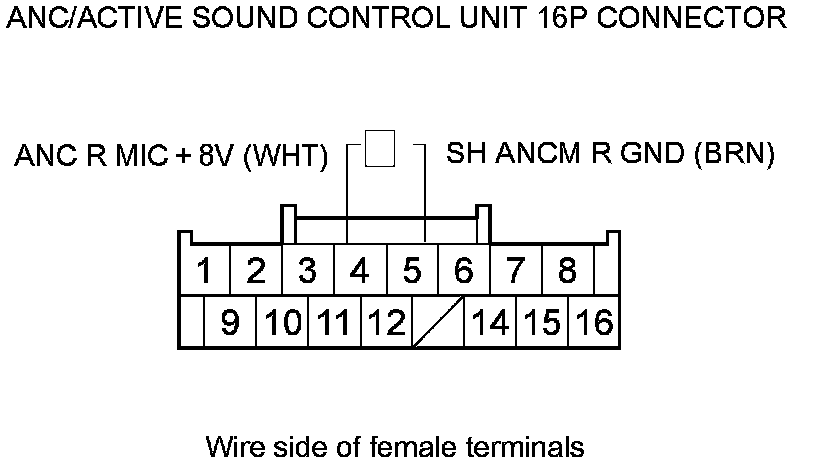
Is there continuity?
YES -
Go to step 27.
NO -
There is an open in the wire between the ANC/active sound control unit 16P connector and the rear ANC/active sound control microphone 2P connector. Replace the affected shielded harness.�
27. Remove the jumper wire.
28. Check for continuity between ANC/active sound control unit 16P connector terminals No. 4 and No. 5.
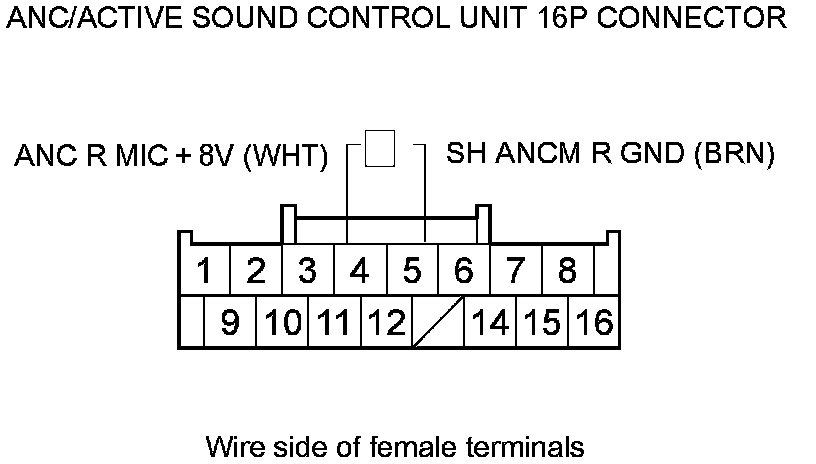
Is there continuity?
YES -
There is a short in the wire between the ANC/ active sound control unit 16P connector and the rear ANC/active sound control microphone 2P connector. Replace the affected shielded harness.�
NO -
Go to step 29.
29. Check for continuity between ANC/active sound control unit 16P connector terminal No. 4 and body ground.
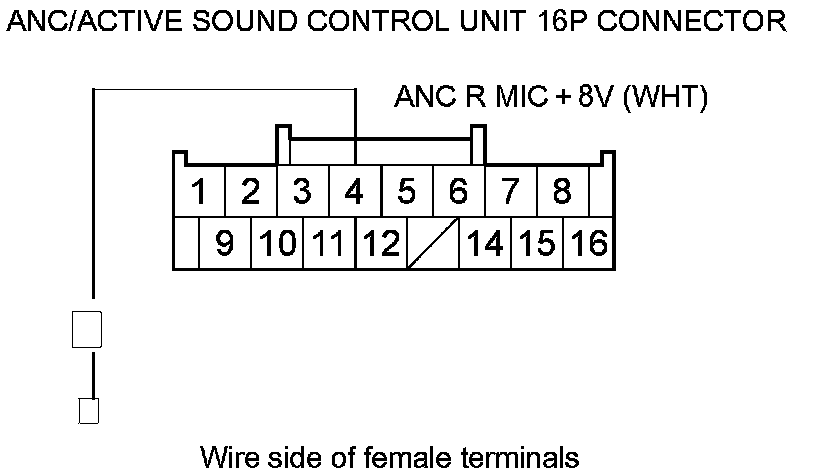
Is there continuity?
YES -
There is a short to body ground in the wire between the ANC/active sound control unit 16P connector and the rear ANC/active sound control microphone 2P connector. Replace the affected shielded harness.�
NO -
Replace the front HFL-navigation-ANC/active sound control microphone Front HFL-Navigation-ANC/Active Sound Control Microphone Removal/Installation and the rear ANC/active sound control microphone Service and Repair at once, and recheck. If the symptom/indication still present, replace the ANC/active sound control unit Service and Repair.�
30. Turn the ignition switch to LOCK (0), or press the engine start/stop button to select the OFF mode.
31. Check the No. 15 (10 A) fuse in the under-hood fuse/relay box.
Is the fuse OK?
YES -
Go to step 32.
NO -
Replace the fuse, and recheck.�
32. Measure the voltage between ANC/active sound control unit 16P connector terminal No. 8 and body ground.
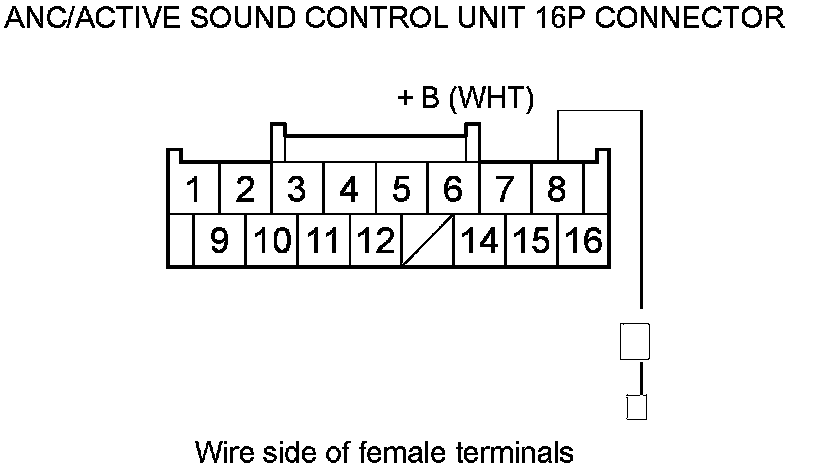
Is there battery voltage?
YES -
Go to step 33.
NO -
Repair an open in the wire between the No. 15 (10 A) fuse in the under-hood fuse/relay box and ANC/active sound control unit 16P connector terminal No. 8.�
33. Turn the ignition switch to ON (II), or press the engine start/stop button to select the ON mode.
34. Measure the voltage between ANC/active sound control unit 16P connector terminal No. 6 and body ground.
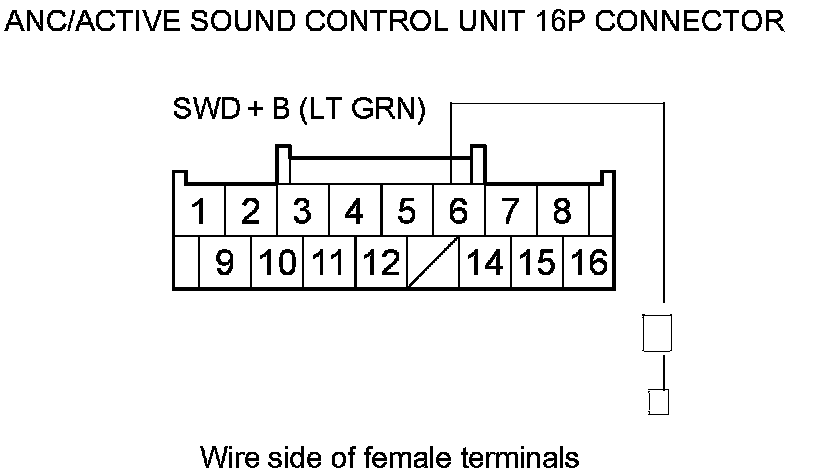
Is there battery voltage?
YES -
Go to step 35.
NO -
Repair an open in the wire between ANC/ active sound control unit 16P connector terminal No. 6 and audio-navigation unit connector A (24P) or audio unit connector A (24P) terminal No. 17. If the wire and pin fits are OK, substitute a known-good audio-navigation unit (including the HDD) Audio-Navigation Unit Removal/Installation or audio unit Audio Unit Removal/Installation, and recheck. If the symptom/indication goes away, replace the original audio-navigation unit Audio-Navigation Unit Removal/Installation or the audio unit Audio Unit Removal/Installation.�
35. Measure the voltage between ANC/active sound control unit 16P connector terminal No. 7 and body ground.
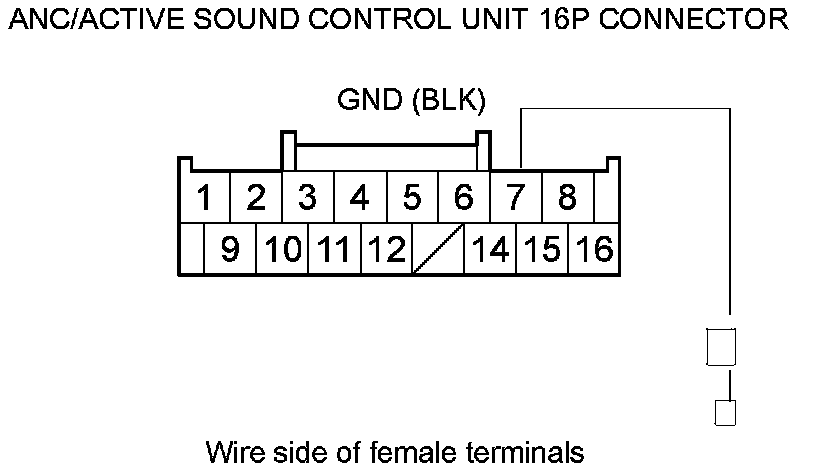
Is there less than 0.2 V?
YES -
Go to step 37.
NO -
Repair an open or high resistance in the wire between ANC/active sound control unit 16P connector terminal No. 7 and body ground (G501) Harness Locations.�
36. Turn the ignition switch to LOCK (0), or press the engine start/stop button to select the OFF mode.
37. Do the ANC/active sound control Self-Diagnostic Function Audio System Self-Diagnostic Function.
38. Press the No. 1 button.
39. Measure the voltage between ANC/active sound control unit 16P connector terminal No. 12 and body ground.
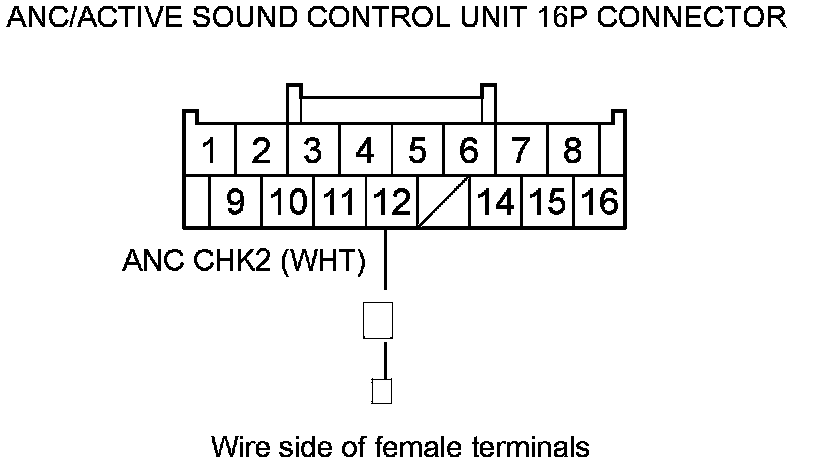
Is there about 5.0 V?
YES -
Go to step 45.
NO -
Go to step 40.
40. Turn the ignition switch to LOCK (0), or press the engine start/stop button to select the OFF mode.
41. Disconnect these items:
- ANC/active sound control unit 16P connector
- Audio-navigation unit connector H (28P) (with navigation system)
- Audio unit connector B (24P) (without navigation system)
42. Check for continuity between ANC/active sound control unit 16P connector terminal No. 12 and body ground.
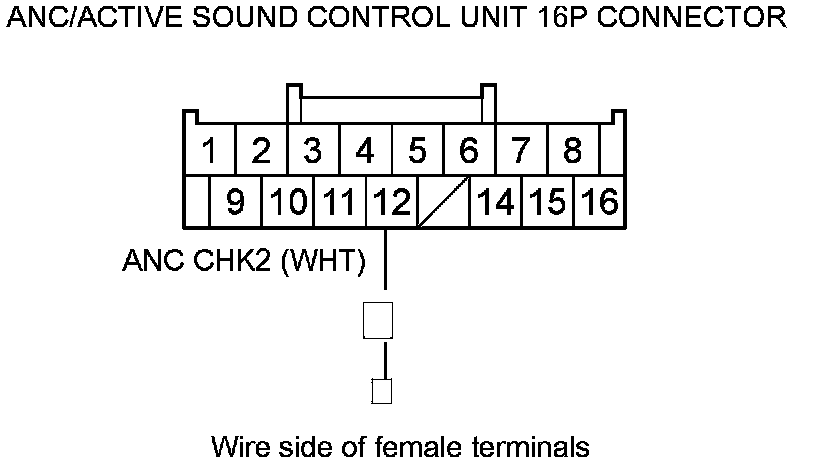
Is there continuity?
YES -
Repair a short to body ground in the wire between the ANC/active sound control unit and the audio unit.�
NO -
- With navigation system, go to step 43.
- Without navigation system go to step 44.
43. Check for continuity between ANC/active sound control unit 16P connector terminal No. 12 and audio-navigation unit connector H (28P) terminal No. 21.
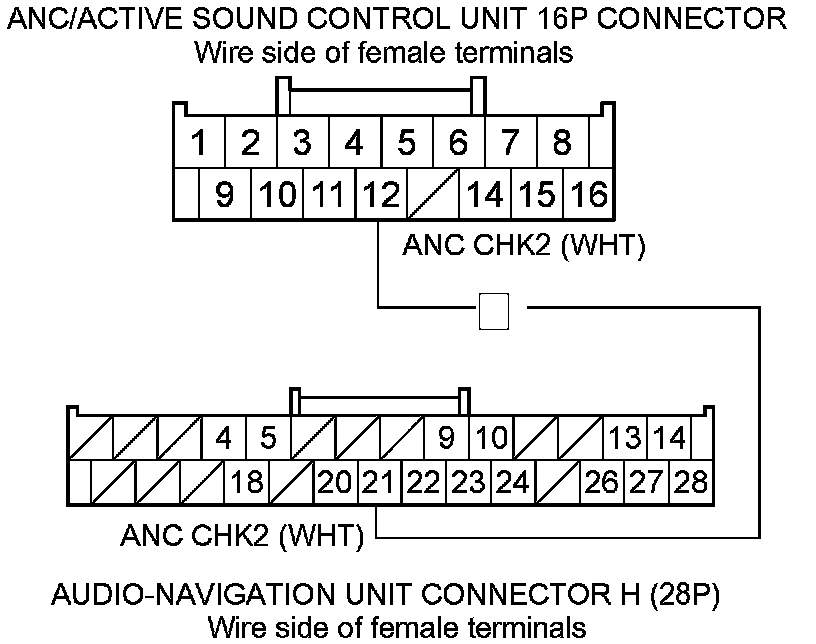
Is there continuity?
YES -
Replace the audio-navigation unit Audio-Navigation Unit Removal/Installation.�
NO -
Repair an open in the wire between the ANC/active sound control unit and the audio-navigation unit.�
44. Check for continuity between ANC/active sound control unit 16P connector terminal No. 12 and audio unit connector B (24P) terminal No. 7.
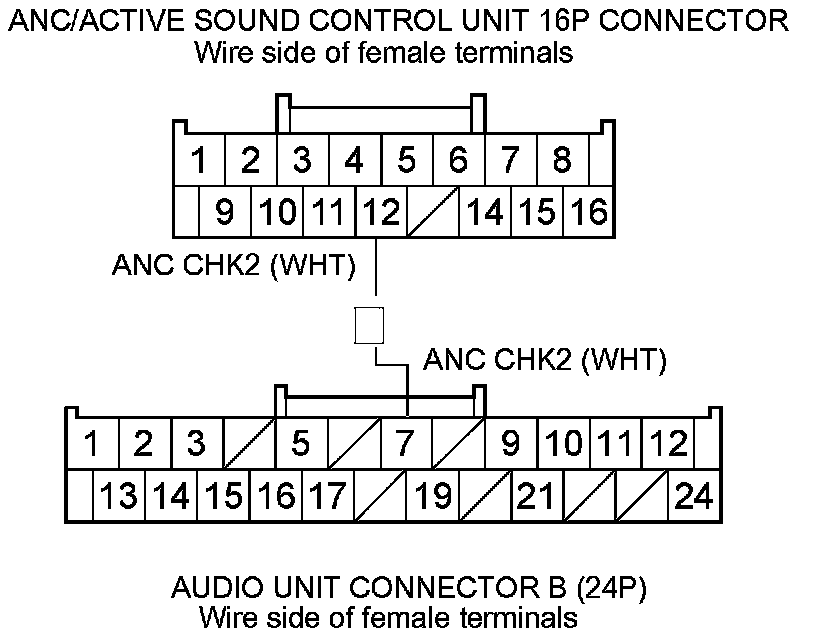
Is there continuity?
YES -
Replace the audio unit Audio Unit Removal/Installation.�
NO -
Repair an open in the wire between the ANC/active sound control unit and the audio unit.�
45. Do the ANC/active sound control Self-Diagnostic Function Audio System Self-Diagnostic Function.
46. Press the No. 1 button.
47. Measure the voltage between the ANC/active sound control unit 16P connector terminal No. 2 and body ground.
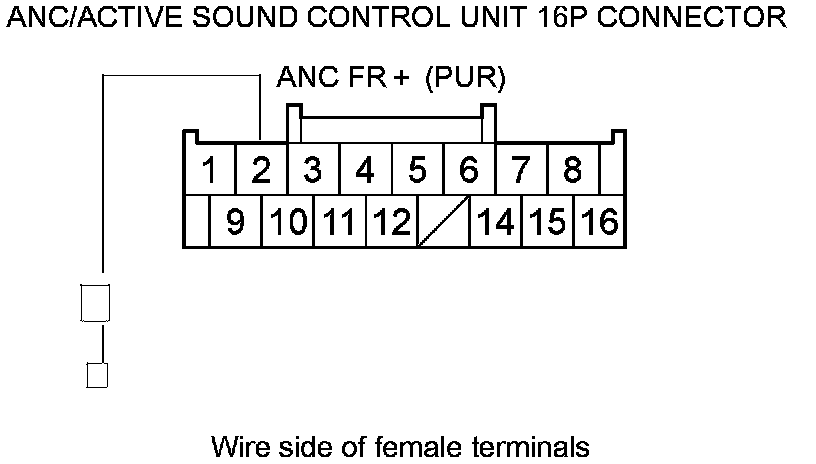
Is there about 2.5 V?
YES -
Replace the stereo amplifier Service and Repair.�
NO -
Go to step 48.
48. Turn the ignition switch to LOCK (0), or press the engine start/stop button to select the OFF mode.
49. Disconnect the ANC/active sound control unit 16P connector and stereo amplifier connector C (5P).
50. Check for continuity between body ground and ANC/active sound control unit 16P connector terminals according to the table.
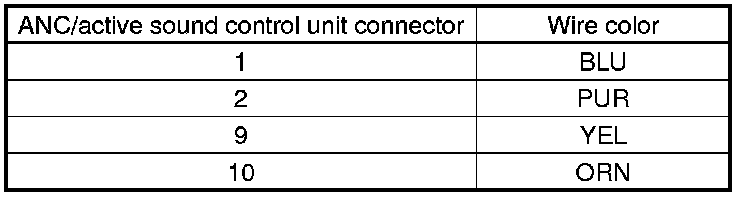
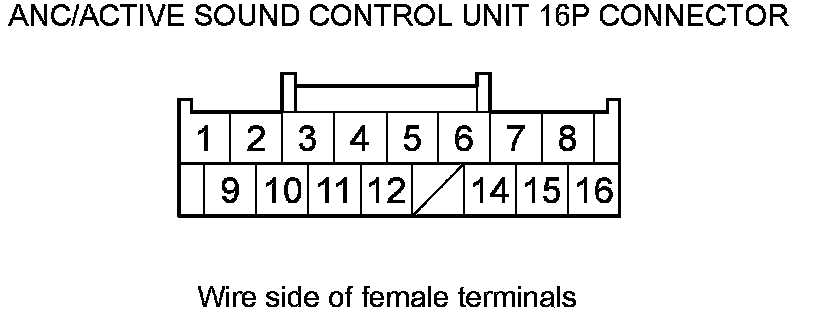
Is there continuity?
YES -
There is a short to body ground in the wire(s) between the ANC/active sound control unit and the stereo amplifier. Replace the affected shielded harness.�
NO -
Go to step 51.
51. Check for continuity between ANC/active sound control unit 16P connector terminals according to the table.
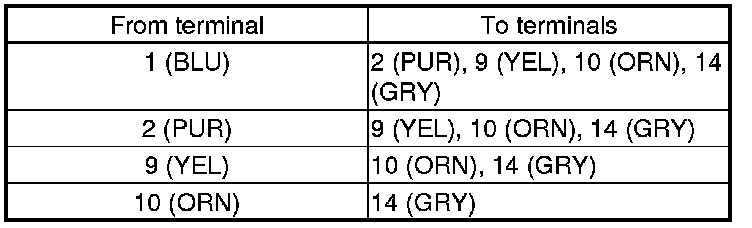
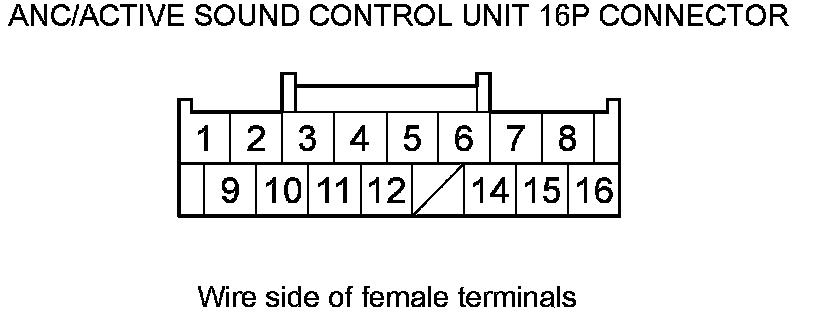
Is there continuity between any of the terminals?
YES -
There is a short in the wire(s) between the ANC/active sound control unit and the stereo amplifier. Replace the affected shielded harness.�
NO -
Go to step 52.
52. Check for continuity between the ANC/active sound control unit 16P connector terminals and stereo amplifier connector C (5P) terminals according to the table.
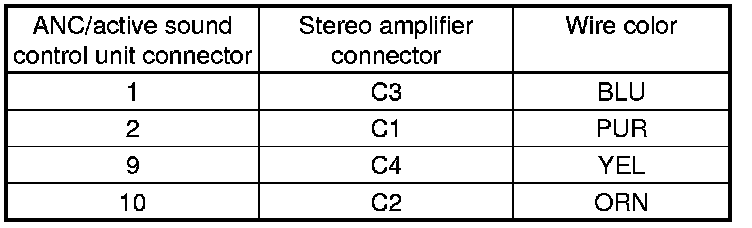
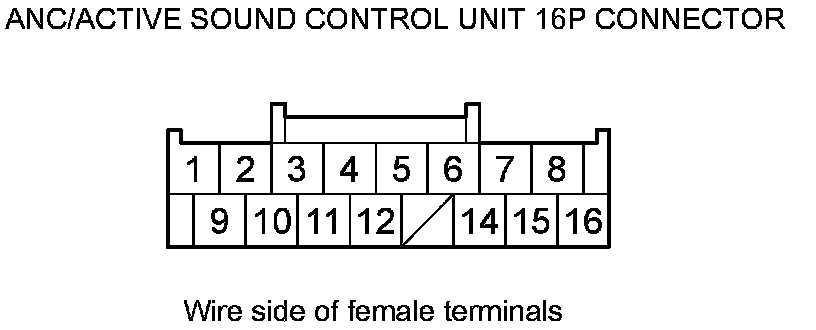
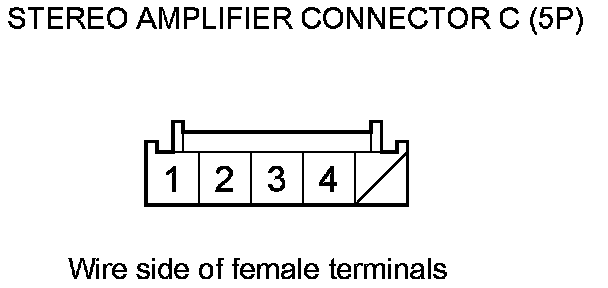
Is there continuity?
YES -
Replace the ANC/active sound control unit Service and Repair.�
NO -
There is an open in the wire(s) between the ANC/active sound control unit and the stereo amplifier. Replace the affected shielded harness.�
53. Start the engine, and let the vehicle idle.
54. Do the ANC/active sound control Self-Diagnostic Function Audio System Self-Diagnostic Function.
55. Press the No. 1 button.
Can you hear the low-frequency hum?
YES -
Go to step 56.
NO -
The system is OK.�
56. Turn the ignition switch to LOCK (0), or press the engine start/stop button to select the OFF mode.
57. Jump the SCS line with the HDS.
58. Disconnect the ANC/active sound control unit 16P connector and PCM connector A (49P).
59. Check for continuity between ANC/active sound control unit 16P connector terminal No. 15 and PCM connector A (49P) terminal No. 33.
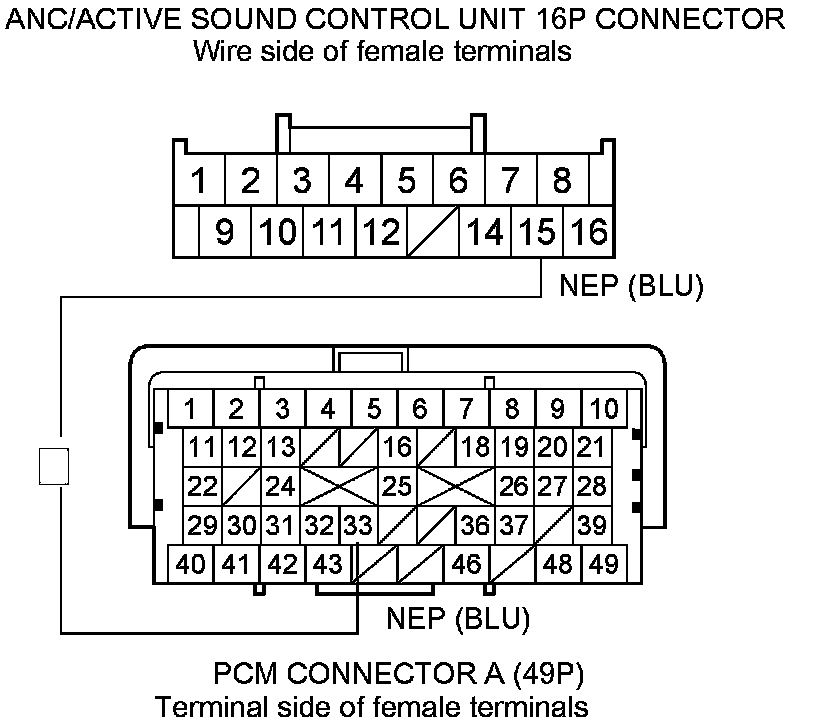
Is there continuity?
YES -
Go to step 60.
NO -
Repair an open in the wire between the ANC/ active sound control unit and the PCM.�
60. Disconnect the ECPS control unit 12P connector.
61. Check for continuity between ANC/active sound control unit 16P connector terminal No. 15 and body ground.
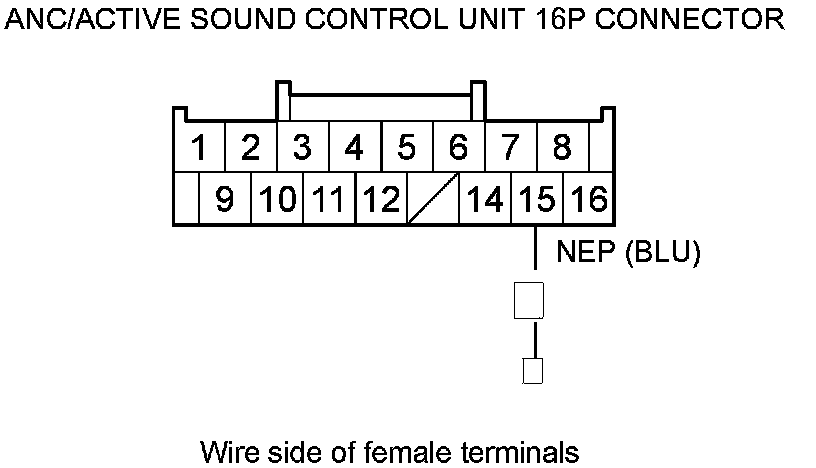
Is there continuity?
YES -
Repair a short in the wire between the ANC/active sound control unit and the PCM.�
NO -
Substitute a known-good ANC/active sound control unit Service and Repair, and recheck. If the symptom/indication goes away, replace the original ANC/active sound control unit Service and Repair. If symptom is still present, update the PCM PCM Update if it does not have the latest software or substitute a known-good PCM Initial Inspection and Diagnostic Overview.�
62. Measure the voltage between ANC/active sound control unit 16P connector terminal No. 16 and body ground while the door is opening.
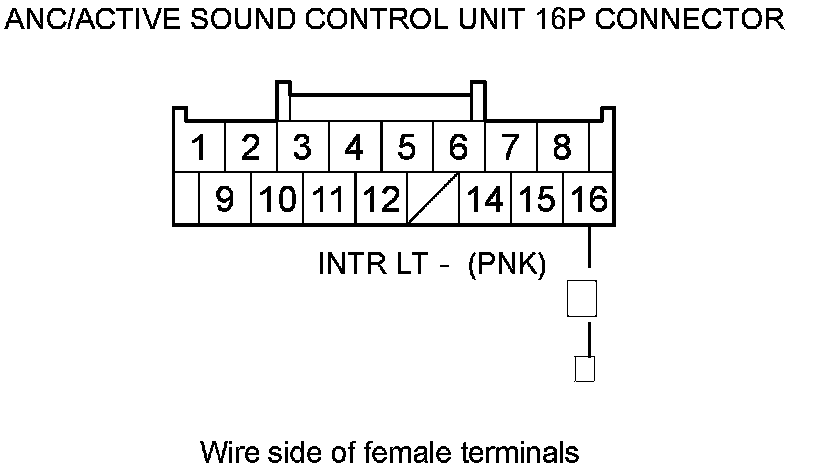
Is there about 5.0 V?
YES -
Replace the ANC/active sound control unit Service and Repair.�
NO -
Repair an open in the wire between the ANC/active sound control unit and driver's under-dash fuse/relay box connector P (20P) terminal No. 4.�