Booming Sound While Driving With Audio Unit On or Off
Symptom Troubleshooting: Booming sound while driving with audio unit on or off
Booming sound while driving with audio unit on or off
NOTE:
- Check the vehicle battery condition first. Testing and Inspection
- Check the connectors for poor connections or loose terminals.
1. Turn the ignition switch to ON (II).
2. Operate the audio unit, and check the function of the speakers.
Is a booming sound heard from the speakers?
YES - Go to step 3.
NO - Go to no sound is heard from speaker(s). No Sound Is Heard From the Speaker(s) (Display Is Normal)
3. Open the driver's door, with the booming sound present.
Is the booming sound still present?
YES - Do the electrical noise test. Sound Quality Diagnosis - Electrical Noise Test
NO - Go to step 4.
4. Turn the audio power switch to off.
5. Do the active noise cancellation (ANC) self-diagnostic function. How to Troubleshoot the Audio System
6. Press the No. 1 button.
Is the low-frequency hum sound heard?
YES - Go to step 7.
NO - Go to step 25.
7. Check that the low-frequency hum sound continues sounding for about 1 minute.
Does the low-frequency hum sound continue sounding for about 1 minute?
YES - Go to step 44.
NO - Go to step 8.
8. Check the No. 5 (7.5 A) fuse in the driver's under-dash fuse/relay box.
Is the fuse OK?
YES - Go to step 9.
NO - Replace the fuse, and recheck.
9. Measure the voltage between active noise cancellation front and rear microphone connector B (3P) terminal No. 3 and body ground.
Is there battery voltage?
YES - Go to step 10.
NO - Repair an open in the wire between the No. 32 (10 A) fuse in the driver's under-dash fuse/relay box and active noise cancellation front or rear microphone connector B (3P).
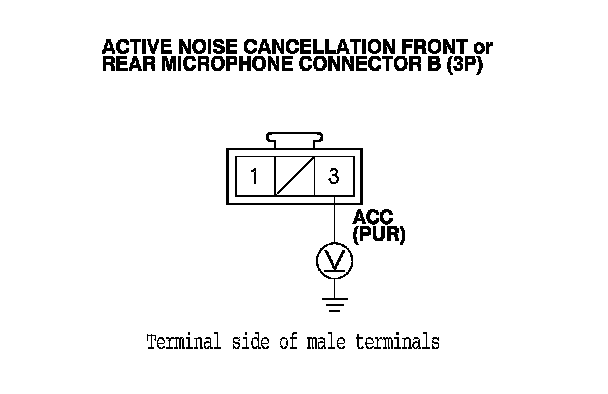
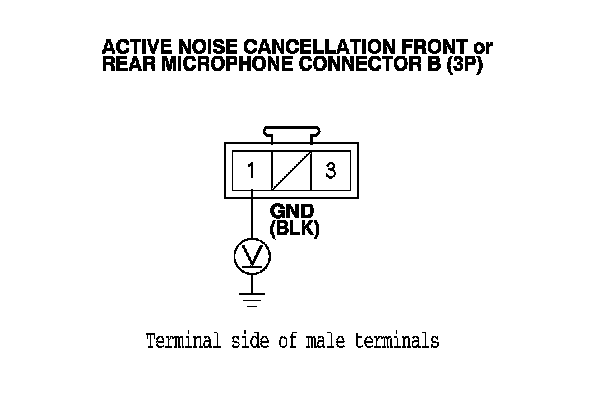
10. Measure the voltage between active noise cancellation front and rear microphone connector B (3P) terminal No. 1 and body ground.
Is there less than 0.2 V?
YES - Go to step 11.
NO - Repair an open in the wire between active noise cancellation front or rear microphone connector B (3P) terminal No 1 and body ground (G652). Right Side Wire Harness (Rear Branch) Connector And Harness Locations
11. Turn the ignition switch to LOCK (0).
12. Disconnect active noise control front microphone connector A (2P) and active noise cancellation rear microphone connector A (2P), active noise control unit 16P connector, and stereo amplifier connector C (23P).
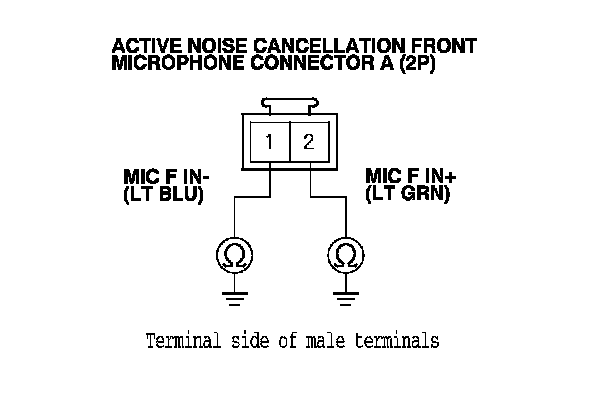
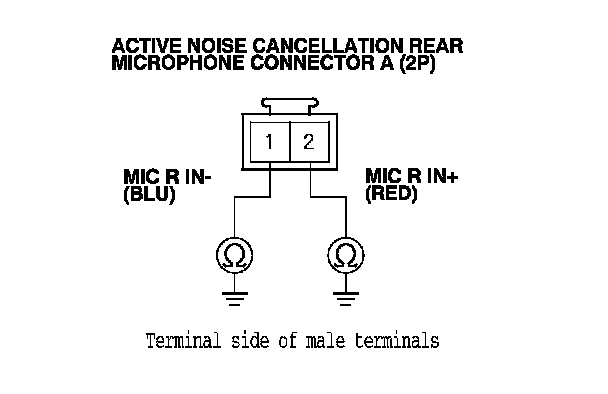
13. Check for continuity between body ground and active noise cancellation front and rear microphone connector A (2P) terminals No. 1 and No. 2 individually.
Is there continuity?
YES - Repair a short in the wire between body ground and active noise cancellation front or rear microphone connector A (2P) terminals No. 1 and No. 2.
NO - Go to step 14.
FRONT
REAR
14. Reconnect the active noise cancellation front and rear microphone control unit, and the stereo amplifier connectors.
15. Turn the ignition switch to ON (II).
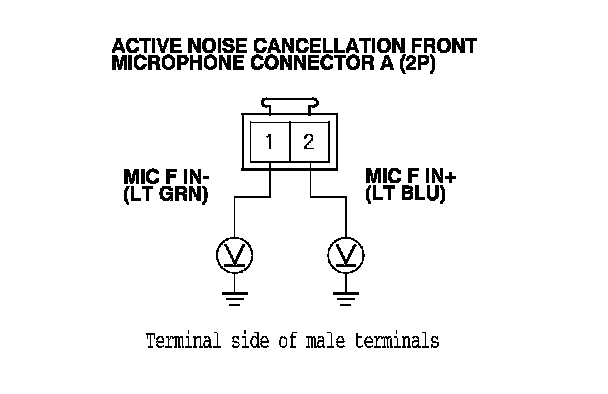
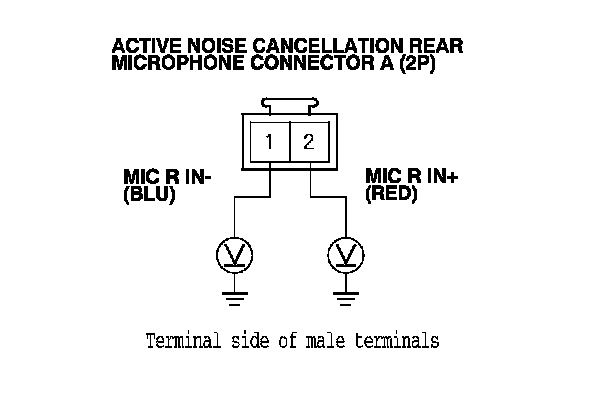
16. Measure the voltage between body ground and active noise cancellation front or rear microphone connector A (2P) terminals No. 1 and No. 2 individually while lightly tapping the microphones.
Does the voltage fluctuate when you tap the microphones?
YES - Go to step 17.
NO - Replace the active noise cancellation front or rear microphone.
FRONT
REAR
17. Turn the ignition switch to LOCK (0).
18. Disconnect the active noise cancellation unit 16P connector.
19. Disconnect active noise cancellation front microphone connector A (2P).
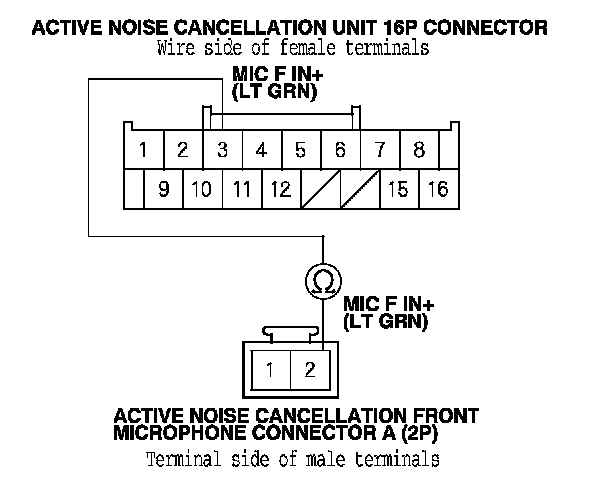
20. Check for continuity between active noise cancellation unit 16P connector terminal No. 3 and active noise cancellation front microphone connector A (2P) terminal No. 2.
Is there continuity?
YES - Go to step 21.
NO - Repair an open in the wire between active noise control unit 16P connector terminal No. 3 and active noise cancellation front microphone connector A (2P) terminal No. 2.
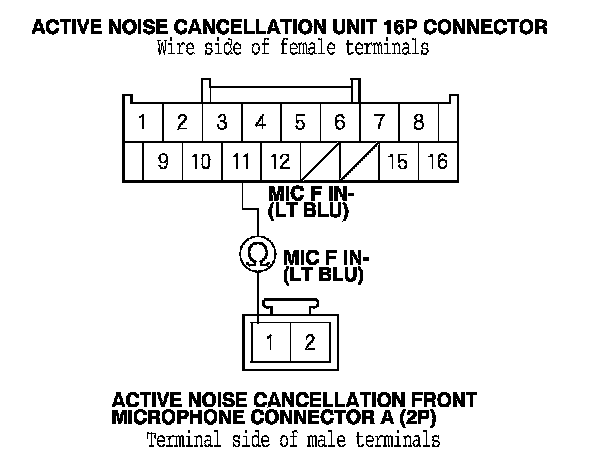
21. Check for continuity between active noise cancellation unit 16P connector terminal No. 11 and active noise cancellation front microphone connector A (2P) terminal No. 1.
Is there continuity?
YES - Go to step 22.
NO - Repair an open in the wire between active noise cancellation unit 16P connector terminal No. 11 and active noise cancellation front microphone connector A (2P) terminal No. 1.
22. Disconnect active noise cancellation rear microphone connector A (2P) and stereo amplifier connector C (23P).
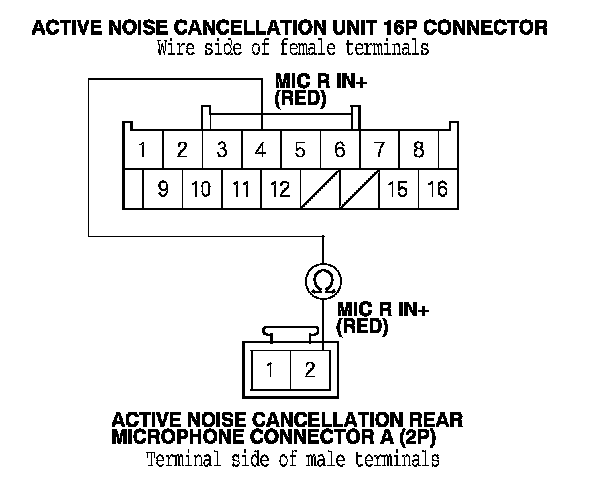
23. Check for continuity between active noise cancellation unit 16P connector terminal No. 4 and active noise cancellation rear microphone connector A (2P) terminal No. 2.
Is there continuity?
YES - Go to step 24.
NO - Repair an open in the wire between active noise cancellation unit 16P connector terminal No. 4 and active noise cancellation front microphone connector A (2P) terminal No. 2.
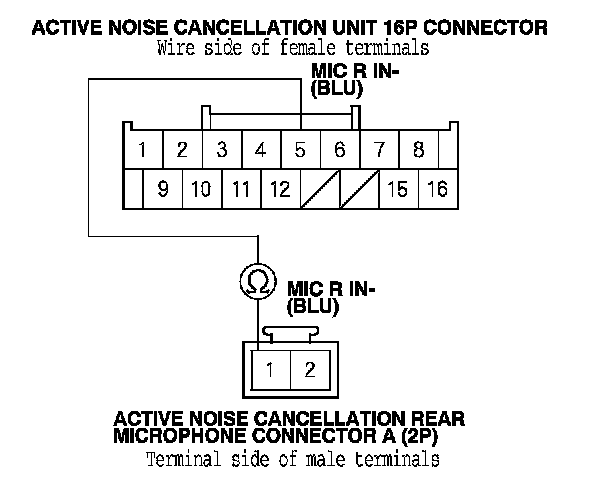
24. Check for continuity between active noise cancellation unit 16P connector terminal No. 5 and active noise cancellation rear microphone connector A (2P) terminal No. 1.
Is there continuity?
YES - Replace the active noise cancellation unit. Service and Repair
NO - Repair an open in the wire between active noise cancellation unit 16P connector terminal No. 5 and active noise cancellation rear microphone connector A (2P) terminal No. 1.
25. Check the No. 5 (7.5 A) fuse in the driver's under-dash fuse/relay box.
Is the fuse OK?
YES - Go to step 26.
NO - Replace the fuse, and recheck.
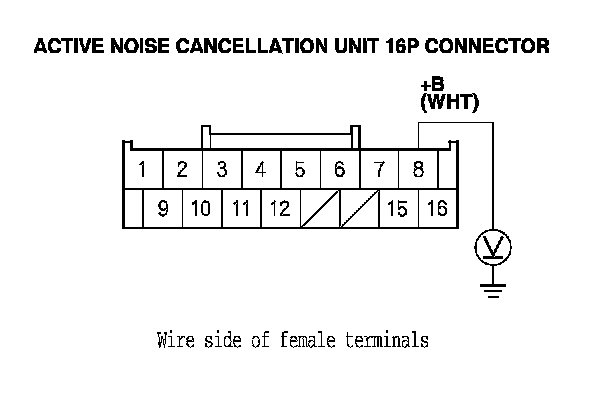
26. Measure the voltage between active noise cancellation unit 16P connector terminal No. 8 and body ground.
Is there battery voltage?
YES - Go to step 27.
NO - Repair an open in the wire between the No. 5 (7.5 A) fuse in the driver's under-dash fuse/relay box and active noise cancellation unit 16P connector terminal No. 8.
27. Measure the voltage between active noise cancellation unit 16P connector terminal No. 7 and body ground.
Is there less than 0.2 V?
YES - Go to step 28.
NO - Repair an open in the wire between active noise cancellation unit 16P connector terminal No 7 and body ground (G652). Right Side Wire Harness (Rear Branch) Connector And Harness Locations
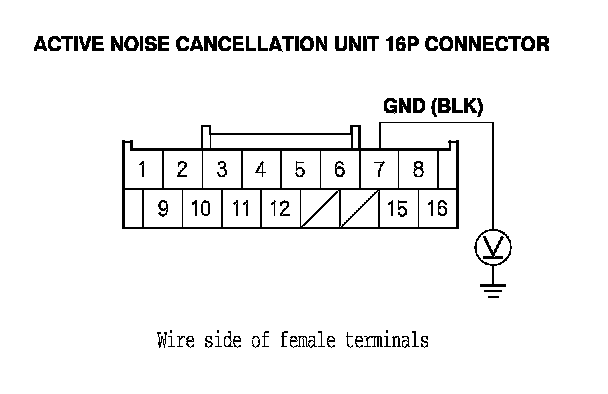
28. Do the active noise cancellation (ANC) self-diagnostic function. How to Troubleshoot the Audio System
29. Press the No. 1 button.
30. Disconnect the active noise cancellation unit 16P connector.
31. Measure the voltage between active noise cancellation unit 16P connector terminal No. 12 and body ground.
Is there about 5 V?
YES - Go to step 36.
NO - Go to step 32.
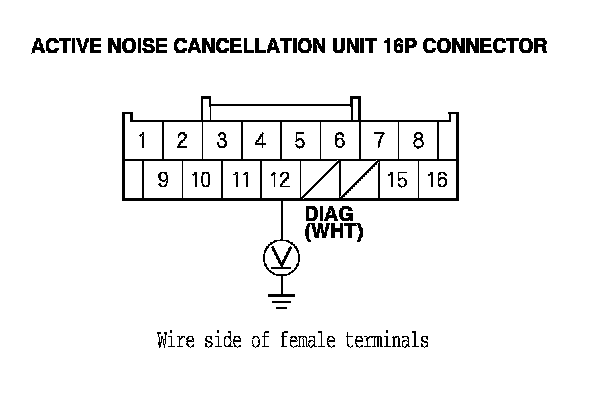
32. Turn the ignition switch to LOCK (0).
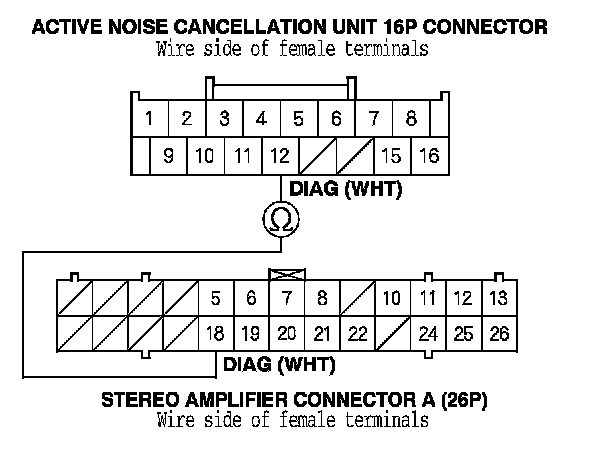
33. Disconnect stereo amplifier connector A (26P).
34. Check for continuity between active noise cancellation unit 16P connector terminal No. 12 and stereo amplifier connector A (26P) terminal No. 18.
Is there continuity?
YES - Go to step 35.
NO - Repair an open in the wire between active noise cancellation unit 16P connector terminal No. 12 and stereo amplifier connector A (26P) terminal No. 18.
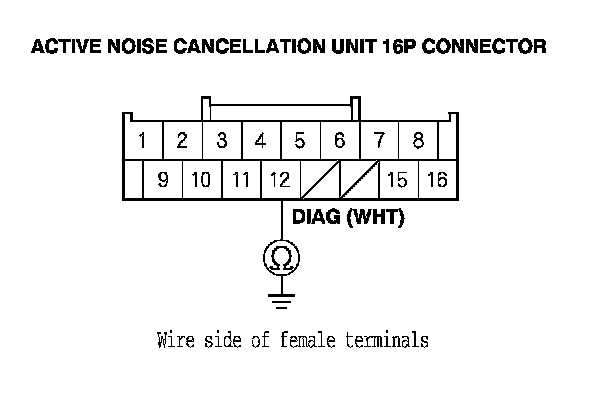
35. Check for continuity between body ground and active noise cancellation unit 16P connector terminal No. 12.
Is there continuity?
YES - Repair a short in the wire between active noise cancellation unit 16P connector terminal No. 12 and stereo amplifier connector A (26P) terminal No. 18.
NO - Replace the stereo amplifier. Service and Repair
36. Reconnect the active noise cancellation unit (16P) connector.
37. Do the active noise cancellation (ANC) self-diagnostic function. How to Troubleshoot the Audio System
38. Press and release the No. 1 button.
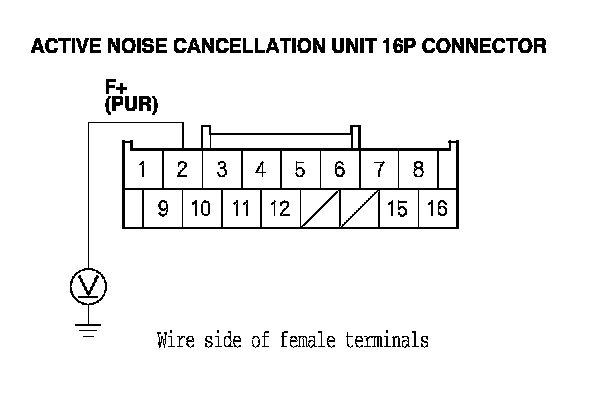
39. Measure the voltage between active noise cancellation unit 16P connector terminal No. 2 and body ground.
Is there about 2.5 V?
YES - Replace the stereo amplifier. Service and Repair
NO - Go to step 40.
40. Turn the ignition switch to LOCK (0).
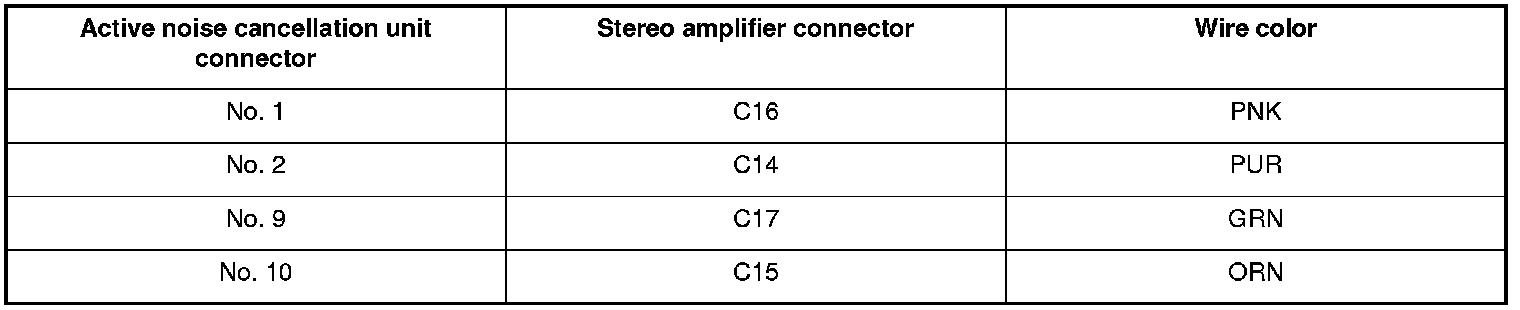
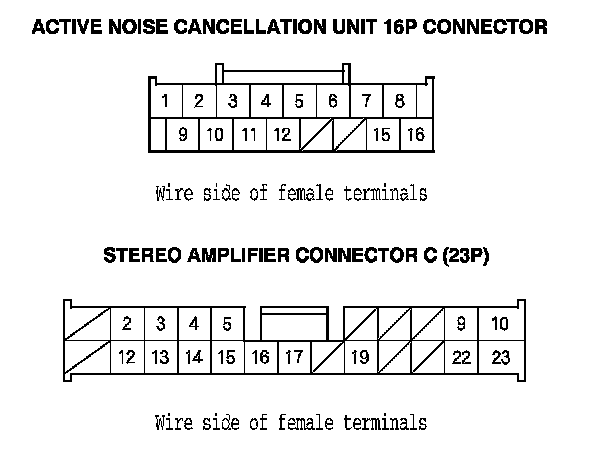
41. Disconnect the active noise cancellation unit 16P connector and stereo amplifier connector C (23P).
42. Check for continuity between the active noise cancellation unit 16P connector and stereo amplifier connector C (23P) according to the table.
Is there continuity?
YES - Go to step 43.
NO - Repair an open in the wire(s) between the active noise cancellation unit 16P connector and stereo amplifier connector C (14P).
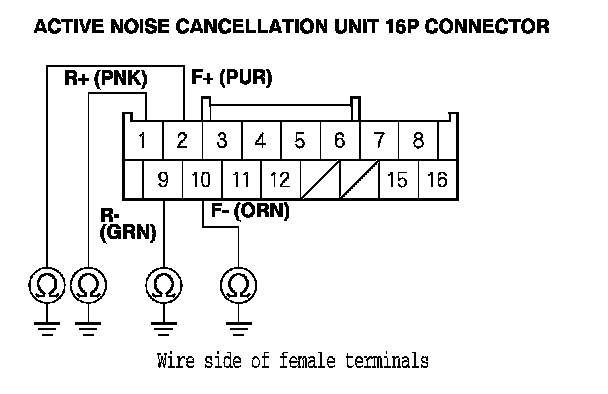
43. Check for continuity between body ground and active noise cancellation unit 16P connector terminals No. 1, 2, 9, and 10 individually.
Is there continuity?
YES - Repair a short in the wire(s) between the active noise cancellation unit 16P connector and stereo amplifier connector C (14P).
NO - Replace the active noise cancellation unit. Service and Repair
44. Start the engine, and let the vehicle idle.
45. Do the active noise cancellation (ANC) self-diagnostic function. How to Troubleshoot the Audio System
46. Press the No. 1 button.
Can you hear the low-frequency hum?
YES - Go to step 47.
NO - The system is OK.
47. Turn the ignition switch to LOCK (0).
48. Disconnect the active noise cancellation unit 16P connector and PCM connector A (31P).
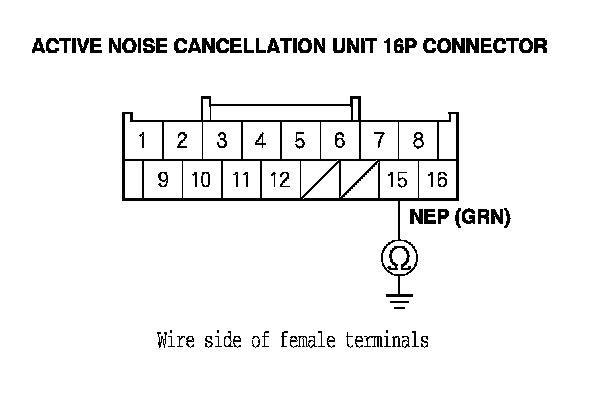
49. Check for continuity between active noise cancellation unit 16P connector terminal No. 15 and PCM connector A (31P) terminal No. 23.
Is there continuity?
YES - Go to step 50.
NO - Repair an open in the wire between active noise cancellation unit 16P connector terminal No. 15 and PCM connector A (31P) terminal No. 23.
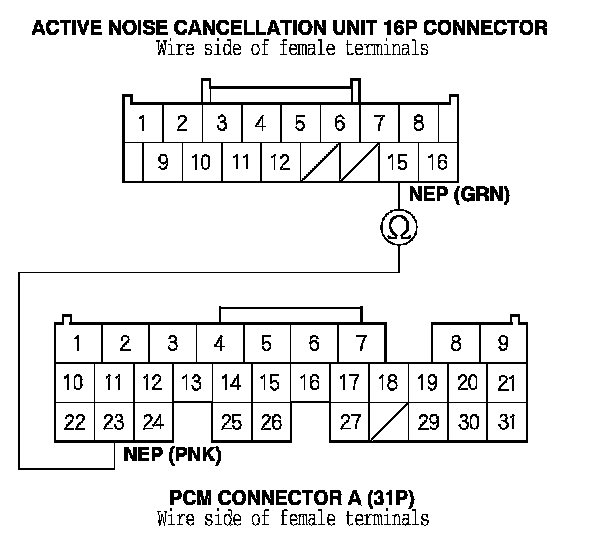
50. Check for continuity between active noise cancellation unit 16P connector terminal No. 15 and body ground.
Is there continuity?
YES - Repair a short in the wire between body ground and active noise cancellation unit 16P connector terminal No. 15 and PCM connector A (31P) terminal No. 23.
NO - Replace the PCM.