Stabilizer Link Removal/Installation
- Raise the rear of the vehicle, and support it with safety stands in the proper locations (see
LIFT AND SUPPORT POINTS
)
- Remove the rear wheel
- Remove the flange nut (A) and the self-locking nut (B) while holding the respective joint pin (C) with a hex wrench (D), then remove the stabilizer link (E)
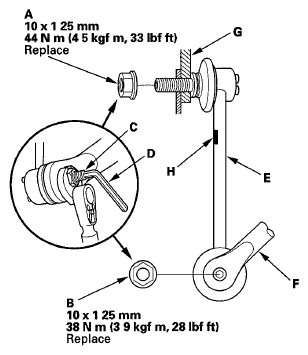 Courtesy of AMERICAN HONDA MOTOR CO., INC.
- Install the stabilizer link on the stabilizer bar (F) and the knuckle adding in the brake hose bracket (G) with the joint pins set at the center of their range of movement
NOTE:
- The stabilizer link has a paint mark (H) The paint mark indicates the difference between the left and right stabilizer links
- Install the end of the stabilizer link with the paint mark in the upper position
- Install the new self-locking nuts, and tighten them to the specified torque values while holding the respective joint pin with a hex wrench
- Clean the mating surfaces of the brake disc and the inside of the wheel, then install the rear wheel.
- Test-drive the vehicle
- After 5 minutes of driving, tighten the self-locking nuts again to the specified torque values