- Remove the hub bearing unit
- Remove the splash guard (A)
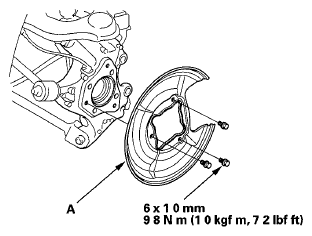 Courtesy of AMERICAN HONDA MOTOR CO., INC.
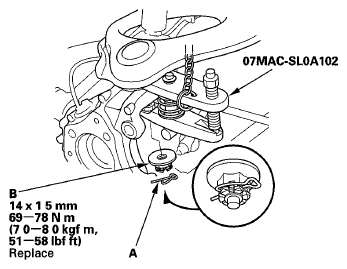
- Remove the lock pin (A) from the upper arm ball joint, then remove the castle nut (B)
NOTE:
During installation, install the lock pin as shown after tightening the new castle nut
 Courtesy of AMERICAN HONDA MOTOR CO., INC.
- Disconnect the upper arm ball joint from the knuckle using the ball joint remover (see
BALL JOINT REMOVAL
)
NOTE:
- Be careful not to damage the ball joint boot when installing the remover
- During installation, to connect the ball joint, raise up the suspension with a jack (see step 9 on
UPPER ARM REPLACEMENT )
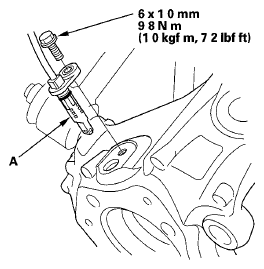
- Remove the wheel speed sensor (A) from the knuckle Do not disconnect the wheel speed sensor connector
 Courtesy of AMERICAN HONDA MOTOR CO., INC.
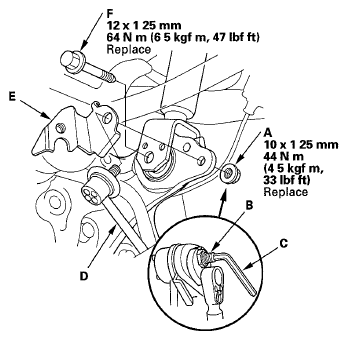
- Remove the self-locking nut (A) while holding the joint pin (B) with a hex wrench (C), then disconnect the stabilizer link (D) from the knuckle, and remove the brake hose bracket (E)
NOTE:
Use a new self-locking nut during reassembly
 Courtesy of AMERICAN HONDA MOTOR CO., INC.
- Remove the damper lower mounting bolt (F)
NOTE:
Use the new mounting bolt during reassembly
- Remove the control arm mounting self-locking nut (A) and the washer (B)
NOTE:
Use a new self-locking nut during reassembly
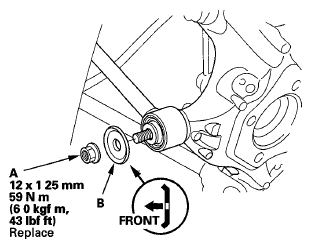 Courtesy of AMERICAN HONDA MOTOR CO., INC.
- Remove the lower arm A mounting bolt (A), and the lower arm B mounting bolt (B), then remove the knuckle (C).
NOTE:
Use new mounting bolts during reassembly C
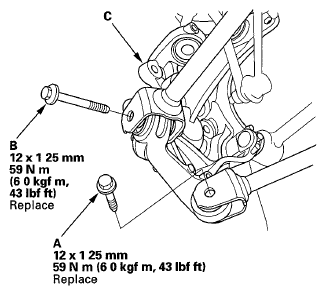 Courtesy of AMERICAN HONDA MOTOR CO., INC.
- Install the knuckle in the reverse order of removal, and note these items
- First install all of the components, and lightly tighten the bolts and the nuts, then raise the suspension to load it with the vehicle's weight before fully tightening to the specified torque values
- Be careful not to damage the ball joint boot when connecting the knuckle
- Before connecting the ball joint, degrease the threaded section and the tapered portion of the ball joint pin, the ball joint connecting hole, and the threaded section and the mating surfaces of the castle nut.
- Torque the castle nut to the lower torque specification, then tighten it only far enough to align the slot with the ball joint pin hole. Do not align the castle nut by loosening it
- Before installing the wheel, clean the mating surfaces on the brake disc and the inside of the wheel
- Check the wheel alignment, and adjust it if necessary (see
WHEEL ALIGNMENT
)