Damper/Spring Removal and Installation: Installation
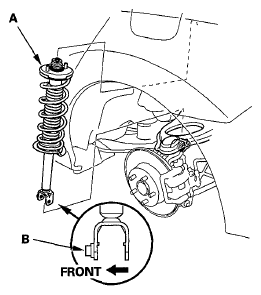
- Lower the rear suspension, and position the damper/spring (A) in the body with the welded nut (B) on the bottom of the damper facing forward
NOTE:
- Be careful not to damage the body
- Make sure the damper is installed in the correct direction
 Courtesy of AMERICAN HONDA MOTOR CO., INC.
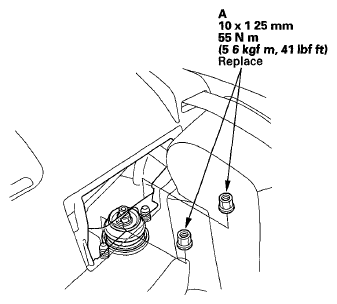
- Loosely install the new damper mounting nuts (A) to the top of the damper
 Courtesy of AMERICAN HONDA MOTOR CO., INC.
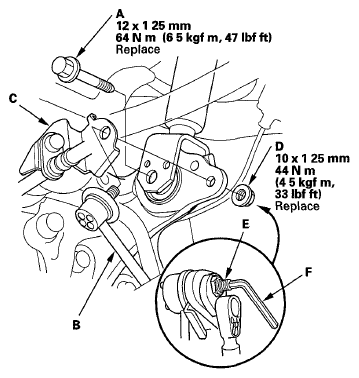
- Loosely install the new damper lower mounting bolt (A) on the bottom of the damper Connect the stabilizer link (B) to the brake hose bracket (C) to the knuckle, and loosely install the new self-locking nut (D)
 Courtesy of AMERICAN HONDA MOTOR CO., INC.
- Place a floor jack under the connecting point of the knuckle and lower arm A, and raise the suspension to load with the vehicle's weight
- Tighten the damper lower mounting bolt and the self-locking nut while holding the joint pin (E) with the hex wrench (F) to the specified torque values
- Tighten the damper mounting nuts on top of the damper to the specified torque value
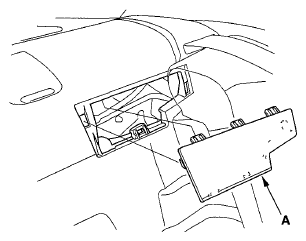
- Install the lid (A), and set the rear seat-back to the original position
 Courtesy of AMERICAN HONDA MOTOR CO., INC.
- Clean the mating surfaces of the brake disc and the inside of the wheel, then install the rear wheel
- Check the wheel alignment, and adjust it if necessary (see
WHEEL ALIGNMENT
)