Restraints - SRS Lamp ON/DTC's 61-1x or 62-1x
09-024September 23, 2009
Applies To:
2007-08 MDX - ALL
2009 MDX - From VIN 2HNYD28...9H500001 thru 2HNYD28..9H517547
SRS Indicator Is On With DTC 61-1x or 62-1x
SYMPTOM
The SRS indicator is on, and DIG 61-1x (open in driver's seat belt buckle switch) or DTC 62-1x (open in front passengers seat belt buckle switch) is stored.
NOTE:
The "x" digit at the end of each DTC can be any one of these: 0 thru 9, or A thru F.
PROBABLE CAUSE
^ If DIG 61 -lx or 62-ix returns after you clear it, the probable cause is the detection item (an open in the driver's or front passenger's seat belt buckle switch).
^ If DTC 61-1 x or 62-1 x does not return after you clear it, the probable cause is a poor connection in the floor wire harness junction connector (G608).
CORRECTIVE ACTION
Depending on the result of your diagnosis, troubleshoot the SRS DIG or replace the floor wire harness.
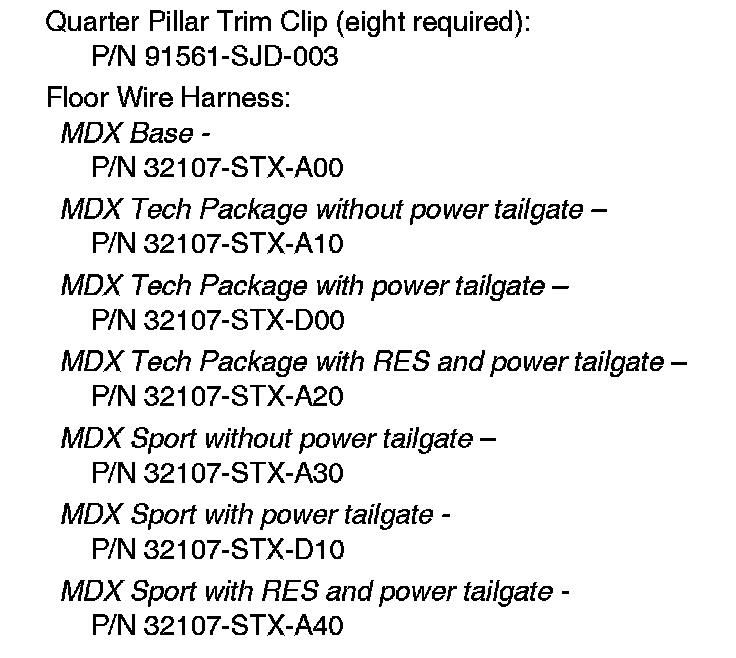
PARTS INFORMATION
NOTE: To make sure the correct floor wire harness is ordered, enter the VIN in your parts catalog search.
REQUIRED MATERIALS
Hondalock 2: P/N 08713-0002 (One bottle repairs about 3 vehicles.)
TOOL INFORMATION
KTC Trim Tool Set: T/N SOJATP2014
WARRANTY CLAIM INFORMATION
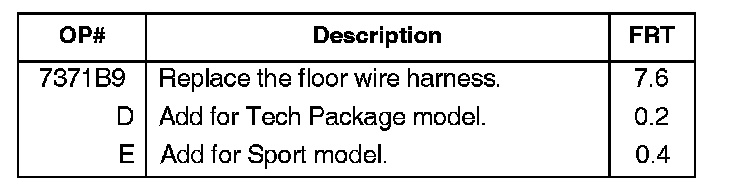
In warranty:
The normal warranty applies.
Failed Part: P/N 32107-STX-A00
Defect Code: 03214
Symptom Code: 03205
Skill Level: Repair Technician
Out of warranty:
Any repair performed after warranty expiration may be eligible for goodwill consideration by the District Parts and Service Manager or your Zone Office. You must request consideration, and get a decision, before starting work.
DIAGNOSIS
1. Connect the HDS to the vehicle's DLC, and check for DTCs.
Is SHS DTC 61-1x or 62-1x indicated?
Yes - Clear the DTCs, then go to step 2.
No - This service bulletin does not apply. Troubleshoot any other DTCs that you found.
2. With the ignition switch in ON (II), buckle and unbuckle the driver's and the front passenger's seat belts several times.
3. Recheck for DTCs.
Is SHS DTC 61-1x or 62-1x indicated?
Yes - Troubleshooting the indicated SRS DTC. No - Go to REPAIR PROCEDURE.
REPAIR PROCEDURE
NOTE:
^ Before you begin, make sure you know the SRS component locations, and that you read and understand the SRS precautions and procedures explained in the service manual.
^ This procedure is in an outline form that you can also use as a checklist for the repair. If you need more details on the topics listed below, bookmark them in the 07-09 MDX Service Manual, or view them online:
- Battery Terminal Disconnection and Reconnection
- Front Inner Fender Replacement
- Rear Fender Cover Replacement
- Carpet Replacement
- B-Pillar Upper/Lower Trim
- Quarter Pillar Trim
- Rear Side Trim Panel Removal/Installation
- Center Console Removal/Installation
- Under-Dash Fuse/Relay Box Removal and Installation
- Front Seat Belt Replacement
- AcuraLink Control Unit (XM Receiver) Removal/Installation
- SH-AWD Control Unit Replacement
- Active Damper Control Unit Replacement
- Cargo Area Light Test/Replacement
Floor Wire Harness Removal
NOTE:
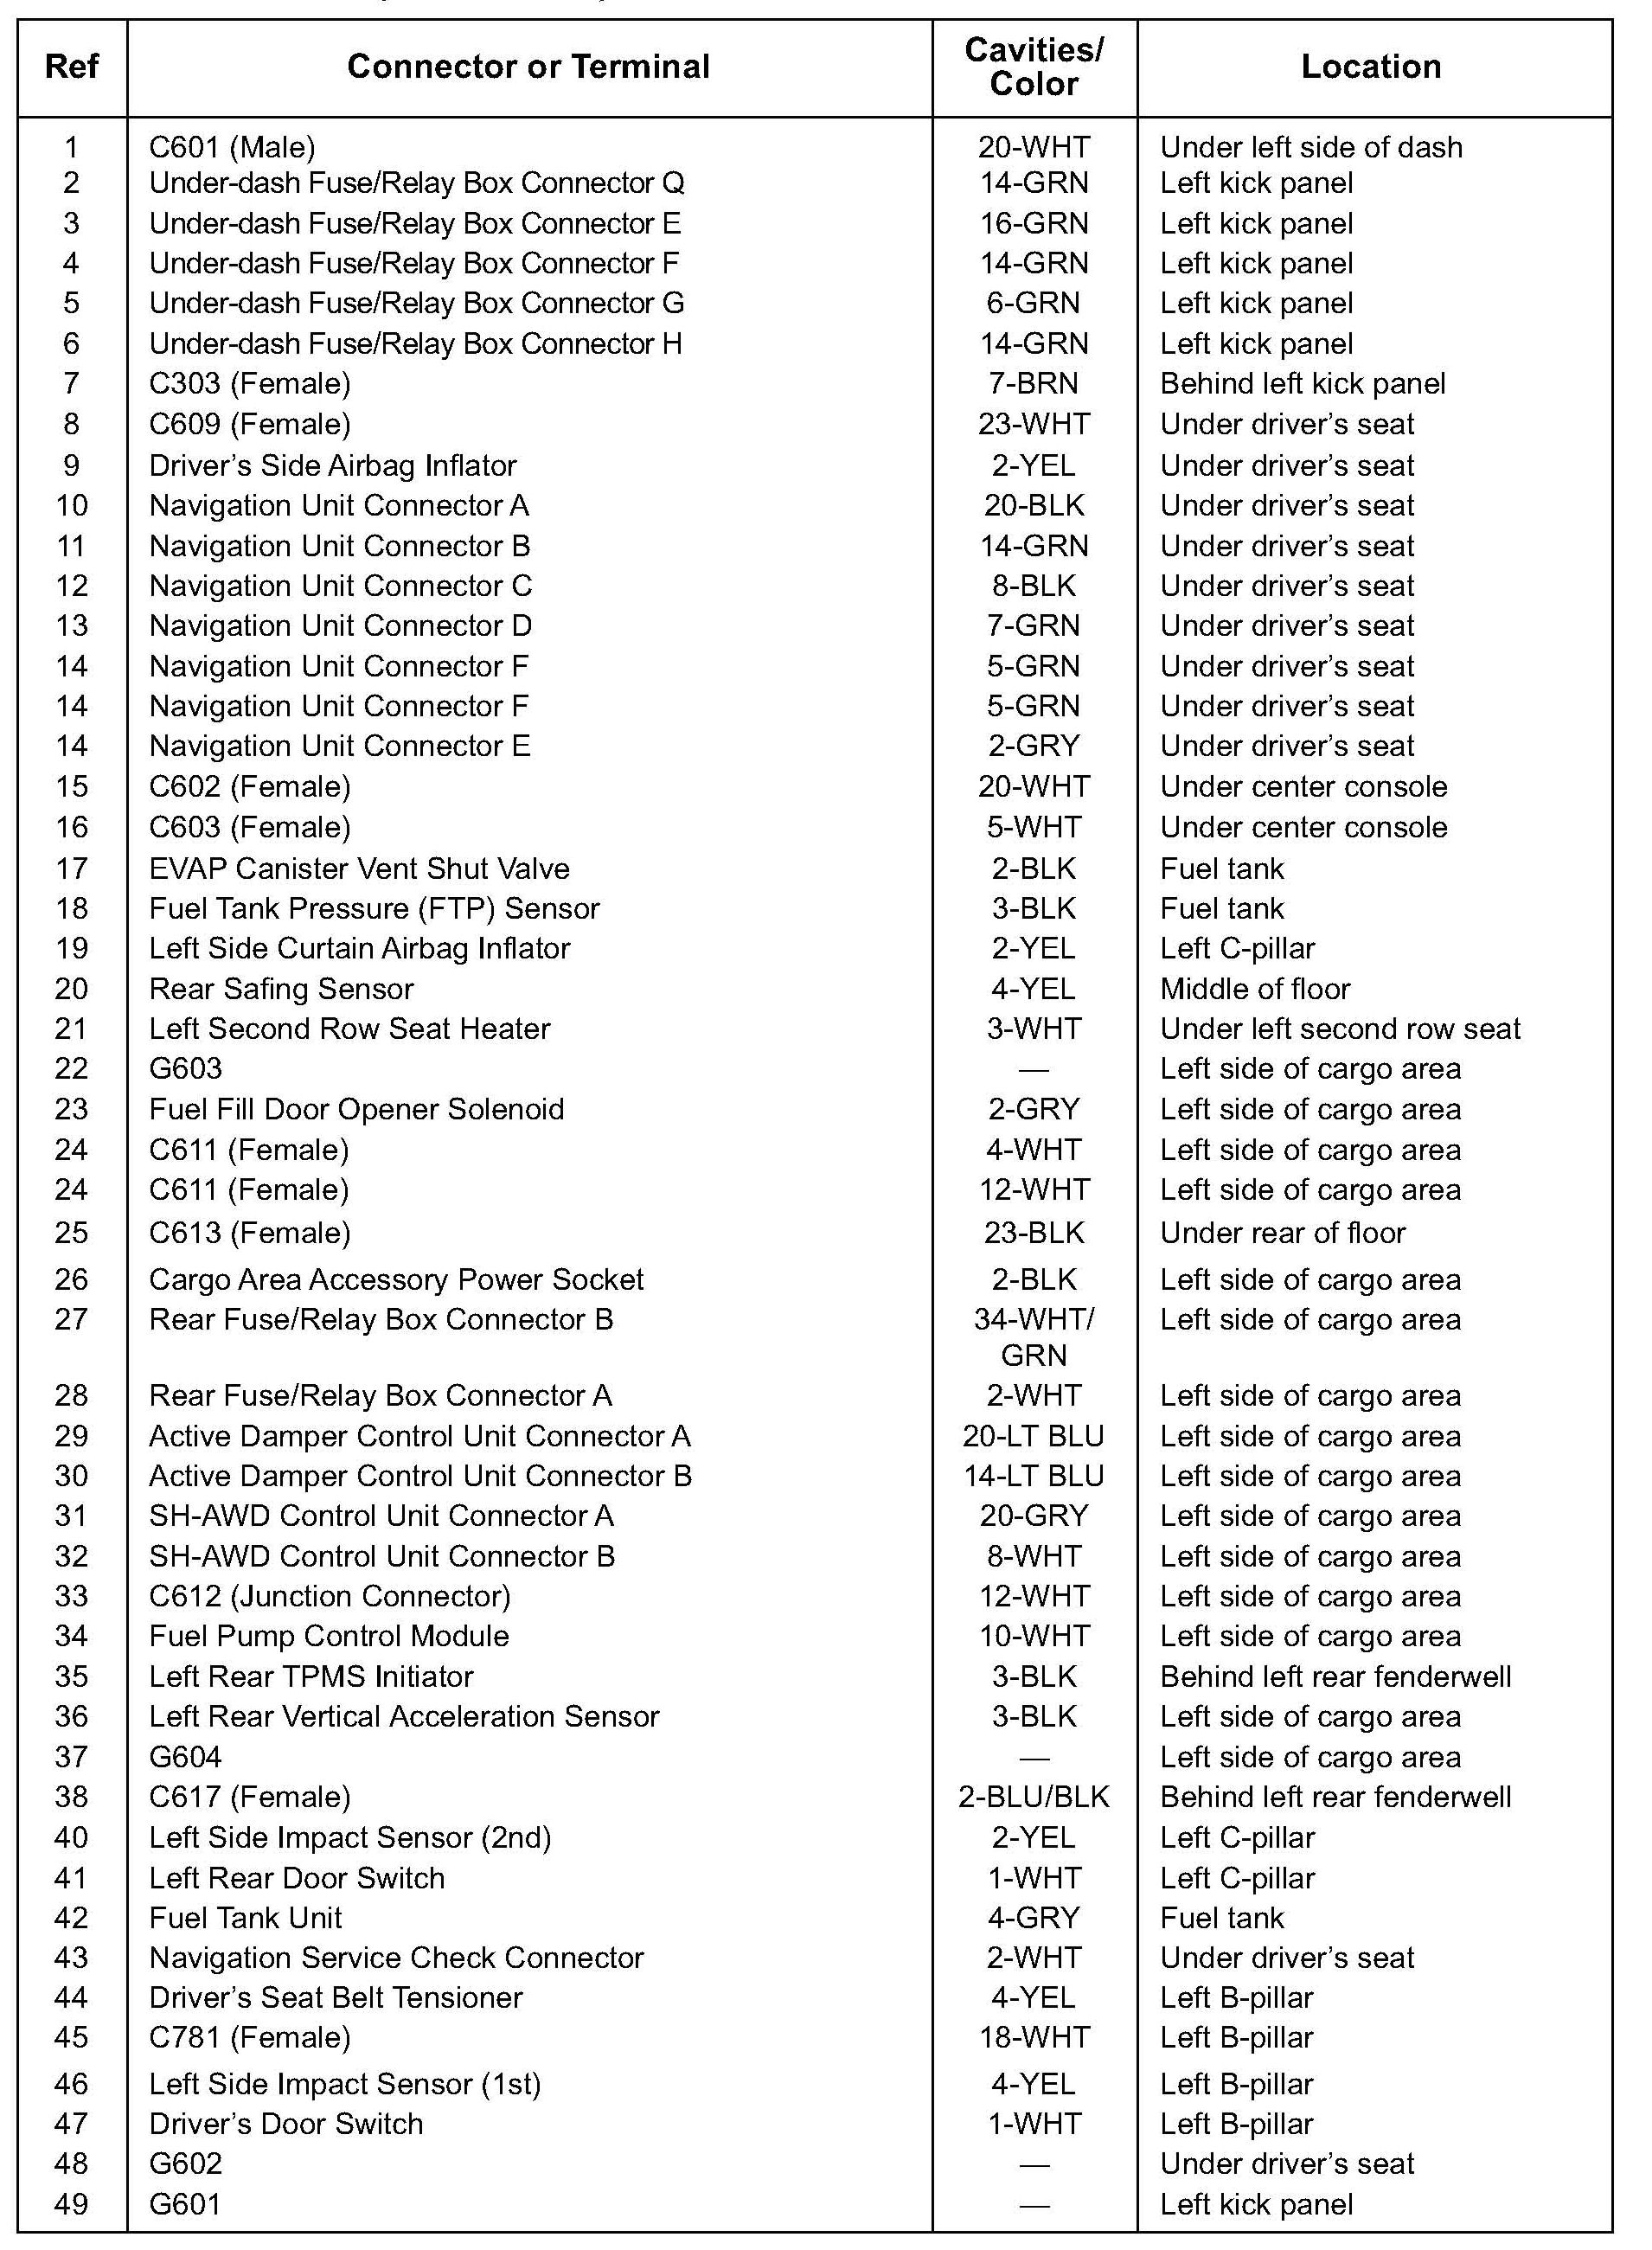
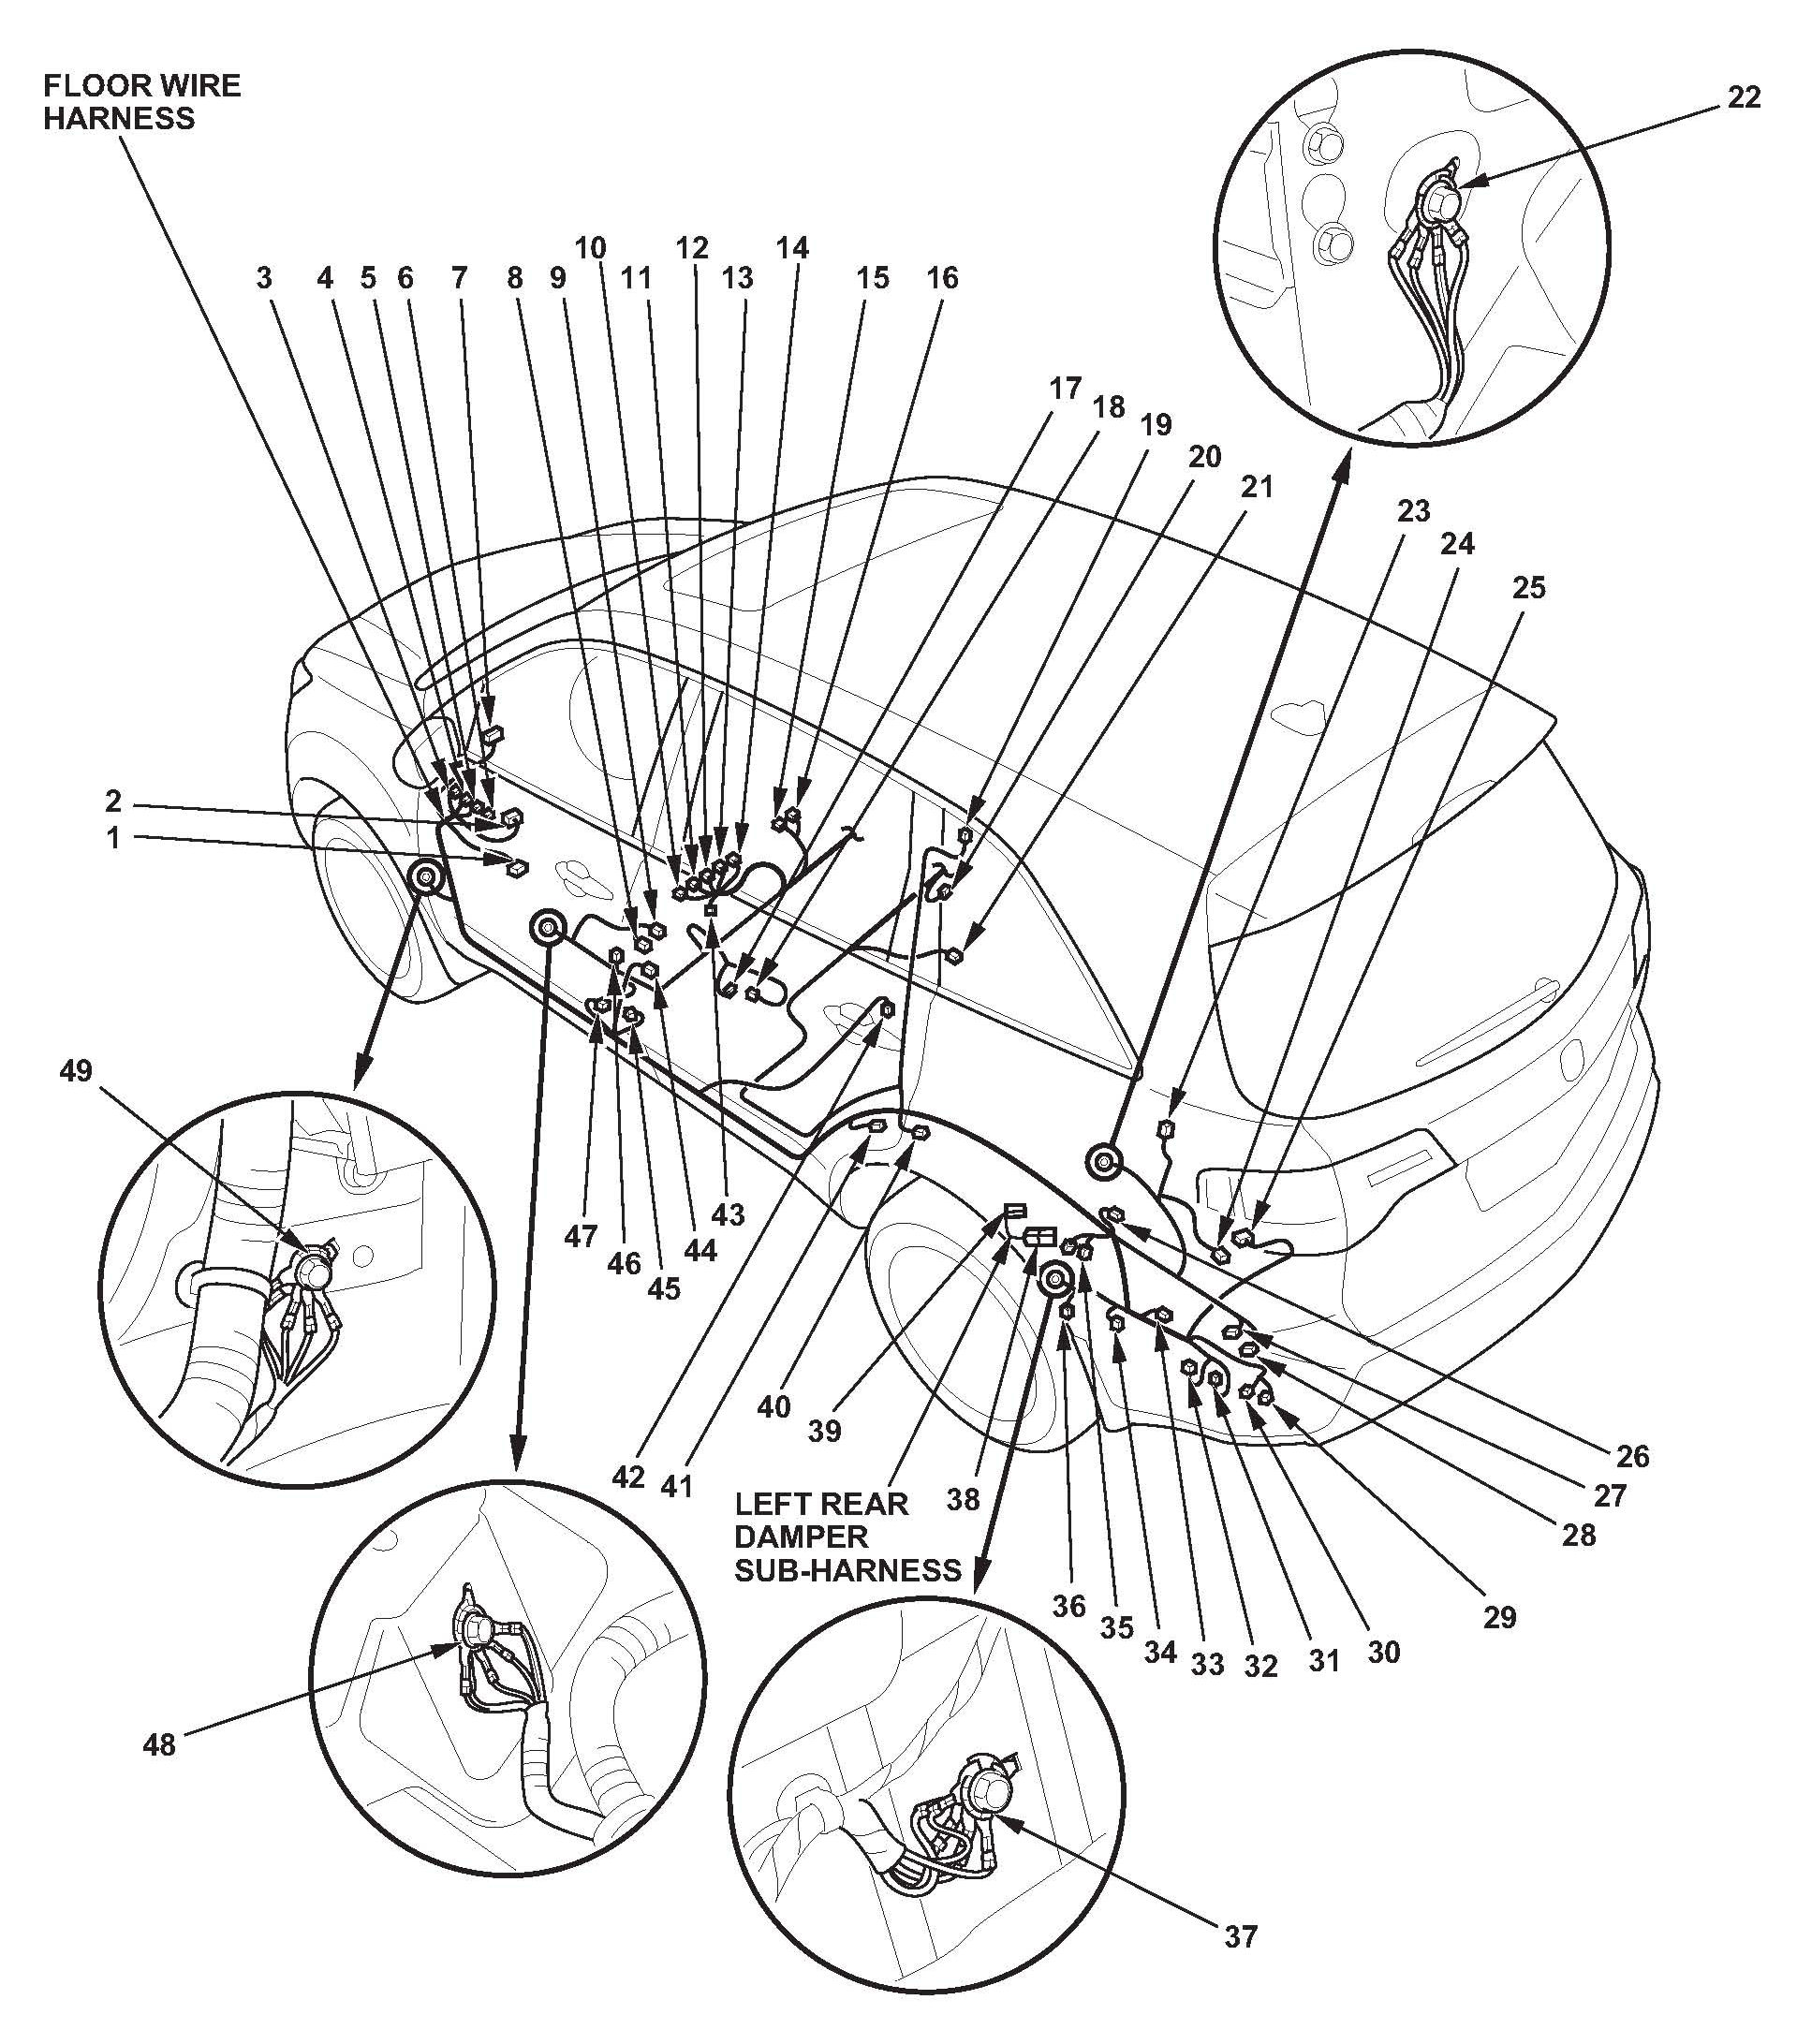
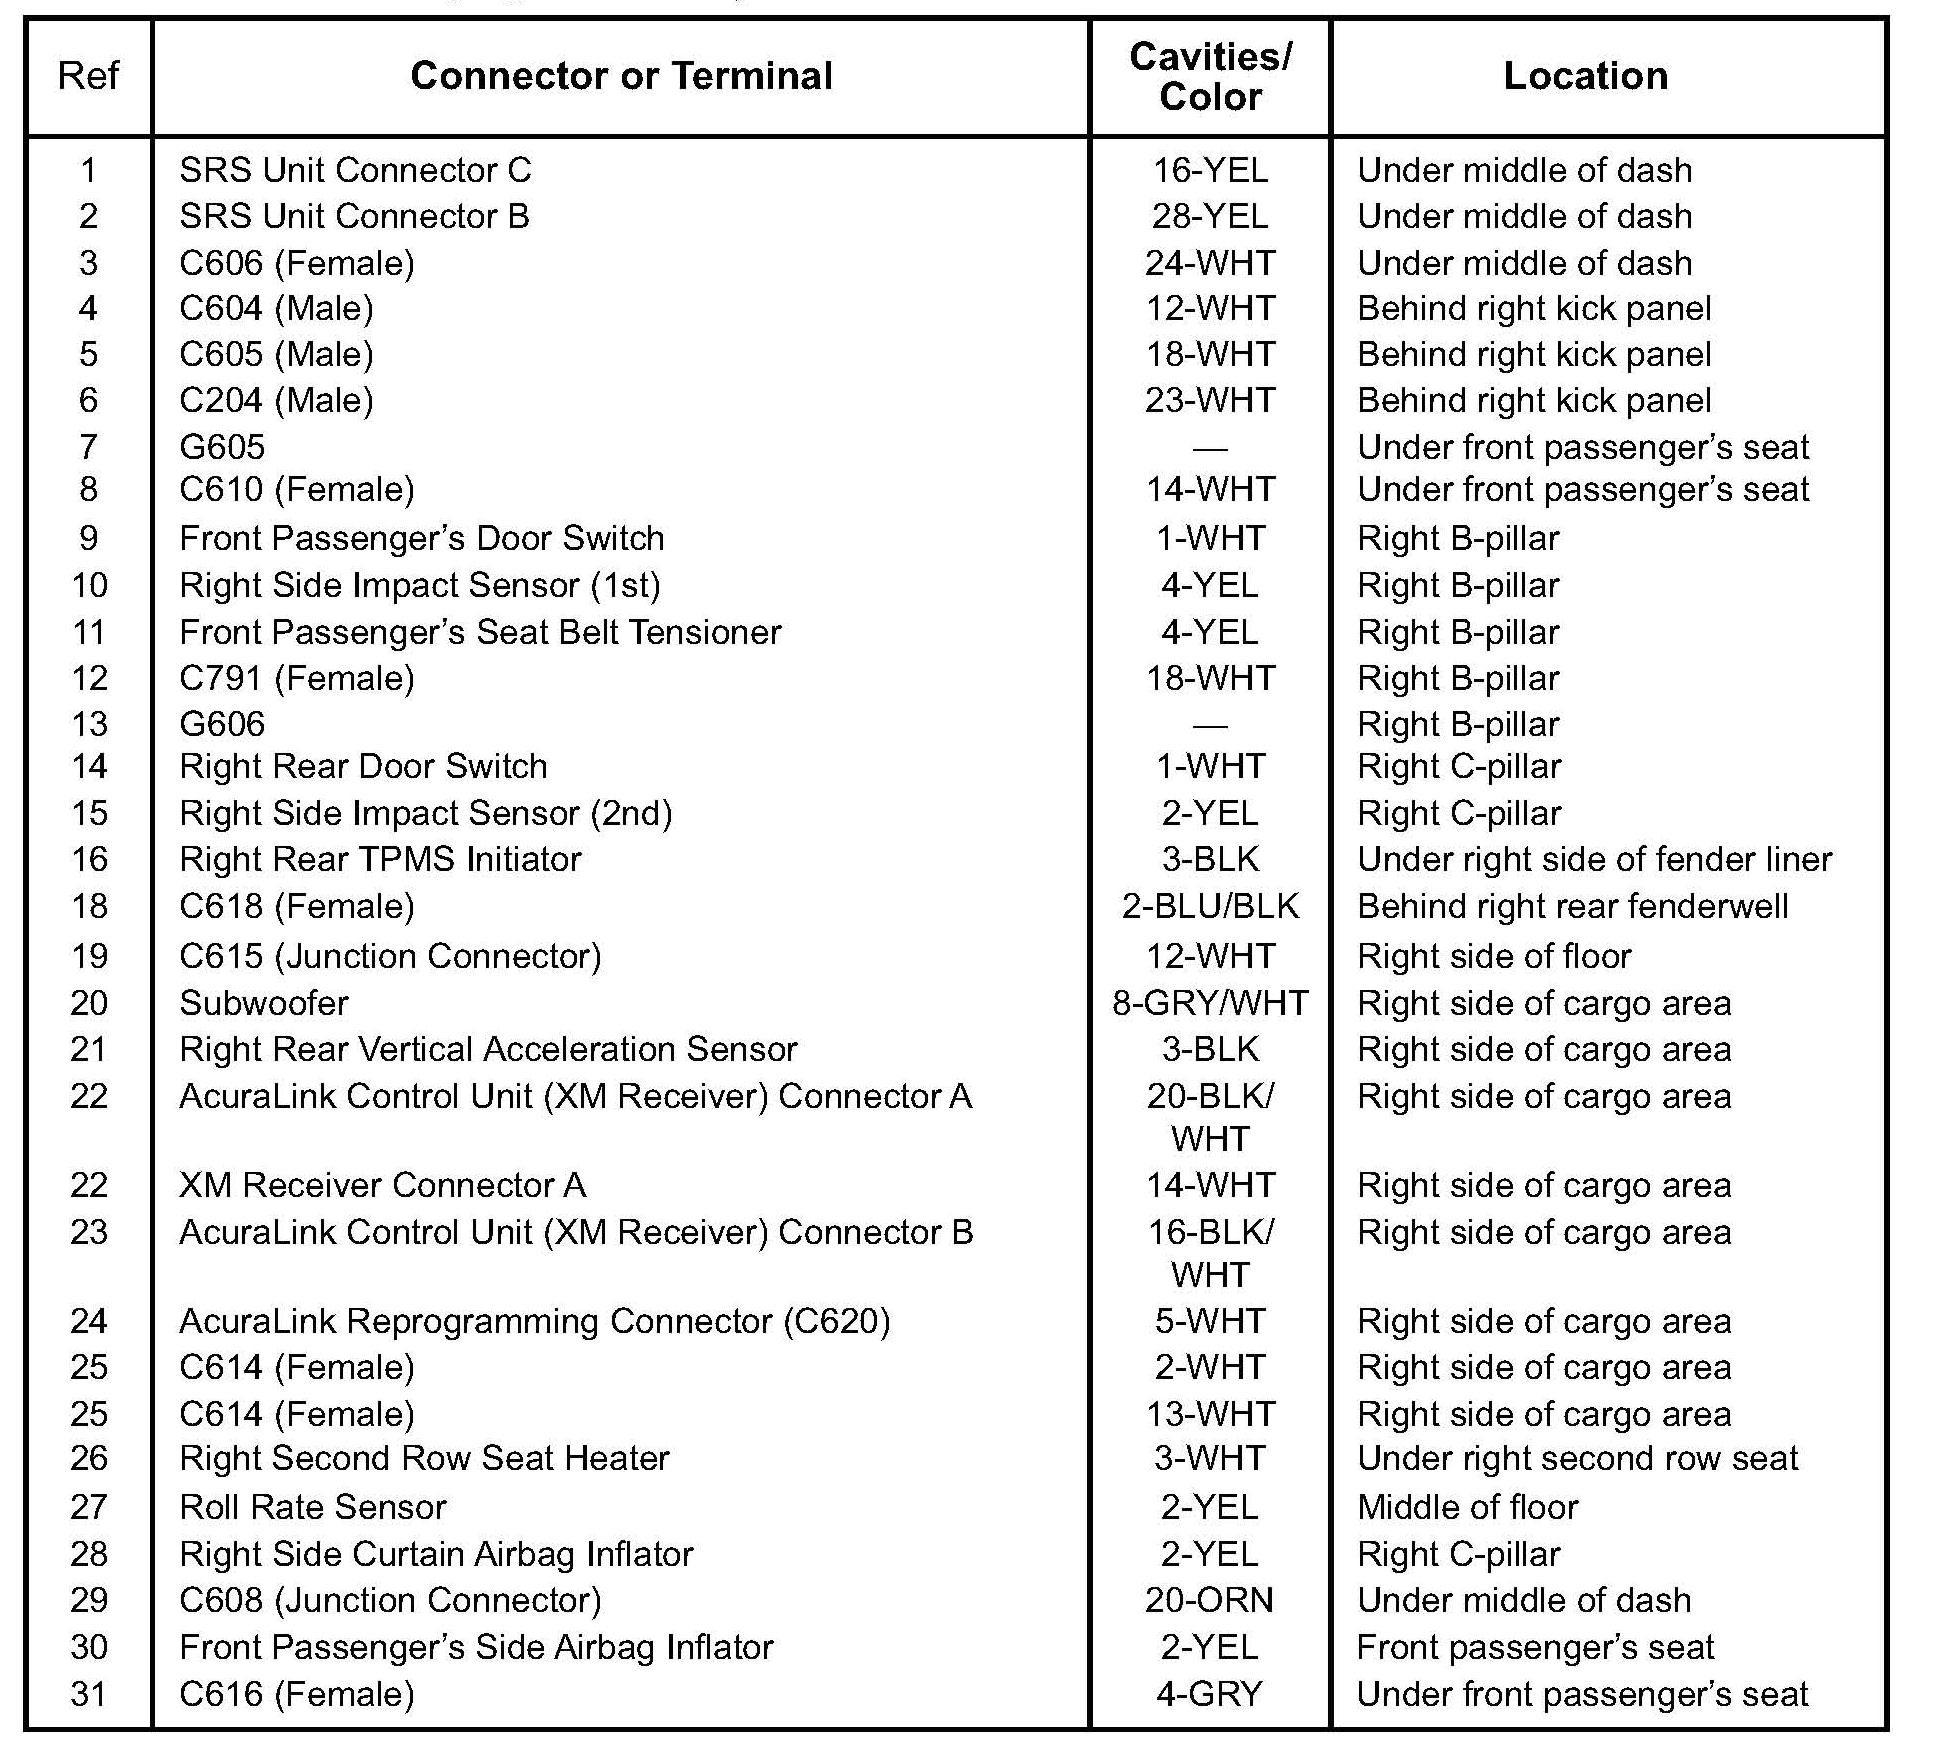
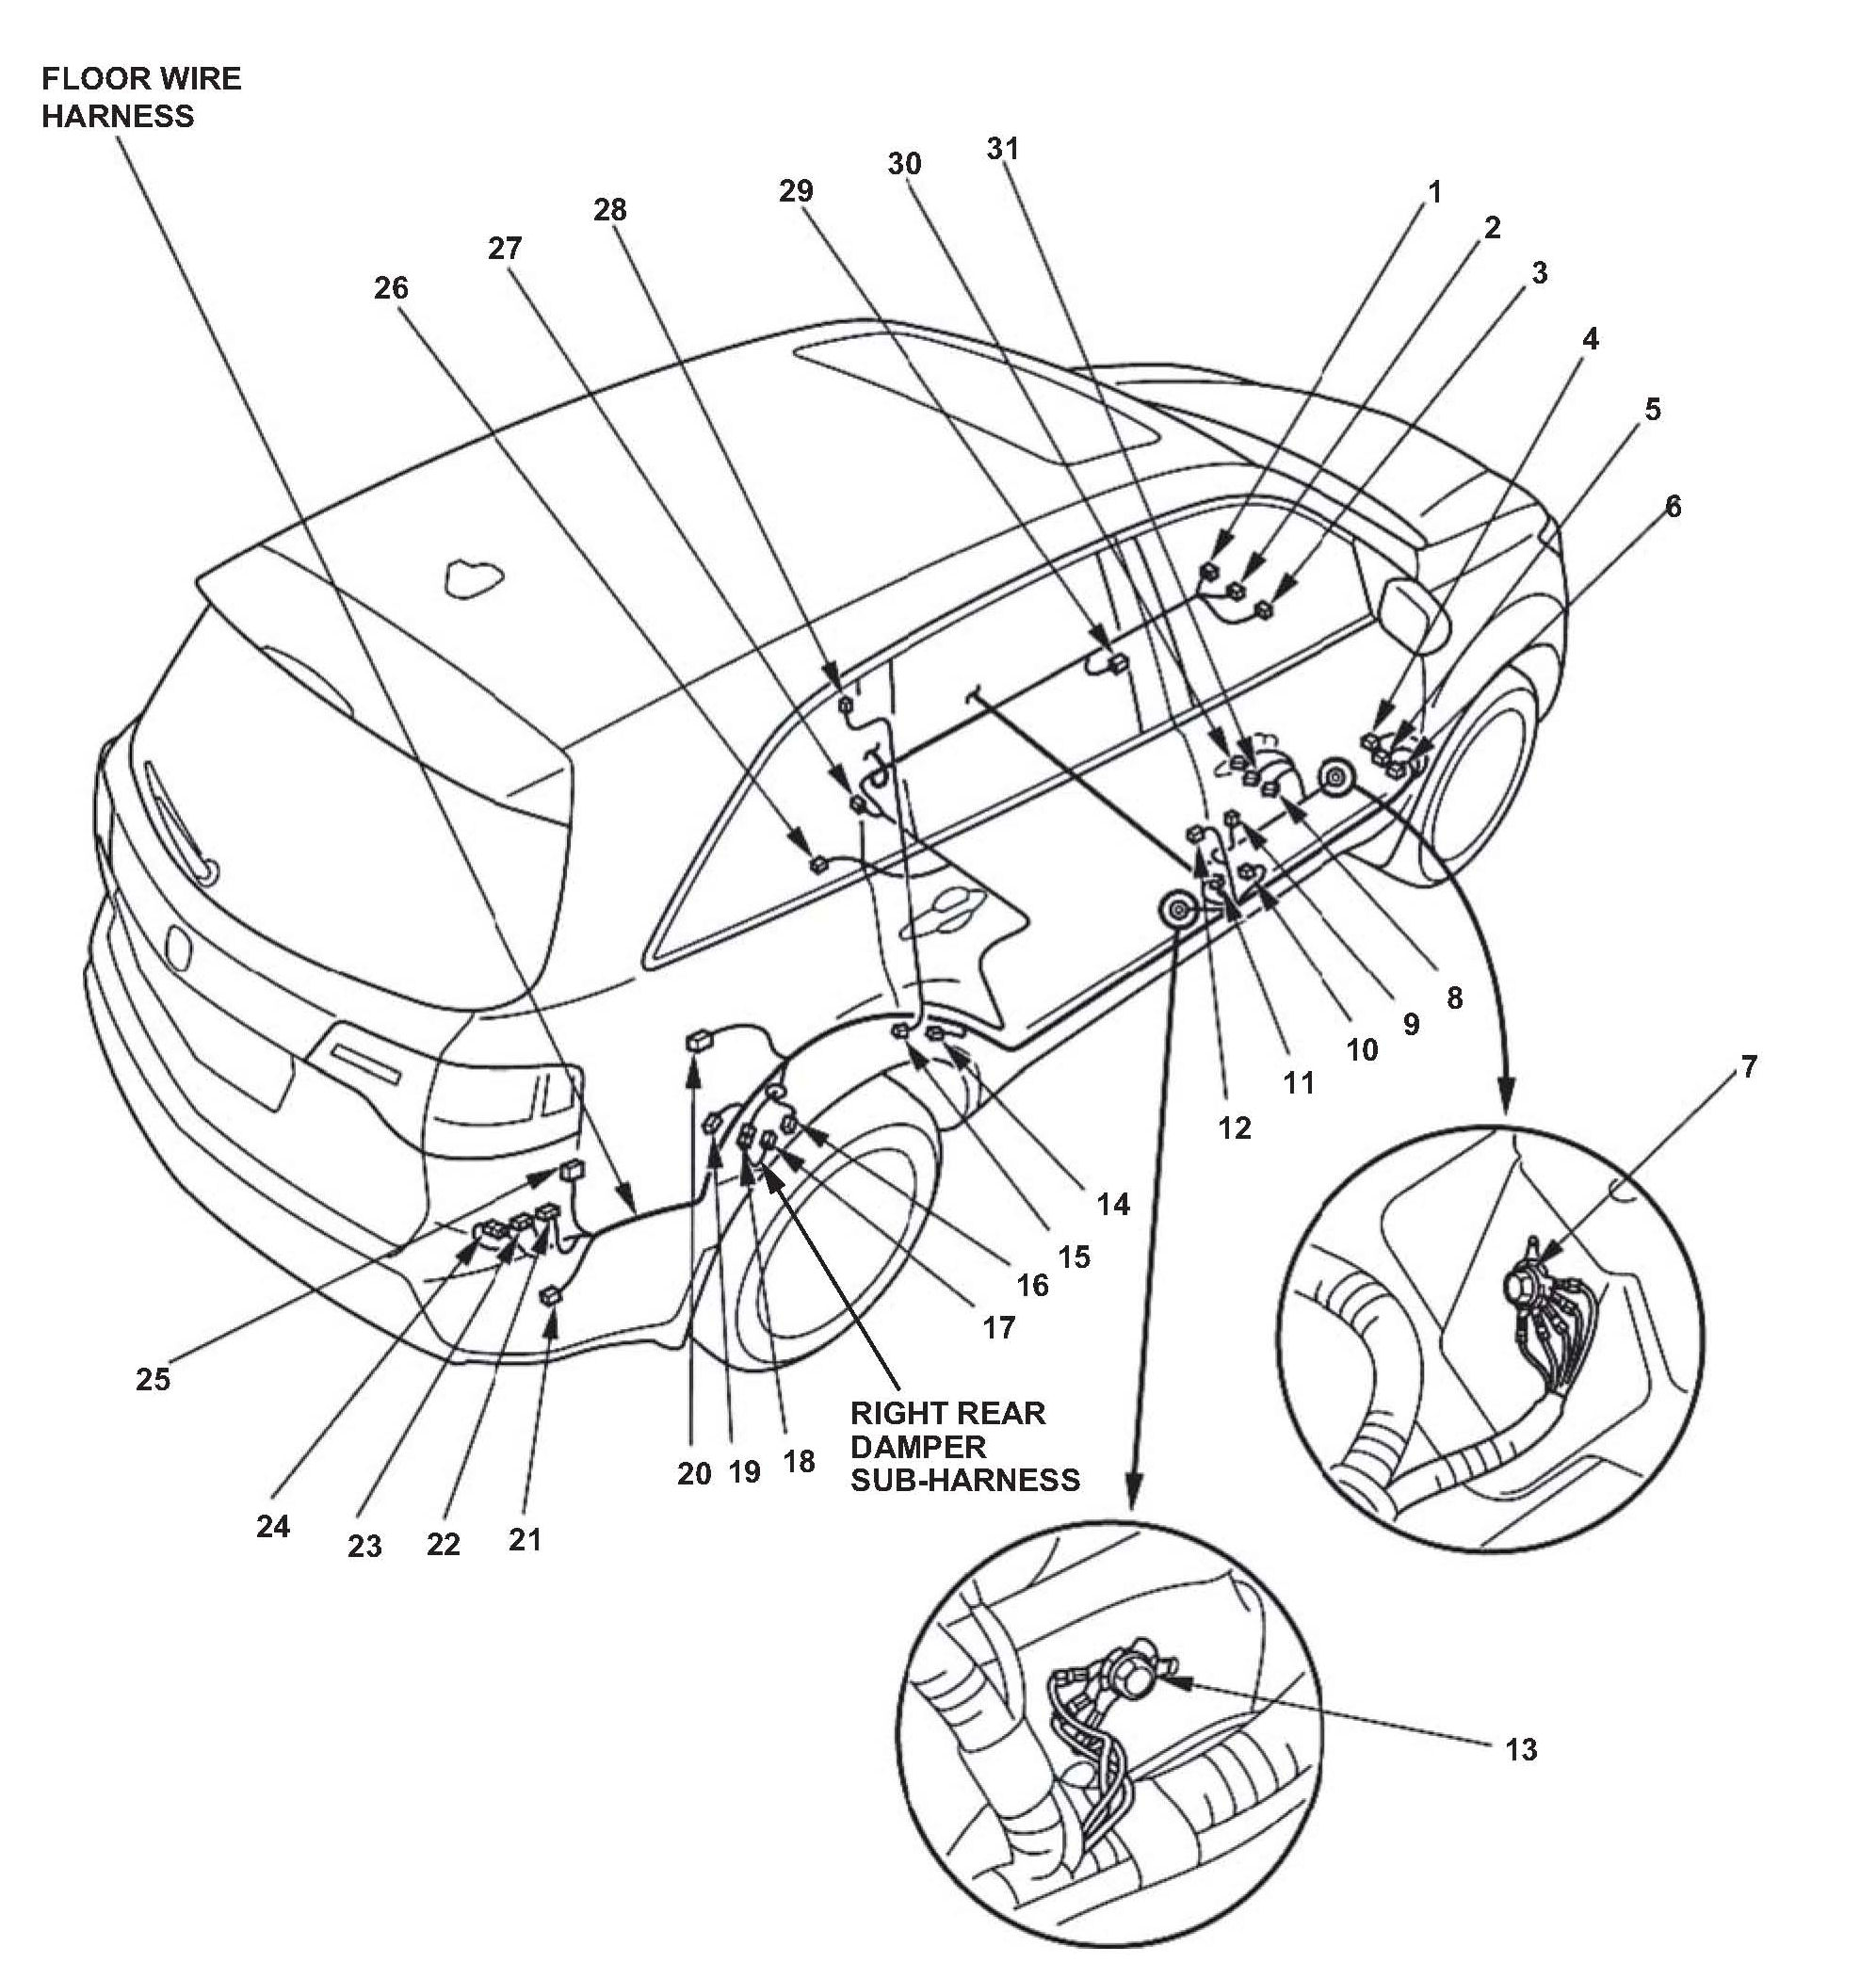
Refer to the floor wire harness chart/illustration as needed.
1. Disconnect the negative cable from the battery, and wait at least 3 minutes.
2. Raise the vehicle on a lift, then remove the right front wheel and the rear wheels.
3. Remove the right front inner fender.
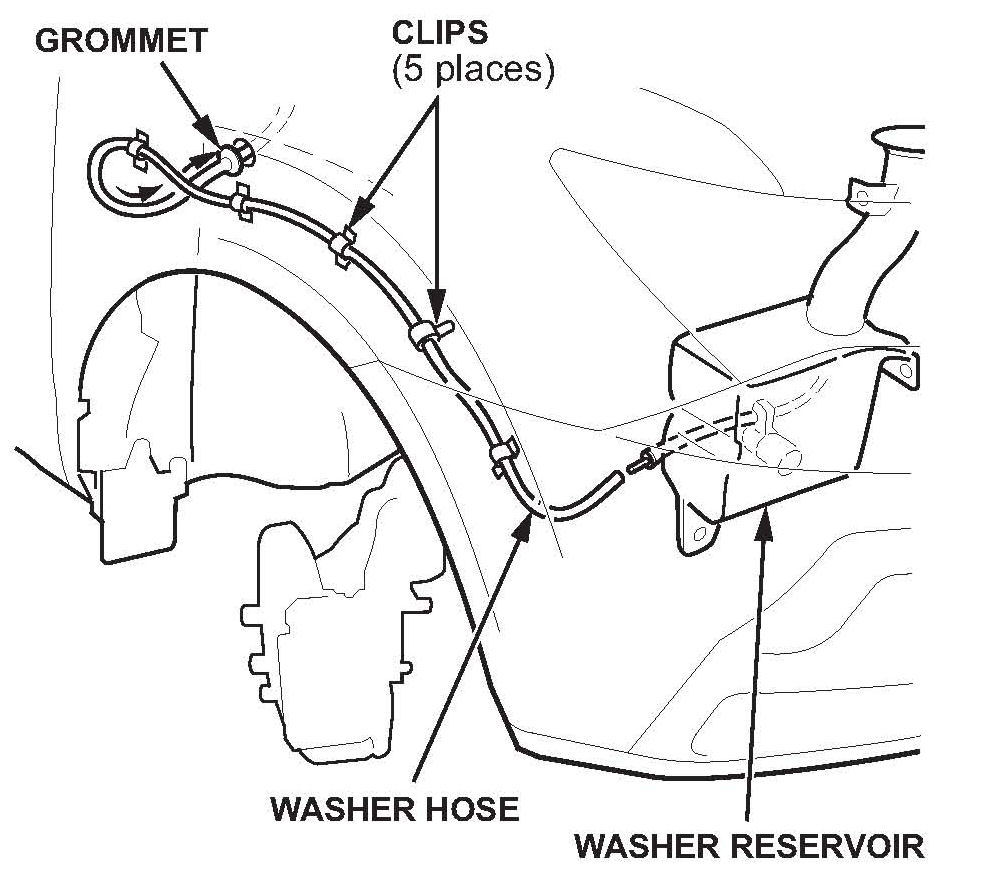
4. Inside the fender, disconnect the rear washer hose at the T- fitting, and plug both ends of the hose.
5. Push the end of the rear washer hose and its grommet into the passenger compartment.
NOTE:
The rear washer hose is attached to the main wire bundle of the floor wire harness. The new floor wire harness comes with the washer hose already attached.
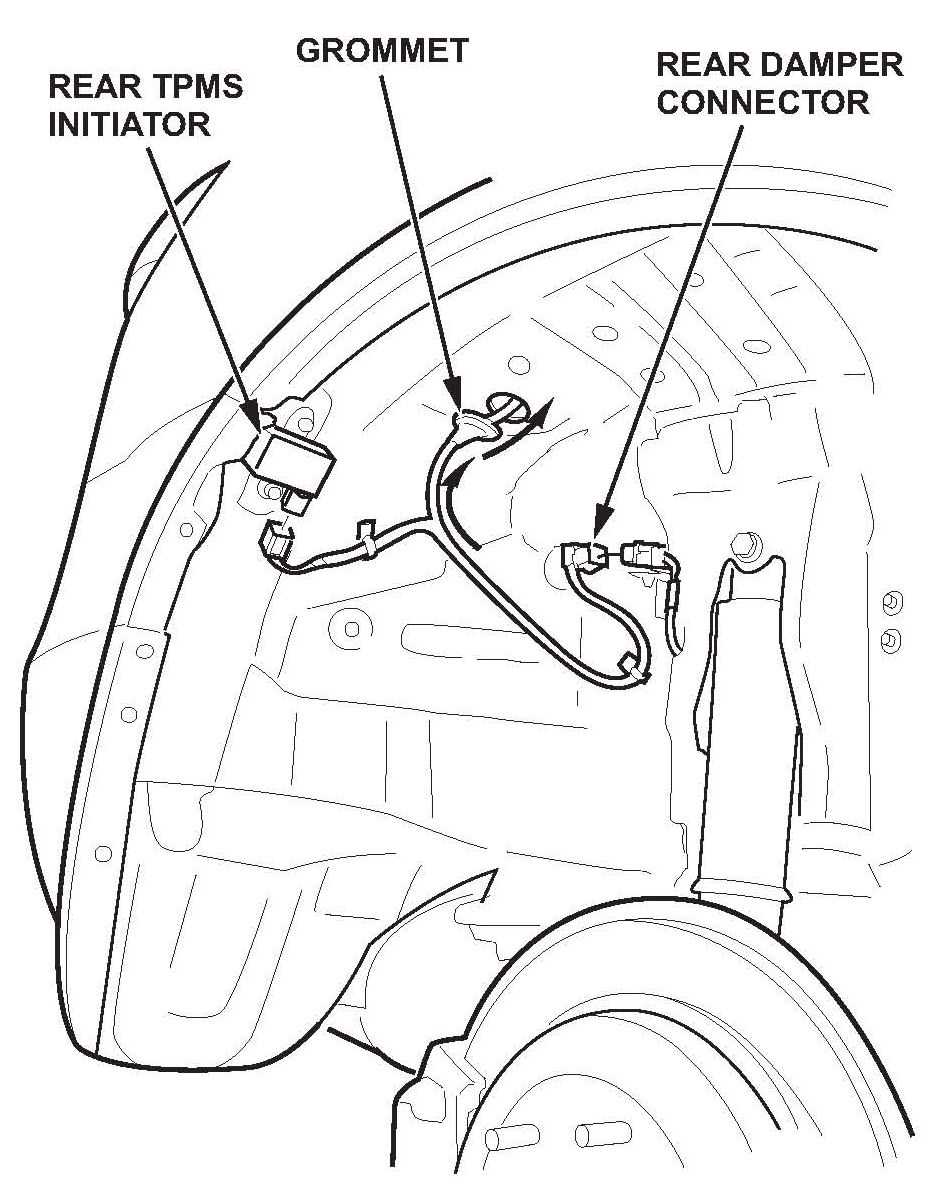
6. Remove both rear fender covers, then disconnect the rear TPMS initiator connectors and the rear damper connectors (if equipped). Push the wire harness grommet, the wire harness, and the connectors into the passenger compartment.
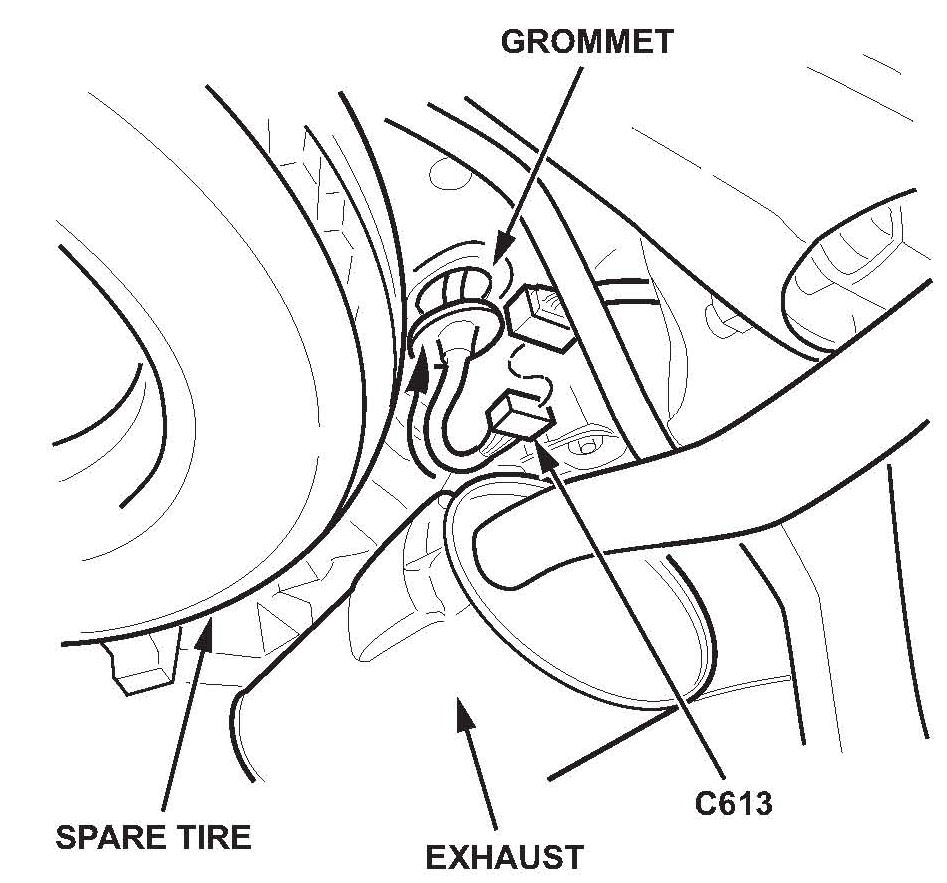
7. Disconnect the C613 (23P) floor wire harness to rear subframe wire harness connector. Push the wire harness grommet, the wire harness, and the connector into the passenger compartment.
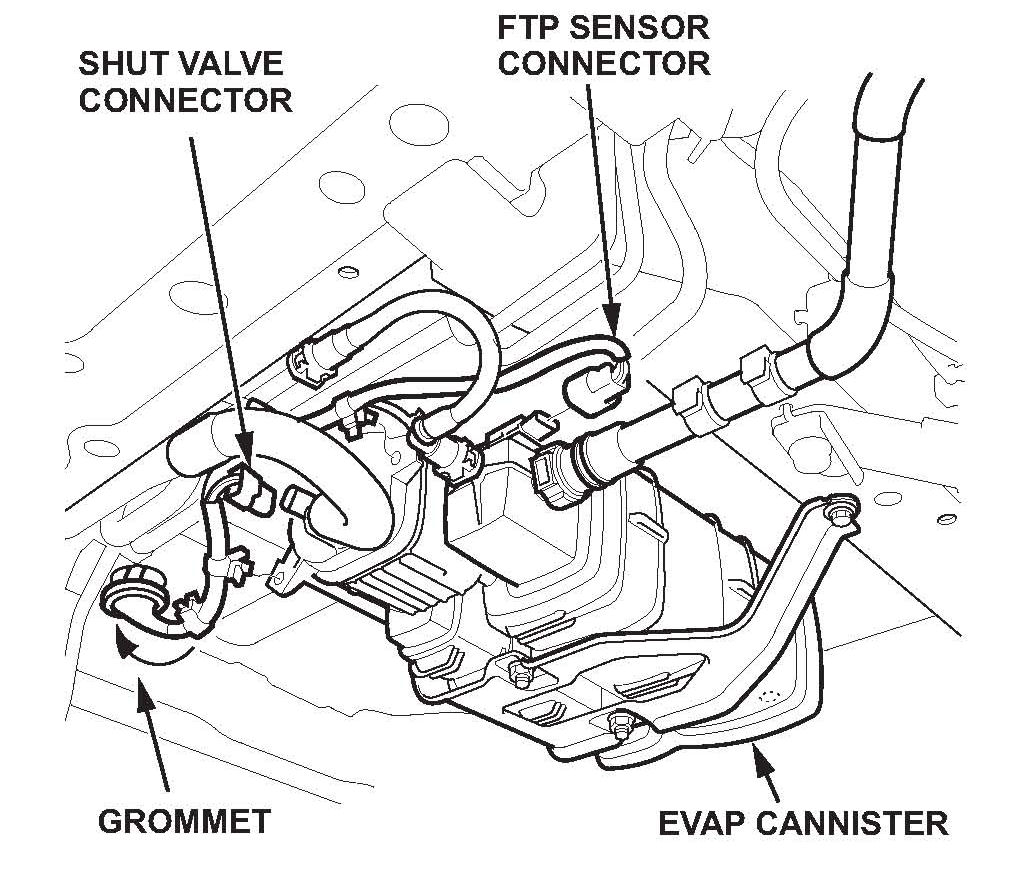
8. Remove the EVAP canister cover, then disconnect the FTP sensor connector and the EVAP canister shut valve connector. Push the wire harness grommet, the wire harness, and the connectors into the passenger compartment.
9. Remove the carpet. To remove the carpet, you first need to remove these parts:
^ Seats
^ Door sill trims
^ Kick panels
^ Dashboard undercovers
^ Steering joint cover
10. Remove the left and right B-pillar lower trim.
11. Remove the left and right quarter pillar trim.
NOTE:
The four upper clips on each quarter pillar trim must be replaced.
12. Remove the left and right rear side trim panels.
13. Remove the center console.
14. Remove the under-dash fuse/relay box.
15. Remove the driver's and front passengers seat belt retractors and the retractor protectors.
16. Remove the XM receiver.
17. Remove the SH-AWD control unit.
18. Remove the active damper control unit (if equipped).
19. Remove the cargo area light.
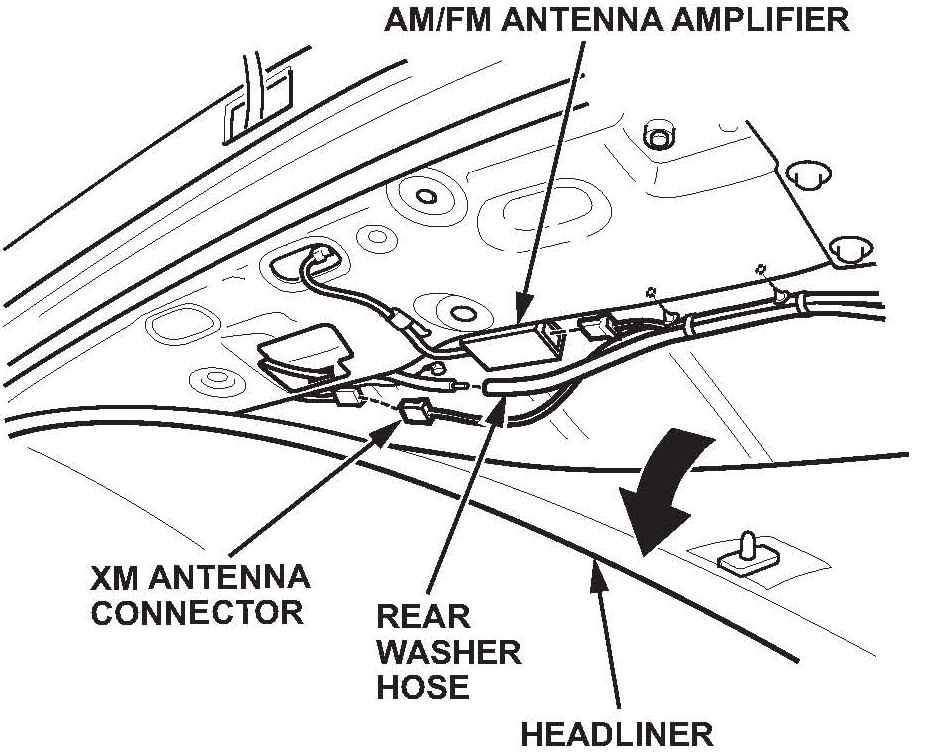
20. At the rear of the vehicle, detach the rear clip on the headliner, then carefully bend the headliner down a few inches. Disconnect the AM/FM antenna amplifier, the XM antenna, and the rear washer hose.
21. Detach the rear washer hose clips, then push the rear washer hose, the wire harness, and the connectors into the passenger compartment.
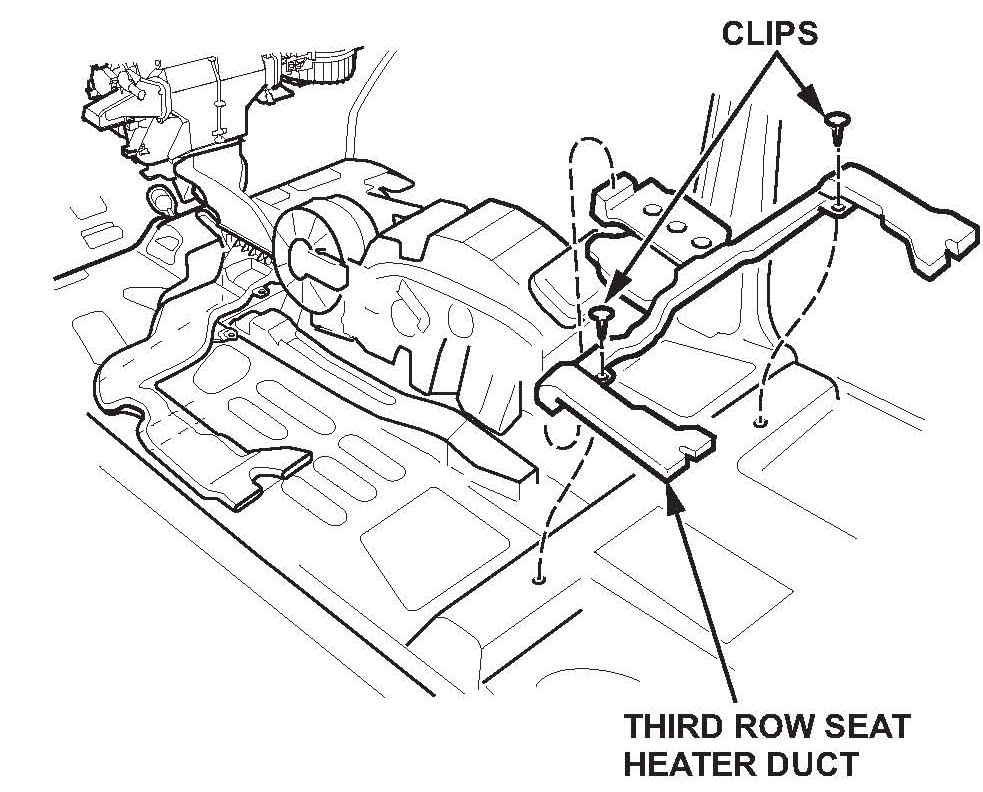
22. Remove the third row seat rear heater duct.
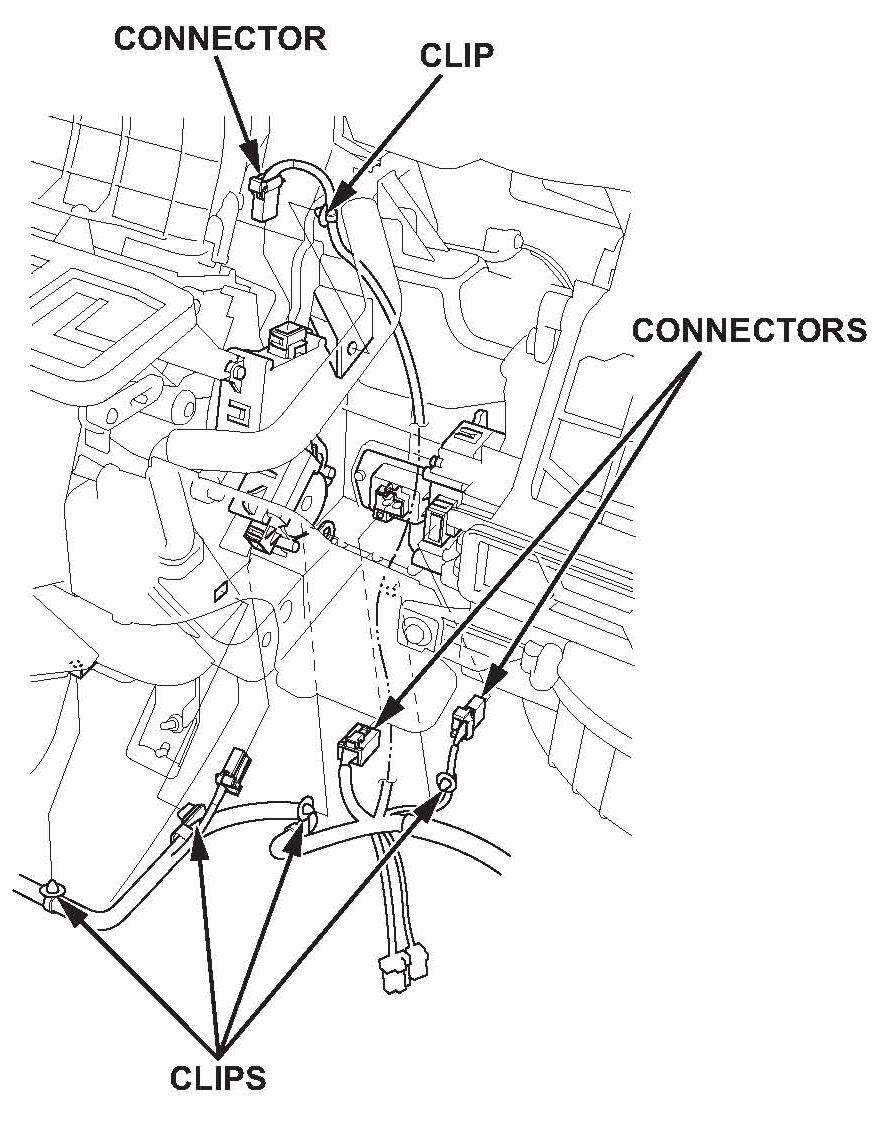
23. Disconnect the floor wire harness connectors and the clips from the front HVAC unit.
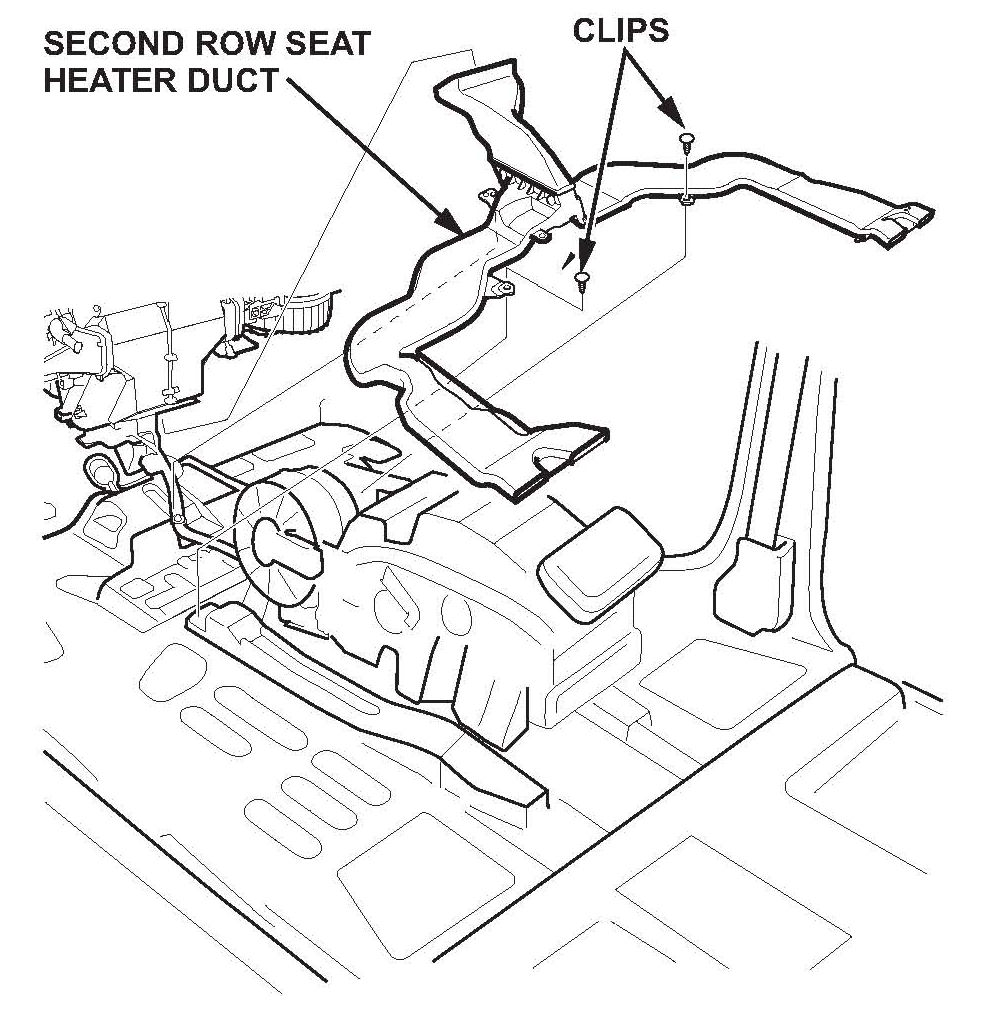
24. Remove the second row seat heater duct.
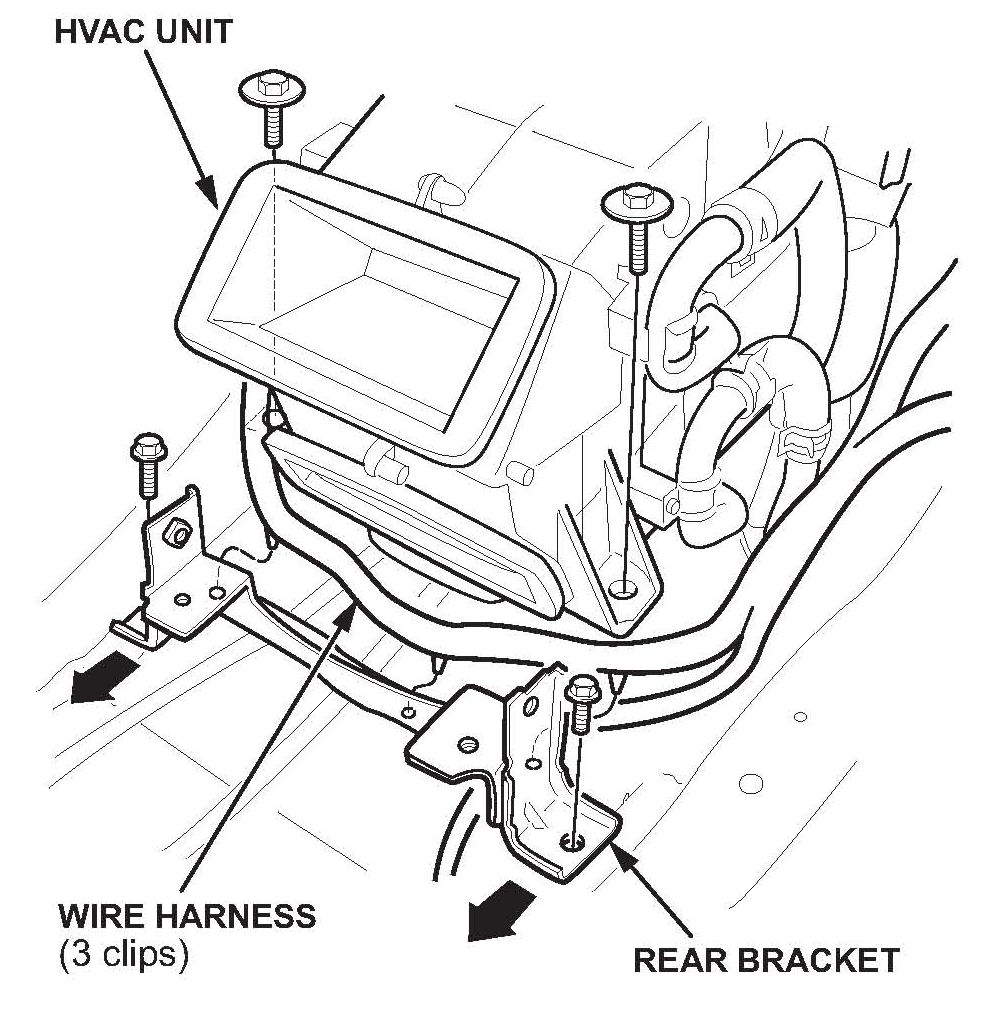
25. Remove the rear bracket from the rear HVAC unit.
26. Remove the six ground bolts from the floor wire harness. then remove the harness from the vehicle.
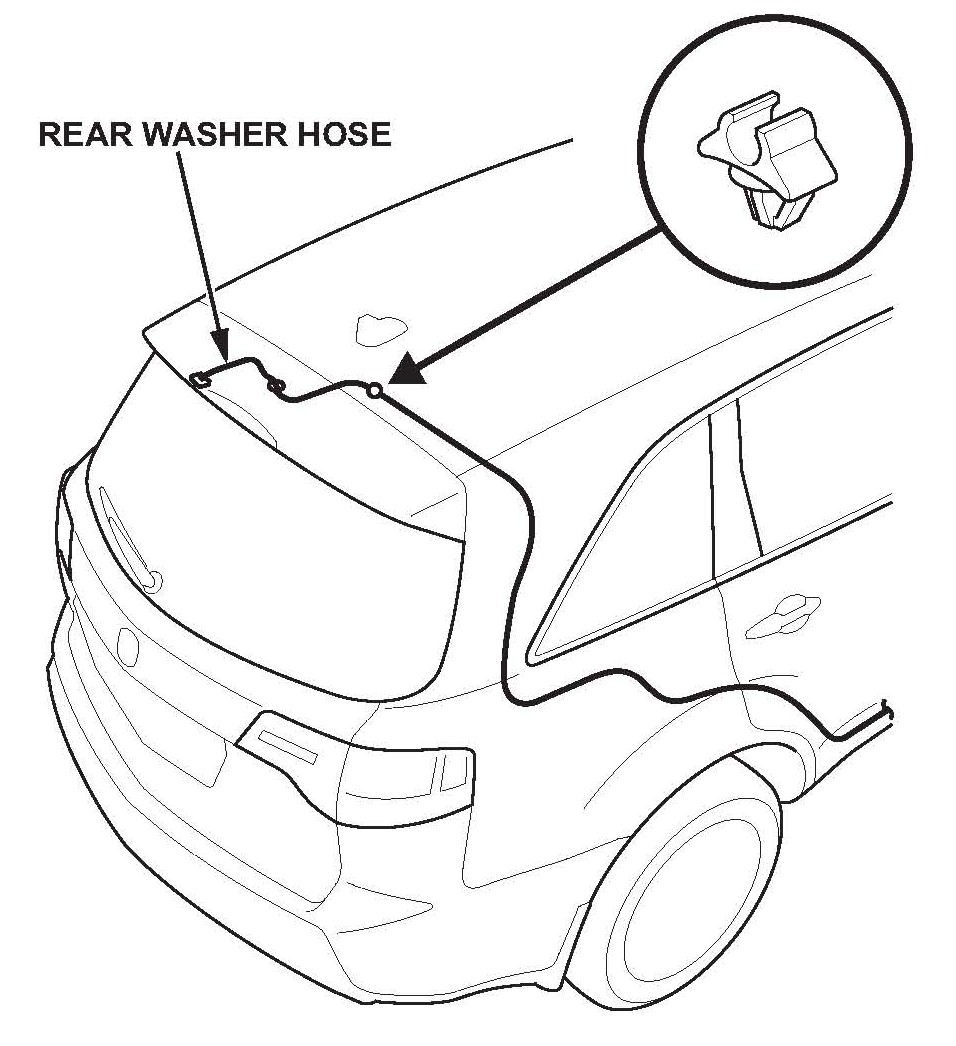
27. Detach the rear washer hose cups, then remove the floor wire harness and the rear washer hose.
Floor Wire Harness Installation
NOTE:
^ Refer to the floor wire harness chart/illustration and the illustrations in Floor Wire Harness Removal as needed.
^ Do not bend or twist the new wire harness excessively, and make sure it is not pinched or too loose in any areas.
^ Make sure all connectors on the new wire harness are secure.
^ Replace any damaged interior trim clips.
1. Bring the new floor wire harness and rear wiper hose into the passenger compartment. Place the various wire harness leads and connectors in their approximate locations.
2. Attach the rear washer hose to the clips on and near the tailgate.
3. Reinstall the six ground bolts in their correct locations on the floor wire harness.
4. Reinstall the rear bracket to the rear HVAC unit.
5. Reinstall the second row seat heater duct, and make sure the mounting clips are secure.
6. Connect the floor wire harness clips and the connectors to the front HVAC unit.
7. Reinstall the third row seat rear heater duct.
8. At the rear of the vehicle, carefully bend the headliner down, then connect the rear washer hose, the XM antenna connector, and the AM/FM antenna amplifier connector. Reattach the headliner rear clip.
9. Reinstall the cargo area light.
10. Reinstall the active damper control unit (if equipped), torque the mounting bolts to 9.8 N.m (7.2 lb-ft), and connect the connectors.
11. Reinstall the SH-AWD control unit:
^ Torque the mounting bolt and the mounting nut to 12 Nm (8.7 lb-ft).
^ Connect the control unit connectors.
12. Reinstall the XM receiver:
^ Torque the mounting bolts to 12 N.m (8.7 lb-ft)
^ Connect the receiver connectors.
13. Reinstall the driver's and front passenger's seat belt retractor protectors and the retractors:
^ Torque the retractor upper mounting bolts to 9.8 N.m (7.2 lb-ft).
^ Torque the retractor lower mounting bolts to 32 N.m (24 lb-ft).
^ Connect the retractor connectors.
14. Reinstall the under-dash fuse/relay box, and connect the connectors.
15. Reinstall the center console:
^ Torque the console front mounting bolts to 22 N.m (16 lb-if).
^ Torque the console rear mounting bolts to 9.8 N.m (7.2 lb-ft).
^ Torque the rear blower motor relay mounting bolt, the second row seat heater relay mounting bolt (if equipped), and the ground bolt to 9.8 N~m (7.2 lb-ft).
^ Connect the parking pin shift connector and the shift lock solenoid connector.
16. Reinstall the left and right rear side trim panels.
17. Reinstall the left and right quarter pillar trim. The four upper clips on each quarter pillar trim must be replaced.
18. Reinstall the left and right B-pillar lower trim.
19. Reinstall the carpet:
^ Do not wrinkle or twist the carpet.
^ Make sure the seat harness connectors are routed correctly.
^ Slip the slits in the carpet over the heater ducts at the second row and third row seats.
^ Properly slip the carpet under the center console, under the B-pillar lower trims, and under the rear side trim panels.
^ Torque the footrest nut to 6 N.m (4 lb-ft).
20. Reinstall the steering joint cover.
21. Reinstall the dashboard undercovers:
^ On the driver's side, attach the harness clip, connect the ambient light connector, and connect the footwell light connector.
^ On the passengers side, connect the ambient light connector, and the footwell light connector.
22. Reinstall the kick panels.
23. Reinstall the front and rear door sill trims.
24. Reinstall the seats:
^ Connect power seat connectors and the side airbag connectors to the connectors on the front seats.
^ Connect ODS connector to the connector on the front passenger's seat.
^ If equipped, connect the navigation unit connectors to the connectors on the driver's seat.
^ If equipped, connect the seat heater connectors to the connectors on the second row seats.
^ Apply Hondalock 2 Thread lock to the seat bolts, then reinstall the bolts, and torque them to 47 N.m (35 lb-ft)
^ Torque the seat belt lower anchor bolts on the front seats to 32 N.m (24 lb-ft).
25. Insert these parts of the floor wire harness into their openings in the passenger compartment, then push them through to the outside of the vehicle:
^ Middle of floor: EVAP canister shut valve connector and FTP sensor connector
^ Rear of floor: C613 (23P) floor wire harness connector and grommet
^ Rear fenders: Rear damper connectors (if equipped) and rear TPMS initiator connectors
^ Right front fender: rear washer hose and grommet
26. Raise the vehicle on a lift.
27. Connect the EVAP canister shut valve connector and the FTP sensor connector to the EVAP canister. Make sure the wire harness grommet is securely fitted to the vehicle body.
28. Reinstall the EVAP canister cover, and torque the cover bolts to 22 N.m (16 lb-ft)
29. Connect the C613 (23P) floor wire harness connector to the rear subframe wire harness connector. Make sure the wire harness grommet is securely fitted to the vehicle body.
30. Connect the rear damper connectors (if equipped) and the rear TPMS initiator connectors. Make sure the wire harness grommet is securely fitted to the vehicle body.
31. Reinstall the rear fender covers:
^ Torque the wheel arch bolts to 9.8 N.m (7.2 lb-ft).
^ Replace any damaged mounting clips.
32. Attach the new rear washer hose to the existing hose inside the right front fender. Make sure the hose grommet is securely fitted to the vehicle body.
33. Reinstall the right front fender cover:
^ Torque the front lower bolt to 9.8 N.m (7.2 lb-ft).
^ Replace any damaged mounting clips.
34. Reinstall the right front inner fender.
35. Reinstall the wheels.
36. Reconnect the negative cable to the battery.
37. Test-drive the vehicle, and make sure that all vehicle systems and controls work properly.
38. Use the HDS to check for DTCs, and clear any that you find.
Floor Wire Harness (Left Branch)

Disclaimer