Error Code: XM No Signal or XM Antenna Is Displayed
Symptom Troubleshooting: Error code: XM NO SIGNAL or XM ANTENNA is displayed
Error code: XM NO SIGNAL or XM ANTENNA is displayed
NOTE:
- Check XM radio reception in an open area. Poor reception/interference can be caused by tall buildings, mountains, or high-voltage power lines.
- If you can only tune to channel 000,001,174 and 247, make sure the audio unit is set to channel mode (see owner's manual), if it is set to channel mode, call XM radio customer support, and check the account activation status.
- If you replace the XM receiver, the Acuralink must be reactivated by Acura Client Services.
- Check the connectors for poor connections or loose terminals.
- Check the vehicle battery condition first.
1. Park vehicle outside with a clear view of the southern horizon.
2. Turn the ignition switch to ON (II).
3. Turn on the audio unit, and select XM radio.
Does the XM radio receive a signal?
YES - Reception interference operation is normal.
NO - With AcuraLink: Go to step 5.
Without AcuraLink: Go to step 12.
4. Turn the ignition switch to LOCK (0).
5. Check the XM antenna 2P connector and the XM receiver (AcuraLink control unit) connector C (2P).
Are the connectors connected?
YES - Go to step 6.
NO - Reconnect XM antenna 2P connector and XM receiver (AcuraLink control unit) connector C (2P), recheck XM radio operation. If the signal is restored, operation is normal. If signal is not restored go to step 6.
6. Disconnect XM receiver (AcuraLink) connector A (20P).
7. Measure the voltage between XM receiver (AcuraLink control unit) connector A (20P) terminal No. 1 and body ground.
Is there battery voltage?
YES - Go to step 8.
NO - Repair open in the wire between the No. 5 (10 A) fuse in the under-dash fuse/relay box and XM receiver (AcuraLink control unit) connector A (20P) terminal No. 1.
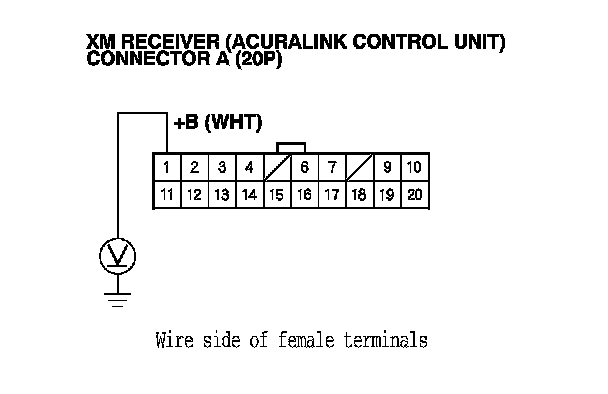
8. Reconnect the XM receiver (AcuraLink control unit) connector A (20P).
9. Turn the ignition switch to ON (II).
10. Measure the voltage between XM receiver (AcuraLink control unit) connector A (20P) terminal No. 11 and body ground.
Is there less than 0.1 V?
YES - Go to step 11.
NO - Repair open in the wire between XM receiver (AcuraLink control unit) connector A (20P) terminal No 11 and body ground (G606).
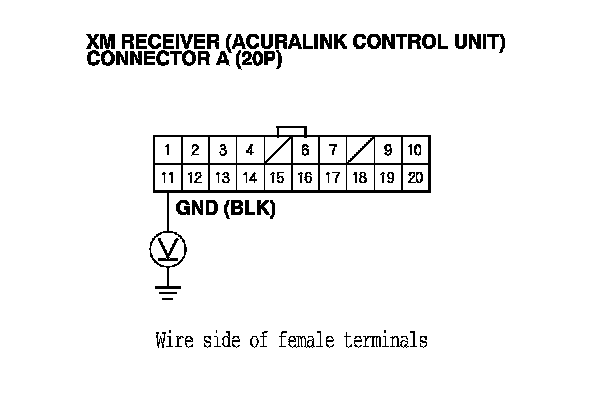
11. Substitute known-good XM antenna.
Does the XM radio receiver a signal?
YES - Replace XM antenna. Service and Repair
NO - Substitute a known-good XM antenna lead. If the XM receiver (AcuraLink control unit) receives a signal, replace the original XM antenna lead. If the XM receiver (AcuraLink control unit) does not receive a signal, substitute a known-good XM receiver (AcuraLink control unit.
12. Check XM antenna 2P connector and XM receiver connector B (2P).
Are the connectors connected?
YES - Go to step 13.
NO - Reconnect XM antenna 2P connector and XM receiver connector B (2P), recheck XM radio operation. If the signal restored, operation is normal. If signal not restored go to step 6.
13. Disconnect XM receiver connector A (14P).
14. Measure the voltage between XM receiver connector A (14P) terminal No. 1 and body ground.
Is there battery voltage?
YES - Go to step 15.
NO - Repair open in the wire between the No. 5 (10 A) fuse in the under-dash fuse/relay box and XM receiver connector A (14P) terminal No. 1.
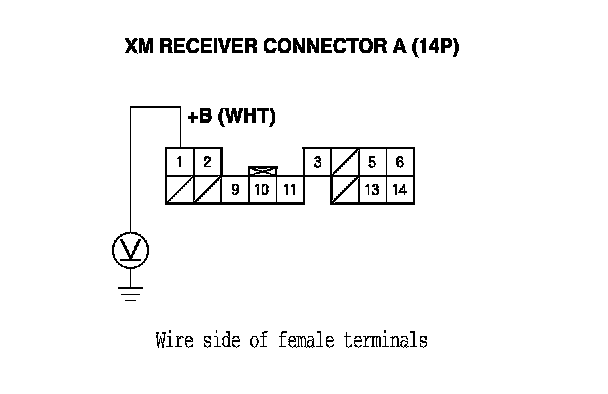
15. Reconnect the XM receiver connector A (14P).
16. Turn the ignition switch to ON (II).
17. Measure the voltage between XM receiver connector A (14P) terminal No. 11 and body ground.
Is there less than 0.1 V?
YES - Go to step 18.
NO - Repair open in the wire between XM receiver connector A (14P) terminal No 11 and body ground (G606).
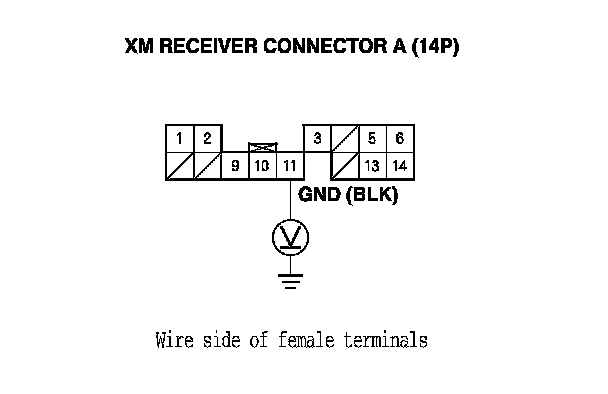
18. Substitute known-good XM antenna.
Does the XM radio receiver a signal?
YES - Replace XM antenna. Service and Repair
NO - Substitute a known-good XM antenna lead. If the XM receiver receives a signal, replace the original XM antenna lead. If the XM receiver does not receive a signal, substitute a known-good XM receiver unit.