DTC Troubleshooting
DTC Troubleshooting: P0497
DTC P0497: EVAP System Low Purge Flow
Special Tools Required
- Vacuum pump/gauge, 0-30 in.Hg, Snap-on YA4000A or equivalent, commercially available
- Vacuum/pressure gauge, 0-4 in.Hg, 07JAZ-001000B
NOTE: Before you troubleshoot, record all freeze data and any on-board snapshot, and review the general troubleshooting information. Initial Inspection and Diagnostic Overview
1. Check the fuel fill cap installation (The cap label must say "Tighten to click.". The cap should tighten 1/4 turn after it is tight.).
Is the fuel fill cap installed and properly tightened?
YES - Go to step 2.
NO - Properly install the fuel fill cap, then go to step 28.
2. Turn the ignition switch to ON (II).
3. Clear the DTC with the HDS.
4. Select EVAP FUNCTION TEST in the INSPECTION MENU with the HDS.
Is the result OK?
YES - Intermittent failure, the system is OK at this time. Check for poor connections or loose terminals at the FTP sensor, the EVAP canister purge valve, the EVAP canister vent shut valve, and the PCM.
NO - Go to step 5.
5. Check for poor connection, blockage, or damage at the EVAP canister purge line between the intake manifold and the EVAP canister.
Is the line OK?
YES - Go to step 6.
NO - Reconnect or repair the EVAP canister purge line, then go to step 28.
6. Disconnect the vacuum hose (A) from the EVAP canister purge valve (B).
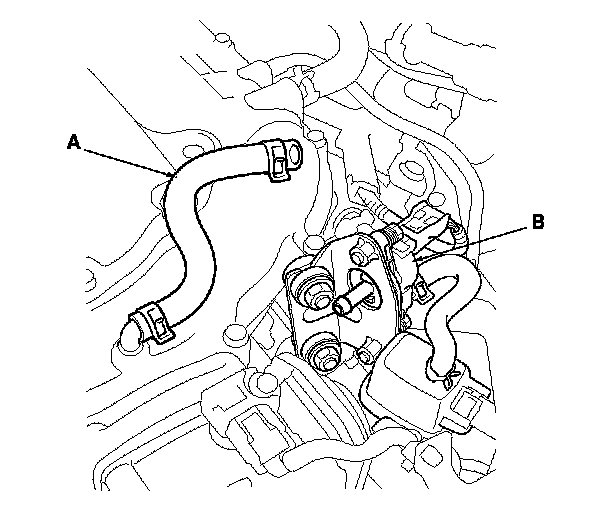
7. Disconnect the vacuum hose (A) from the purge line (at the EVAP canister side), and connect a T-fitting (B) from the vacuum gauge and the vacuum pump/gauge, 0-30 in.Hg, to the hose as shown.
8. Select EVAP PCS ON in the INSPECTION MENU with the HDS.
9. Slowly apply about 2 kPa (0.6 in.Hg, 15 mmHg) of vacuum to the hose.
Does it hold vacuum?
YES - Go to step 10.
NO - Go to step 15.
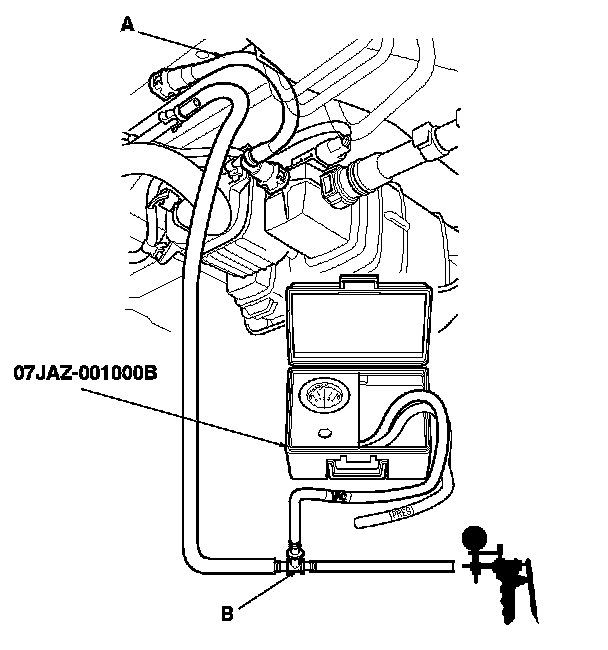
10. Select EVAP PCS OFF in the INSPECTION MENU with the HDS.
11. Disconnect the vacuum hose (A) from the EVAP canister purge valve (B). Connect a T-fitting (C) from the vacuum gauge and the vacuum pump/gauge, 0-30 in.Hg, to the hose (D) as shown.
12. Turn the ignition switch to ON (II).
13. Select EVAP PCS ON in the INSPECTION MENU with the HDS.
14. Slowly apply about 2 kPa (0.6 in.Hg, 15 mmHg) of vacuum to the hose.
Does it hold vacuum?
YES - Replace the EVAP canister purge valve, Service and Repair then go to step 28.
NO - Check for blockage in the vacuum hose between the EVAP canister purge valve and the EVAP canister, then go to step 28.
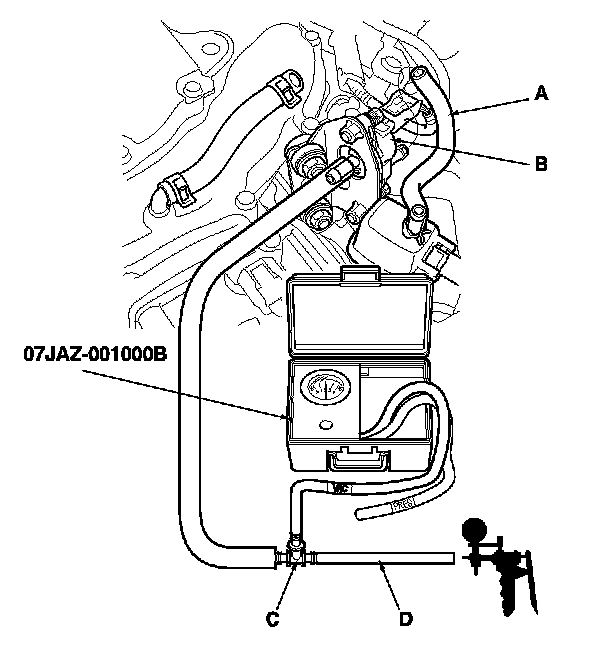
15. Connect the vacuum pump/gauge, 0-30 in.Hg, to the vacuum hose (A) as shown.
16. Start the engine, and let it idle.
Is there vacuum?
YES - Go to step 17.
NO - Check for blockage in the vacuum hose between the EVAP canister purge valve and the intake manifold, then go to step 28.
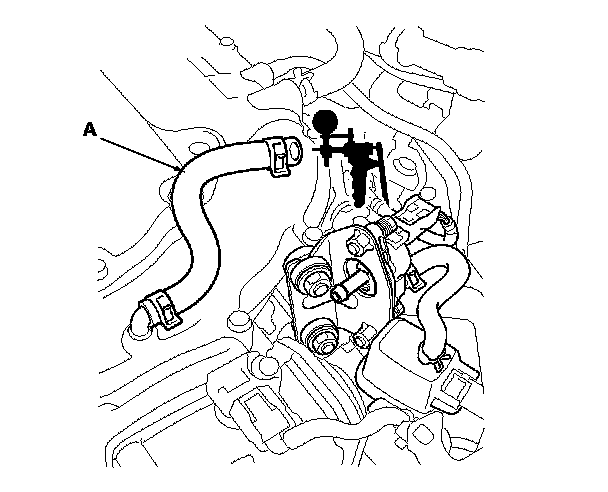
17. Turn the ignition switch to LOCK (0).
18. Remove the FTP sensor with its connector connected. Service and Repair
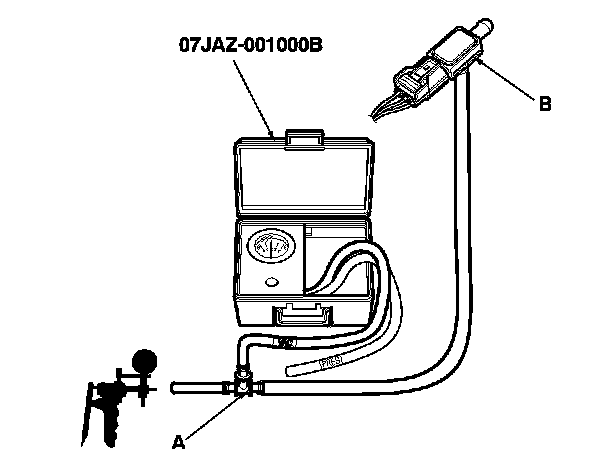
19. Connect a T-fitting (A) from the vacuum pump/gauge, 0-30 in.Hg, and the vacuum pump to the FTP sensor (B) as shown.
20. Check and record the FTP SENSOR reading in the DATA LIST with the HDS.
21. Slowly apply about 1.3 kPa (0.4 in.Hg, 10 mmHg) of vacuum to the hose.
NOTE: Be careful not to exceed the vacuum. If you do, the FTP sensor can be damaged.
22. Check the FTP SENSOR in the DATA LIST with the HDS.
Is the difference more than 1.1 kPa (0.31 in.Hg, 8 mmHg) before and after applying vacuum?
YES - Go to step 23.
NO - Replace the FTP sensor, Service and Repair then go to step 27.
23. Reconnect the vacuum hoses to the EVAP canister purge line (EVAP canister side), and reinstall the FTP sensor.
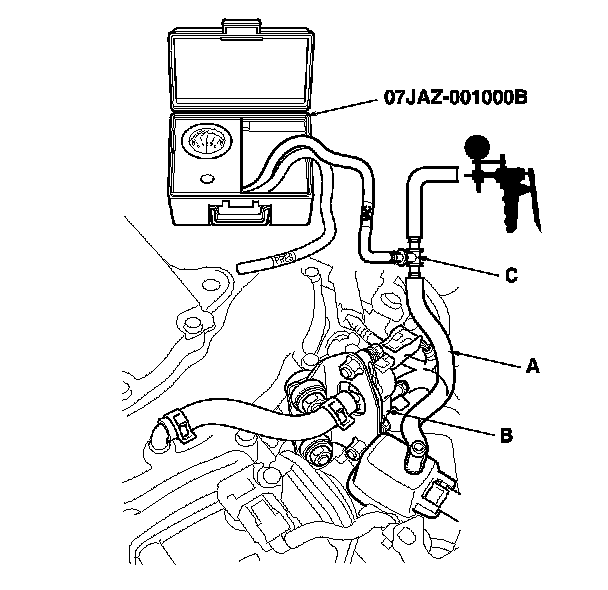
24. Disconnect the vacuum hose (purge line) (A) from the EVAP canister purge valve (B) in the engine compartment, and connect a T-fitting (C) from the vacuum gauge and the vacuum pump/gauge, 0-30 in.Hg, to the vacuum hose (A) as shown.
25. Select EVAP CVS ON in the INSPECTION MENU with the HDS.
26. Slowly apply about 2 kPa (0.6 in.Hg, 15 mmHg) of vacuum to the hose.
Does the hose hold vacuum?
YES - Check for blockage at the EVAP canister port, then go to step 27.
NO - Replace the EVAP canister vent shut valve, Service and Repair then go to step 27.
27. Reconnect all hoses.
28. Turn the ignition switch to ON (II).
29. Reset the PCM with the HDS.
30. Do the PCM idle learn procedure. PCM Idle Learn Procedure
31. Do the EVAP FUNCTION TEST in the INSPECTION MENU with the HDS.
Is the result OK?
YES - Troubleshooting is complete.
NO - Check for poor connections or loose terminals at the FTP sensor, the EVAP canister purge valve, the EVAP canister vent shut valve, and the PCM, then go to step 1.