6-8
Active Damper System DTC Troubleshooting: 6-5, 6-6, 6-7, 6-8
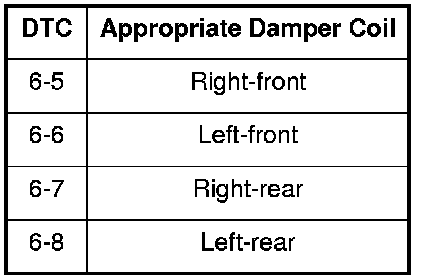
DTC 6-5: Active Damper Control Unit Internal Right-front Damper Coil Drive Circuit Current Higher Than Expected
DTC 6-6: Active Damper Control Unit Internal Left-front Damper Coil Drive Circuit Current Higher Than Expected
DTC 6-7: Active Damper Control Unit Internal Right-rear Damper Coil Drive Circuit Current Higher Than Expected
DTC 6-8: Active Damper Control Unit Internal Left-rear Damper Coil Drive Circuit Current Higher Than Expected
1. Turn the ignition switch to LOCK (0).
2. Disconnect the appropriate damper coil 2P connector, then reconnect the connector.
3. Turn the ignition switch to ON (II).
4. Clear the DTC with the HDS.
5. Turn the ignition switch to LOCK (0).
6. Start the engine.
7. Do the DAMPER FORCE OPERATION in the ACTIVE DAMPER SYSTEM INSPECTION MENU with the HDS.
8. Check for DTCs with the HDS.
Is DTC 6-5, 6-6, 6-7, or 6-8 indicated?
YES - Go to step 9.
NO - Intermittent failure, the system is OK at this time. Check for poor or loose connections between the damper coil and the active damper control unit.
9. Turn the ignition switch to LOCK (0).
10. Disconnect active damper control unit connector A (20P).
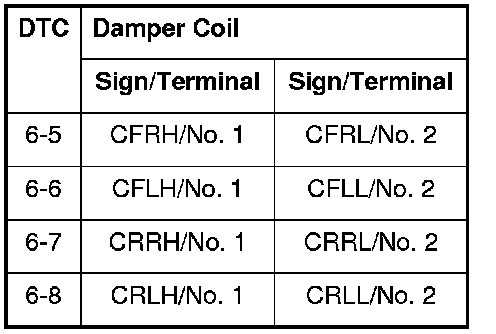
11. Measure resistance between the appropriate active damper control unit connector A (20P) terminals (see table).

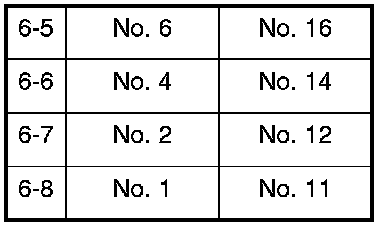
Is the resistance between 0.6-2.0 Ohms?
YES - Replace the active damper control unit, Service and Repair then go to step 16.
NO - Go to step 12.
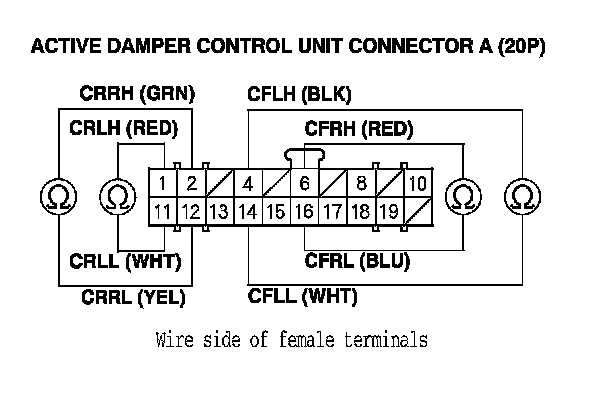
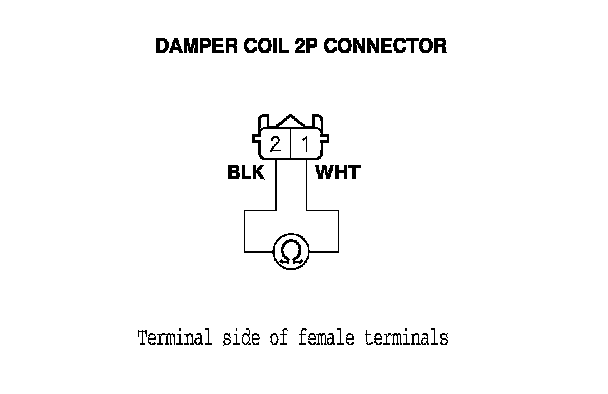
12. Disconnect the appropriate damper coil 2P connector.
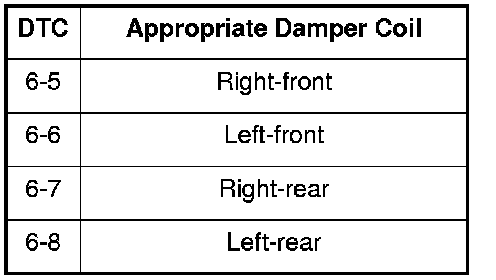
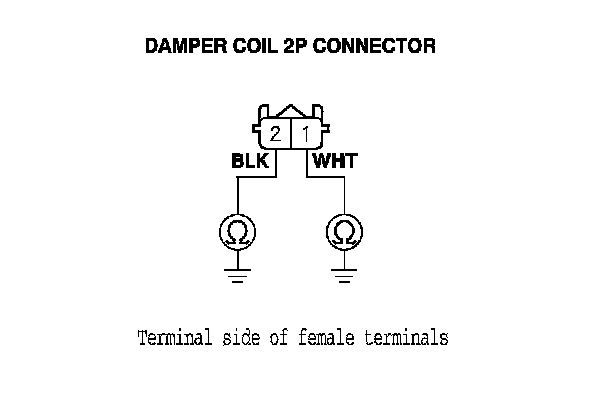
13. Check for continuity between body ground and appropriate damper coil 2P connector terminals No. 1 and No. 2 individually (see table).
Is there continuity?
YES - Repair short to body ground in the wire between the appropriate damper coil and active damper control unit, then go to step 16.
NO - Go to step 14.
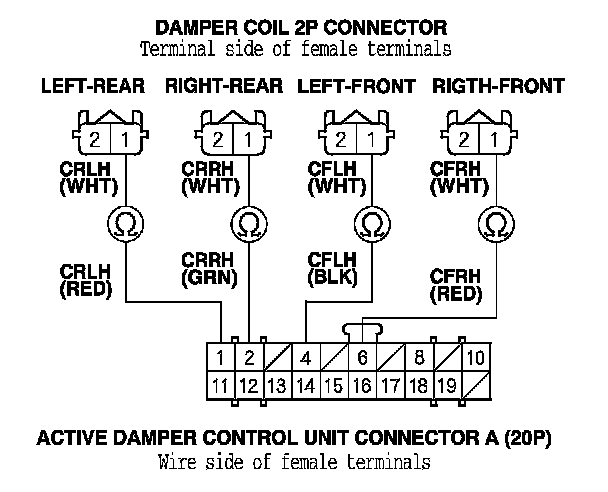
14. Check for continuity between the appropriate active damper control unit connector A (20P) terminal and appropriate damper coil 2P connector terminal No. 1 (see table).

Is there continuity?
YES - Go to step 15.
NO - Repair open in the wire between the appropriate damper coil and the active damper control unit, then go to step 16.
15. Check for continuity between appropriate damper coil 2P connector terminals No. 1 and No. 2 (see table).
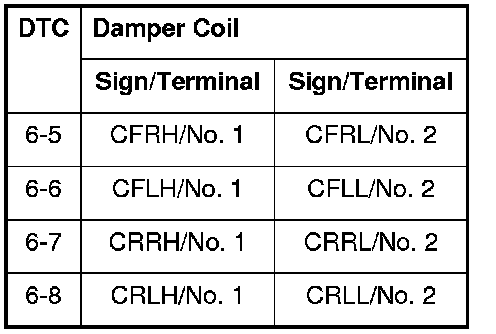
Is there continuity?
YES - Repair short in the wires between the appropriate damper coil and the active damper control unit, then go to step 16.
NO - Replace the appropriate damper unit: Front, Front Damper/Spring Removal and Installation rear, Rear Suspension then go to step 16.
16. Reconnect all connectors.
17. Turn the ignition switch to ON (II).
18. Clear the DTC with the HDS.
19. Turn the ignition switch to LOCK (0).
20. Start the engine.
21. Do the DAMPER FORCE OPERATION in the ACTIVE DAMPER SYSTEM INSPECTION MENU with the HDS.
22. Check for DTCs with the HDS.
Is any DTC indicated?
YES - Go to the indicated DTC's troubleshooting.
NO - Troubleshooting is complete.