XM Radio Display Is Blank and No Station Information Is Displayed (Without AcuraLink)
XM radio display is blank and no station information is displayed (Without AcuraLink)NOTE: If you can only tune to channel 000, 001,174, and 247, make sure the audio unit is set to channel mode (see the owner's manual). If it is set to channel mode, call XM radio customer support and check the account activation status.
1. Turn the ignition switch to ACC (I).
2. Disconnect XM receiver connector A(14P).
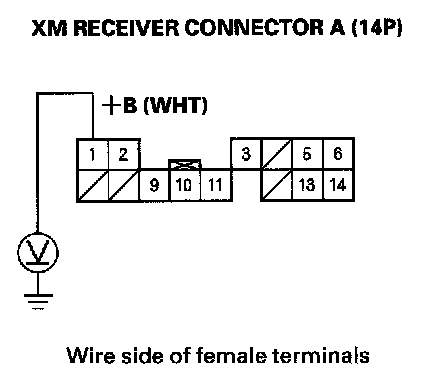
3. Measure the voltage between XM receiver connector A (14P) No. 1 terminal and body ground.
Is there battery voltage?
YES - Go to Step 4.
NO - Repair open in the wire between No. 5 (10 A) fuse in the under-dash fuse/relay box and XM receiver connector A (14P) No. 1 terminal.
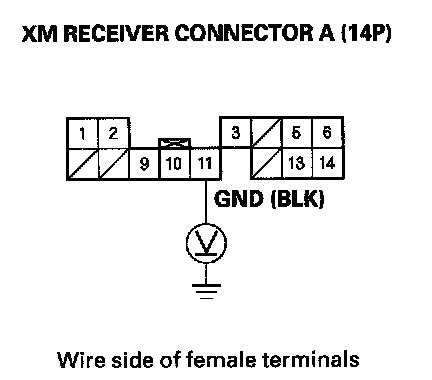
4. Measure the voltage between XM receiver connector A (14P) No. 11 terminal and body ground.
Is there less than 0.1 V?
YES - Go to Step 5.
NO - Repair open in the wire between XM receiver connector A (14P) No. 11 terminal and body ground (G606).
5. Turn the ignition switch OFF.
6. Reconnect XM receiver connector A (14P).
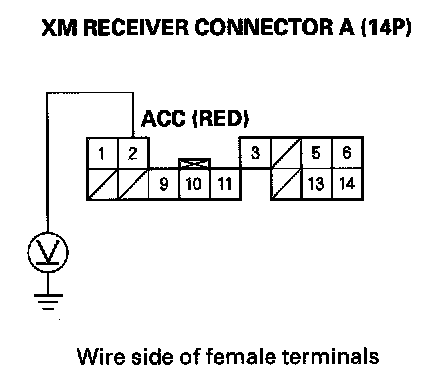
7. Measure the voltage between XM receiver connector A (14P) No. 2 terminal and body ground.
Is there 10 volts or more present?
YES - Go to step 8.
NO - Substitute a known- good XM receiver and recheck. If 10 volts or more are present, replace the original XM receiver.
8. Turn the ignition switch ON (II).
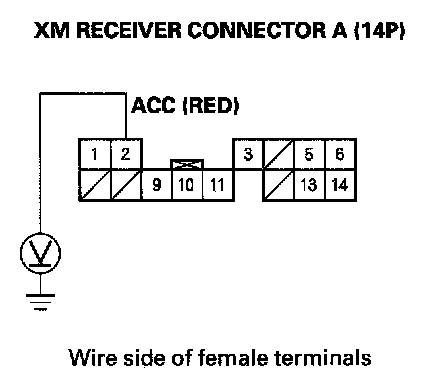
9. Measure the voltage between XM receiver connector A (14P) No. 2 terminal and body ground.
Is there less than 0.5 V?
YES - Go to step 10.
NO - Substitute a known-good audio unit and recheck. If 0.5 volts or less are present, replace the original audio unit.
10. Turn the ignition switch to LOCK(0).
11. Disconnect audio unit connector D(14P), XM receiver connector A (14P), navigation unit connector A (20P), and navigation display unit 20P connector.
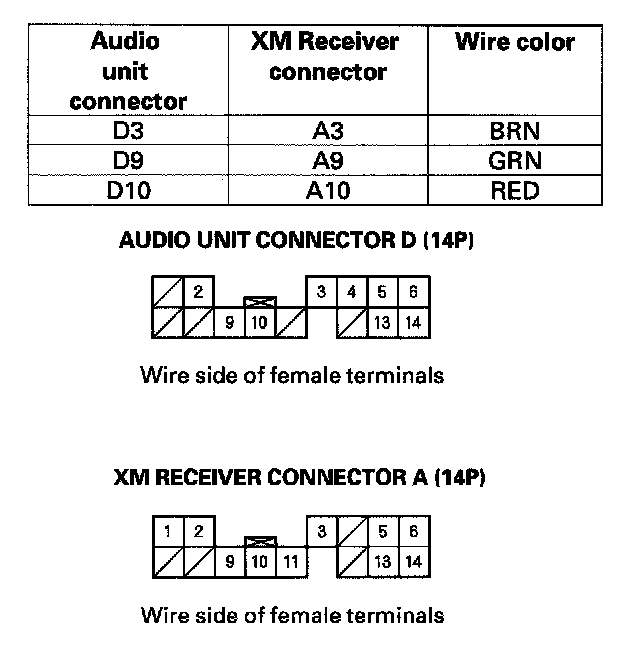
12. Check for continuity between the following terminals of the audio unit connector D(14P) and XM receiver A (14P).
Is there continuity?
YES - Go to step 13.
NO - Repair open in the wire(s) between audio unit and XM receiver.
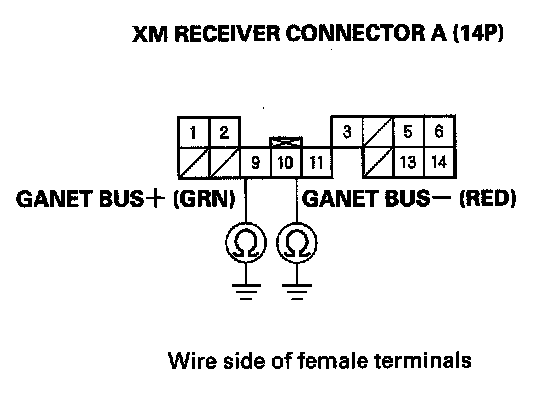
13. Check for continuity between body ground and XM receiver connector A (14P) terminals No. 9 and 10 individually.
Is there continuity?
YES - Repair short to body ground in the wire(s) between the audio unit and XM receiver or a short between the shield wires (replace the applicable shielded harness).
NO - Go to Step 14.
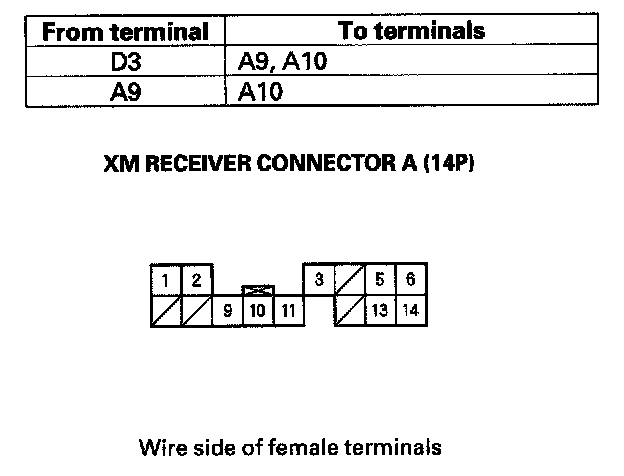
14. Check for continuity between the terminals of XM receiver connector A(14P) according to the cable.
Is there continuity between any of the terminals?
YES - Repair short in the wire(s) between the audio unit and XM receiver (replace the appropriate shield harness).
NO - Substitute a known-good audio unit and recheck. If the symptom/indicated goes away, replace the original audio unit. If the symptom is still present, substitute a known-good XM receiver and recheck. If the symptom/indicated goes away, replace the original XM receiver.