Steering Wheel Installation
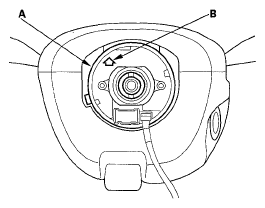
- Before installing the steering wheel, make sure the front wheels are aligned straight ahead, then center the cable reel (A). Do this by first rotating the cable reel clockwise until it stops. Then rotate it counterclockwise about three full turns. The arrow mark (B) on the cable reel label point should point straight up.
 Courtesy of AMERICAN HONDA MOTOR CO., INC.
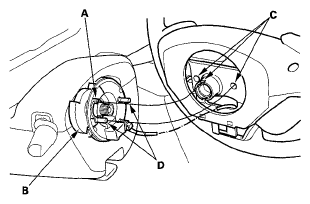
- Position the two tabs (A) of the turn signal cancelling sleeve (B) as shown. Install the steering wheel on to the steering column shaft, making sure the steering wheel hub (C) engages the pins (D) of the cable reel and tabs of the turn signal cancelling sleeve. Do not tap on the steering wheel or steering column shaft when installing the steering wheel.
 Courtesy of AMERICAN HONDA MOTOR CO., INC.
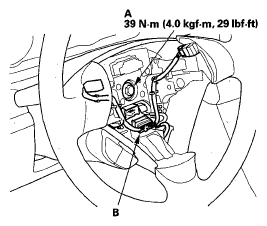
- Install the steering wheel bolt (A) and tighten it to the specified torque. Connect the cable reel subcord connector (B). Make sure the wire harness is routed and fastened properly.
 Courtesy of AMERICAN HONDA MOTOR CO., INC.
- Install the driver's airbag, and confirm that the system is operating properly (see
DRIVER'S AIRBAG REPLACEMENT
).
- Reconnect the negative battery cable to the battery, and do these tasks:
- Turn the ignition switch ON (II); the SRS indicator should come on for about 6 seconds and then go off.
- Enter the anti-theft codes for the audio system and the navigation system (if equipped), then enter the client's audio presets.
- Set the clock (on vehicles without navigation).
- Make sure the horn and turn signal switches work properly.
- Make sure the steering wheel switches work properly.
- After installation, do these checks.
- Check the steering wheel spoke angle. If the steering spoke angles to the right and left are not equal (steering wheel and rack are not centered), correct the engagement of the joint/pinion shaft serrations.
- Set the steering column to the center tilt position, and to the center telescopic position, then do the front toe inspection (see
WHEEL ALIGNMENT
).