Replacement for after a collision where the front passenger's airbag deployed
- Disconnect the negative cable from the battery, then wait for 3 minutes before starting work.
- Remove the dashboard assembly out of the vehicle (see
DASHBOARD/STEERING HANGER BEAM REMOVAL/INSTALLATION
), then remove the glove box striker and front passenger's air conditioning duct (see
DASHBOARD UPPER PANEL REMOVAL/INSTALLATION
).
- Remove the dashboard upper panel from the lower panel (see
DASHBOARD UPPER PANEL REMOVAL/INSTALLATION
).
- Install the new dashboard upper panel to the lower panel (see
DASHBOARD UPPER PANEL REMOVAL/INSTALLATION
).
- With the dashboard upside-down, remove the protective cover from the new dashboard upper panel.
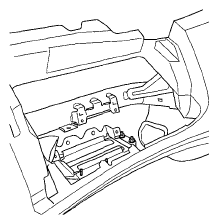 Courtesy of AMERICAN HONDA MOTOR CO., INC.
- Place the new front passenger's airbag with the airbag protector (A) into the mounting bracket on the dashboard, and install the center nut (B) by hand. Do not fully tighten it.
NOTE:
- Be sure to use the airbag protector when installing the front passenger's airbag.
- Be sure to install the front passenger's airbag so it does not interfere with other parts.
- Be careful not to damage the airbag.
- Be sure to keep the new airbag clean, and do not unfold or tamper with the cloth cover on the airbag.
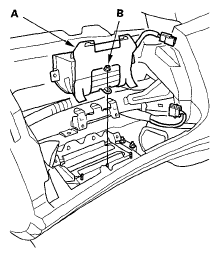 Courtesy of AMERICAN HONDA MOTOR CO., INC.
- Remove the lower hooks of the airbag protector (A) from the front passenger's airbag (B), and pull out the protector.
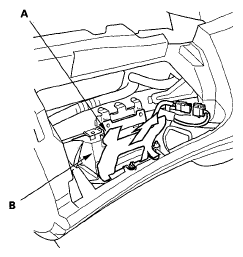 Courtesy of AMERICAN HONDA MOTOR CO., INC.
- Tighten the front passenger's airbag mounting nuts (A) and bolts (B) to the specified torque.
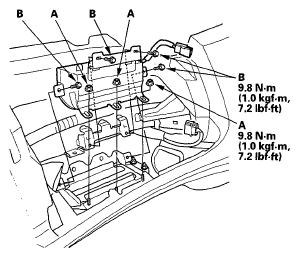 Courtesy of AMERICAN HONDA MOTOR CO., INC.
- Install the dashboard assembly (see
DASHBOARD/STEERING HANGER BEAM REMOVAL/INSTALLATION
).
- Connect the front passenger's airbag 4P connector (A) to the dashboard wire harness, then install all removed parts in the reverse order of removal.
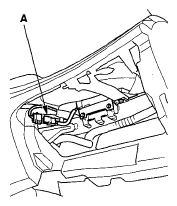 Courtesy of AMERICAN HONDA MOTOR CO., INC.
- Reconnect the negative cable to the battery.
- Connect the HDS and clear the DTCs.
- After installing the airbag, confirm proper system operation: Turn the ignition switch ON (II); the SRS indicator should come on for about 6 seconds and then go off.