Rear Bumper Fascia Replacement
Rear Bumper Fascia Replacement
Tools Required
J 38778 Door Trim Pad and Garnish Clip Remover
Removal Procedure
1.Remove the rear bumper fascia extension, if equipped. Refer to Rear Bumper Fascia Extension Replacement Rear Bumper Fascia Extension Replacement .
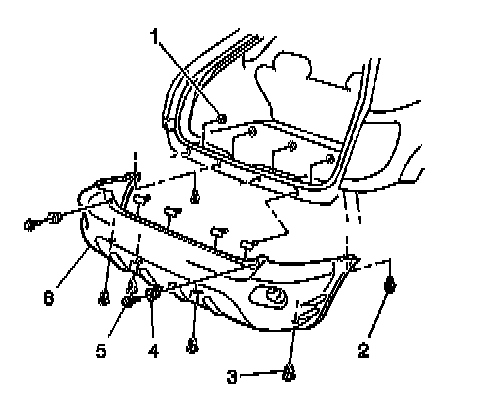
2.Open the liftgate.
3.Remove the rear door sill plate. Refer to Liftgate Door Sill Plate Replacement .
4.Remove the 4 rear bumper fascia nuts (1) from the rear sill.
5.Remove the 4 push-in retainers (3) from the rear bumper fascia (5), using the J 38778 .
6.Remove the 2 screws (2) from the top right and left upper fascia.
7.Remove the 2 screws (5) and retainers (4) from the right and left upper fascia.
8.Disconnect the backup lamp electrical connectors. Refer to Backup Lamp Replacement .
9.Remove the rear bumper fascia (6) from the vehicle.
10.Remove the backup lamps from the vehicle, if required. Refer to Backup Lamp Replacement .
Installation Procedure
1.Install the backup lamps to the rear fascia, if removed. Refer to Backup Lamp Replacement .
2.Position the rear fascia (6) to the vehicle.
3.Install the 2 retainers (4) and screws (5) to the right and left upper fascia.
4.Install the 2 screws (2) to the right and left upper fascia corners.
5.Install the 4 push-in retainers (3) to the rear fascia (6).
Notice:Refer to Fastener Notice .
6.Install the 4 rear bumper fascia nuts (1) to the rear sill.
TightenTighten the rear bumper fascia nuts to 5.5 N �m (49 lb in).
7.Install the rear sill plate. Refer to Liftgate Door Sill Plate Replacement .
8.Install the rear bumper fascia extension, if removed. Refer to Rear Bumper Fascia Extension Replacement Rear Bumper Fascia Extension Replacement .
9.Close the liftgate.