Antenna Feeder No. 3 Removal/Installation
ANTENNA FEEDER NO.3 REMOVAL/INSTALLATION
1. Disconnect the negative battery cable.
2. Remove the rain sensor cover. (with auto light / wiper system) Service and Repair
3. Disconnect the rain sensor connector. (with auto light / wiper system) Service and Repair
4. Disconnect the auto-dimming mirror connector. (with auto-dimming mirror) Auto-Dimming Mirror Removal Auto-Dimming Mirror Installation
5. Remove the following parts:
a. Sunroof seaming welt (with sunroof system)
b. A-pillar trim A-Pillar Trim Removal/Installation
c. Front scuff plate Front Scuff Plate Removal/Installation
d. Rear scuff plate Rear Scuff Plate Removal/Installation
e. B-pillar lower trim B-Pillar Lower Trim Removal/Installation
f. Front seat belt upper anchor installation bolt Front Seat Belt Removal/Installation
g. B-pillar upper trim B-Pillar Upper Trim Removal/Installation
h. Rear seat cushion Rear Seat Cushion Removal/Installation
i. Rear side seat back Rear Side Seat Back Removal/Installation
j. C-pillar trim C-Pillar Trim Removal/Installation
k. Map light Map Light Removal/Installation
l. Sunvisor Service and Repair
m. Assist handle Service and Repair
n. Headliner Service and Repair
6. Disconnect the connector.
7. Remove the clips A and B.
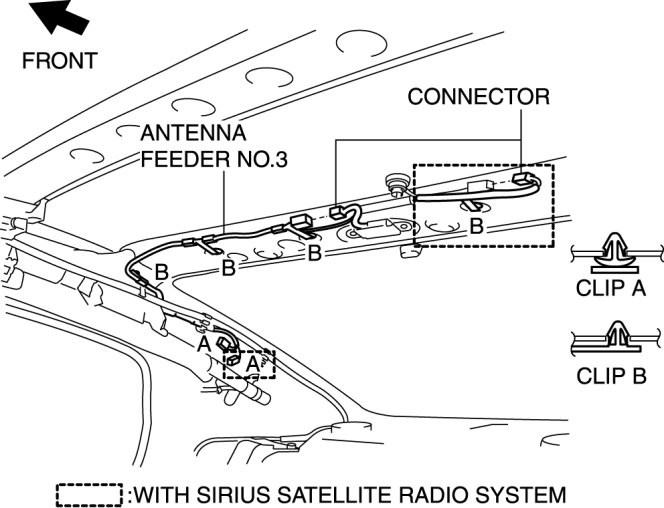
8. Remove the antenna feeder No.3.
9. Install in the reverse order of removal.