Removal
1UR-FE ENGINE MECHANICAL: CYLINDER HEAD GASKET: REMOVAL
1. REMOVE EXHAUST MANIFOLD ASSEMBLY
(a) Remove the exhaust manifold assembly Removal.
2. REMOVE CAMSHAFT SUB-ASSEMBLY
(a) Remove the camshaft sub-assembly Removal.
3. REMOVE NO. 1 VALVE ROCKER ARM SUB-ASSEMBLY
(a) Remove the 32 No. 1 valve rocker arms from the cylinder head.
HINT
Arrange the removed parts in the correct order.
4. REMOVE VALVE LASH ADJUSTER ASSEMBLY
(a) Remove the 32 valve lash adjusters from the cylinder head.
HINT
Arrange the removed parts in the correct order.
5. REMOVE VALVE STEM CAP
(a) Remove the 32 valve stem caps from the cylinder head.
HINT
Arrange the removed parts in the correct order.
6. REMOVE CYLINDER HEAD SUB-ASSEMBLY LH
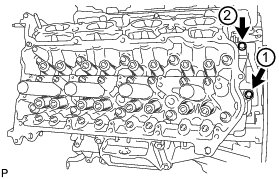
(a) Uniformly loosen and remove the 2 bolts in the sequence shown in the illustration.
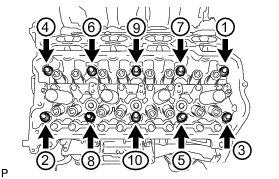
(b) Using a 10 mm bi-hexagon wrench, uniformly loosen the 10 cylinder head bolts in the sequence shown in the illustration. Remove the 10 cylinder head bolts and plate washers.
HINT
Be sure to arrange the removed parts for each installation position separately.
NOTICE:
* Be careful not to drop washers into the cylinder head.
* Head warpage or cracking could result from removing bolts in an incorrect order.
(c) Remove the cylinder head LH.
7. REMOVE NO. 2 CYLINDER HEAD GASKET
8. REMOVE CYLINDER HEAD SUB-ASSEMBLY
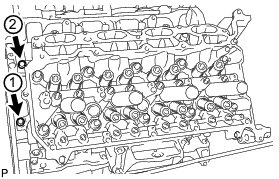
(a) Uniformly loosen and remove the 2 bolts in the sequence shown in the illustration.
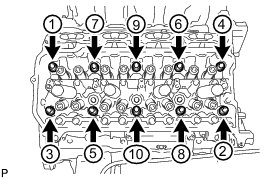
(b) Using a 10 mm bi-hexagon wrench, uniformly loosen the 10 cylinder head bolts in the sequence shown in the illustration. Remove the 10 cylinder head bolts and plate washers.
HINT
Be sure to arrange the removed parts for each installation position separately.
NOTICE:
* Be careful not to drop washers into the cylinder head.
* Head warpage or cracking could result from removing bolts in an incorrect order.
(c) Remove the cylinder head.
9. REMOVE CYLINDER HEAD GASKET
10. INSPECT CYLINDER HEAD SET BOLT Engine Unit
11. INSPECT CYLINDER HEAD SUB-ASSEMBLY Testing and Inspection