Camshaft Position Actuator Solenoid Valve Solenoid Replacement - Bank 2 (Left Side) Exhaust
Camshaft Position Actuator Solenoid Valve Solenoid Replacement - Bank 2 (Left Side) Exhaust
Removal Procedure
1. Ignition OFF.
Warning: Refer to Battery Disconnect Warning Service Precautions.
2. Disconnect the battery negative cable. Refer to Battery Negative Cable Disconnection and Connection Battery Negative Cable Disconnection and Connection.
3. Remove the intake cover.
Warning: Refer to Safety Glasses Warning Safety Glasses Warning.
4. Use compressed air to remove debris from the camshaft position (CMP) actuator solenoid valve and surrounding cavities.
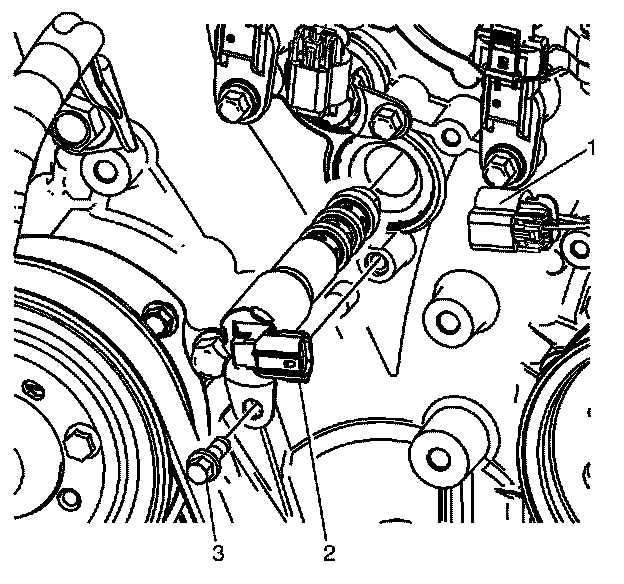
5. Remove the CMP actuator solenoid valve electrical connector♦(1) from the CMP actuator solenoid valve♦(2).
6. Remove the CMP actuator solenoid valve to engine front cover retaining bolt♦(3).
7. Remove the CMP actuator solenoid valve♦(2) from the engine.
Installation Procedure
1. Inspect the CMP actuator solenoid valve seal for damage. Replace the CMP actuator solenoid valve seal if necessary. Refer Engine Front Cover Disassemble 74. Engine Front Cover Disassemble
2. Install the CMP actuator solenoid valve♦(2) to the engine.
Caution: Refer to Fastener Caution Fastener Caution.
3. Install the CMP actuator solenoid valve to engine front cover retaining bolt♦(3) and tighten to 9♦Nm (80♦lb♦in).
4. Connect the CMP actuator solenoid valve electrical connector♦(1) to the CMP actuator solenoid valve♦(2).
5. Install the intake cover.
6. Connect the battery negative cable. Refer to Battery Negative Cable Disconnection and Connection Battery Negative Cable Disconnection and Connection.