Hood Primary and Secondary Latch Replacement
Hood Primary and Secondary Latch Replacement
Removal Procedure
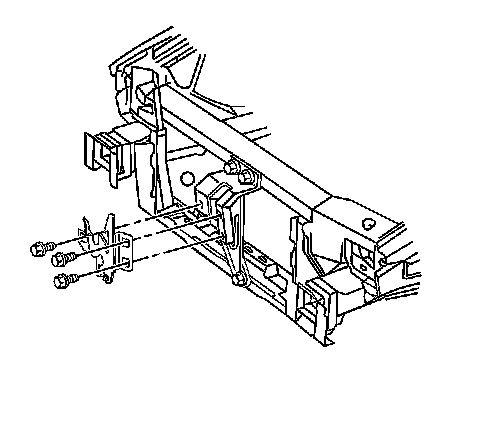
1. Open the hood.
2. Remove the upper radiator air baffle. Refer to Radiator Air Baffle Assemblies and Deflectors (Upper) Radiator Air Baffle Assemblies and Deflectors (Side) Radiator Air Baffle Assemblies and Deflectors (Lower) in Engine Cooling.
3. Remove the front upper fascia support bracket. Refer to Front Upper Fascia Support Bracket Replacement (Front Upper Fascia Support Bracket Replacement) in Bumpers.
4. Mark the hood latch to the center support bracket with a grease pencil.
5. Remove the bolts from the hood latch.
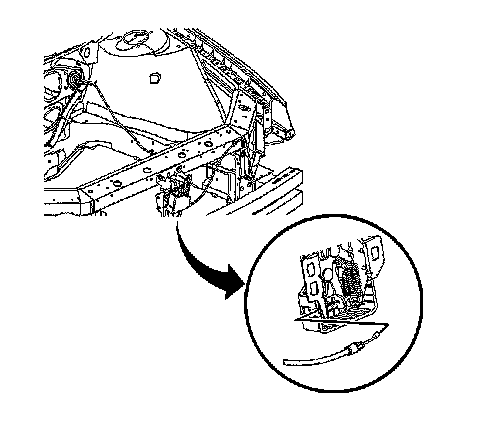
Important: Do not crimp the hood release cable.
6. Remove the hood release cable from the hood latch by squeezing the cable retainer.
7. Remove the hood latch from the vehicle.
Installation Procedure
1. Install the hood release cable to the hood latch.
2. Align the hood latch to the marks on the center support bracket.
Notice: Refer to Fastener Notice in Cautions and Notices.
3. Install the hood latch to center support bolts.
Tighten the Hood Latch to Center Support Bolts to 10 Nm (89 lb in).
4. Install the front upper fascia support bracket. Refer to Front Upper Fascia Support Bracket Replacement (Front Upper Fascia Support Bracket Replacement) in Bumpers.
5. Install the upper radiator air baffle. Refer to Radiator Air Baffle Assemblies and Deflectors (Upper) Radiator Air Baffle Assemblies and Deflectors (Side) Radiator Air Baffle Assemblies and Deflectors (Lower) in Engine Cooling.
6. Adjust the hood, if required. Refer to Hood Adjustment (Adjustments).
7. Close the hood.